Temperature measurement is a crucial aspect of many industrial processes, and RTDs (Resistance Temperature Detectors) are the go-to tools for accurate temperature sensing. However, like any electronic device, RTDs may fail or drift over time, leading to inaccurate measurements and costly process control issues.
But fear not. The answer to the question of how to check if your RTD is working correctly is surprisingly simple. By following some straightforward steps, you can quickly determine whether your RTD is ok or not.
In this blog post, we’ll explore these steps in detail and help you troubleshoot any issues with your RTD. We’ll start by discussing the basics of RTDs – what they are and how they work. Then, we’ll move on to explain how to perform a functional check to ensure that your RTD is operating as it should. This test involves simulating a temperature change and monitoring the RTD’s output to verify that it corresponds with the expected value.
We’ll also delve into checking for physical damage or corrosion in the RTD leads and probe – factors that can also impact its accuracy. Finally, we’ll provide some tips on maintaining your RTD to prevent future issues.
So come along as we dive into the fascinating world of RTDs and learn how to keep them functioning at their best.
Contents
What is an RTD?
An RTD, or Resistance Temperature Detector, is a highly precise temperature sensor used in various industries where precision and reliability are essential. It measures temperature by detecting the change in electrical resistance of a metal wire or thin film, typically made of platinum, but other metals like nickel or copper can also be used.
RTDs are available in different forms, such as wire-wound RTDs and thin-film RTDs. Wire-wound RTDs are made by winding a length of platinum wire around a ceramic or glass core, while thin-film RTDs are made by depositing a thin layer of platinum on a substrate, usually ceramic or glass. The resistance of an RTD increases as the temperature increases, and this change in resistance is used to calculate the temperature.
The wide temperature measurement range and high accuracy make RTDs ideal for use in industries such as food and beverage, pharmaceuticals, oil and gas, and HVAC. However, to ensure that an RTD is functioning correctly, several steps need to be followed.

Firstly, it’s crucial to ensure that the RTD is correctly connected to the measuring instrument or control system and free from any physical damage or corrosion that may affect its accuracy. Secondly, a zero-check or ice-point calibration must be performed by immersing the RTD in ice water and ensuring that the reading on the measuring instrument or control system shows zero degrees Celsius. If it doesn’t show zero degrees Celsius, adjustments need to be made.
Finally, perform a span-check or full-scale calibration by immersing the RTD in boiling water and ensuring that the reading on the measuring instrument or control system shows 100 degrees Celsius. If it doesn’t show 100 degrees Celsius, adjustments need to be made. Regular checks and maintenance of RTDs can prevent potential harm or damage in industrial settings.
What are the Different Types of RTDs?
RTDs are Resistance Temperature Detectors that measure temperature changes by detecting the electrical resistance of a metal wire. There are several different types of RTDs available, each with its own unique advantages and disadvantages. In this article, we’ll explore five sub-sections of RTDs to give you a more in-depth understanding of what they are and how they work.
Platinum RTDs:
The platinum RTD is the most commonly used type of RTD, and for a good reason. It uses platinum as its temperature-sensitive material, offering high accuracy and stability over a wide temperature range. Platinum RTDs are suitable for various industrial applications, including aerospace, pharmaceuticals, and food processing.
Nickel RTDs:
Nickel RTDs use nickel as the temperature-sensitive material. They are less accurate than platinum RTDs but are less expensive and can be used in applications where high accuracy is not required. They’re suitable for applications where cost is a primary concern, such as in HVAC systems.
Copper RTDs:
Copper RTDs use copper as the temperature-sensitive material. They’re the least expensive of the three types but also the least accurate and have the smallest temperature range. Despite this, they can still be useful in certain applications where cost is a primary concern, such as in consumer electronics.
Thermistor-based RTDs:
Thermistor-based RTDs use thermistors as their temperature-sensitive material. They offer high sensitivity and fast response times but are less accurate than other types of RTDs. They’re suitable for high-speed applications such as in automotive or medical devices.
Specialized RTDs:
There are also specialized types of RTDs, such as thin-film RTDs and wire-wound RTDs. Thin-film RTDs use a thin layer of metal deposited on a substrate as the sensing element and are typically smaller and more sensitive than other types of RTDs. Wire-wound RTDs use a coiled wire as the sensing element and are often used in high-temperature applications such as in furnaces.
The Importance of Checking an RTD
When it comes to temperature measurements, accuracy is everything. That’s why many industries rely on RTDs (Resistance Temperature Detectors) for their high precision and stability. However, even the most reliable devices can fail or degrade over time, which can result in incorrect temperature readings and potentially hazardous situations. Therefore, it’s crucial to regularly check and calibrate your RTD to ensure that it’s functioning correctly.
Calibration is the process of verifying your RTD’s resistance value against a known reference value at a specific temperature. By doing so, you can determine whether your device is accurately measuring temperatures within its specified tolerance limits. If your RTD isn’t calibrated correctly, it can cause significant errors in temperature measurements, which can lead to process inefficiencies and potential safety hazards.
But calibration is just one part of the maintenance equation for your RTD. You should also be checking your device’s wiring connections and insulation regularly. Loose or damaged wiring can lead to incorrect or unstable readings, jeopardizing the reliability and safety of your entire process. Poor insulation can cause electrical leakage or short circuits, leading to permanent damage to your RTD or even a fire hazard.
To summarize, regular checking and calibration of your RTD is vital for accurate and reliable temperature measurements. Neglecting this essential task could result in costly equipment damage, safety hazards, and process inefficiencies. Therefore, make sure to check and calibrate your RTD regularly to ensure that it’s functioning correctly and keeping your industry safe.
Steps to Check if an RTD is Functioning Correctly
Checking the health of your RTD is crucial to prevent any potential safety hazards or process inefficiencies. Neglecting this important task could result in costly equipment damage, jeopardizing the reliability and safety of your entire process. As an expert, I am here to guide you through the steps to check if your RTD is functioning correctly.
Step 1: Installation Check
The first step in verifying if an RTD is functioning correctly is to ensure its proper installation. The RTD should be placed in a location where it can accurately measure the temperature of the process or environment. An improperly installed RTD can lead to inaccurate readings.
Step 2: Damage Check
After installation, check for physical damage or defects. Visible signs of damage such as cracks or breaks in the wiring can affect the accuracy of the RTD and lead to incorrect readings. Therefore, inspecting the RTD for any visible signs of damage is essential.
Step 3: Resistance Test
The next step is to test the RTD’s resistance using a high-quality multimeter with low measurement error tolerance. Disconnect the RTD from the system and take resistance measurements at various temperature points. The resistance values should align with the expected resistance values for the specific type of RTD being tested. Using correct measurement units (ohms) and temperature coefficients of resistance (TCR) when interpreting results is crucial.
Step 4: Ice Bath Test
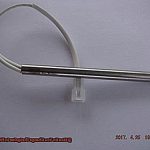
Another method for testing an RTD’s functionality is by using an ice bath. An ice bath is used to test whether or not an RTD can accurately measure temperatures close to 0°C (32°F). Immerse the RTD probe in an ice bath and compare its readings with a reference thermometer.
Step 5: Potential Sources of Error
Lastly, it’s important to consider any potential sources of error that could affect the RTD’s accuracy, such as electrical interference or thermal shock. By taking these steps and considering potential sources of error, you can ensure that your RTD is functioning correctly and providing accurate temperature measurements.
Step 1: Ensure Proper Connection
This may sound simple, but it’s crucial to prevent any potential safety hazards or process inefficiencies.
Firstly, let’s talk about wiring connections. Loose connections can cause inaccurate readings and even damage to the RTD, so it’s important to ensure that they are secure and tight. To do this, disconnect the RTD from the circuit or device it is connected to. Inspect the wires for any signs of damage or corrosion and replace them if necessary. Make sure you use high-quality wires that are rated correctly for the temperature range of your RTD.
Once you have inspected and replaced any damaged wires, reconnect them to their respective terminals or plug. Ensure that the connections are tight and secure, using a torque wrench to meet the manufacturer’s specifications.
Now that you’ve reconnected everything, turn on the device or circuit and wait for it to reach its normal operating temperature. Check the readings on your meter or display to make sure they are within acceptable ranges. If you notice any discrepancies, double-check your wiring connections for any loose or damaged wires.
Step 2: Check for Physical Damage or Corrosion
Today, we’re delving into step two of checking your RTD: inspecting for physical damage or corrosion. Now, I know it may sound mundane, but trust me when I say that this step is crucial in ensuring the accuracy of your RTD readings.
So, let’s jump right in.
Firstly, let’s talk about physical damage. Whether it’s a crack, chip, or any other type of damage, mishandling or installation errors can cause physical harm to your RTD sensor and cables. However, this damage can negatively affect the accuracy of your readings. By inspecting your RTD sensor and cables thoroughly for any visible signs of damage before proceeding with testing, you can avoid inaccuracies that could lead to potential safety hazards or process inefficiencies.
Next up is corrosion – the bane of metal components everywhere. Corrosion occurs when exposed to corrosive substances or environments and can cause a change in the resistance value of your RTD, leading to inaccurate readings. Keep an eye out for discoloration, rust, or any other signs of corrosion on the sensor and cable. If you spot any of these signs, don’t worry – simply clean the affected parts thoroughly using a suitable cleaning solution to ensure accurate temperature readings.
To sum it up, checking for physical damage or corrosion is a vital step in ensuring that your RTD is providing accurate temperature readings. By carefully inspecting the sensor and cables for any visible signs of damage and replacing any damaged parts or cleaning any corroded areas, you can avoid inaccuracies that could lead to potential safety hazards or process inefficiencies.
Step 3: Perform a Zero-Check Calibration
After inspecting your RTD for physical damage and corrosion, it’s time to move on to the next crucial step – performing a zero-check calibration. This step ensures that your RTD is accurately measuring temperature readings and functioning at its best.
To begin, you’ll need an ice bath or a mixture of ice and water to submerge your RTD probe. It’s important to let the temperature stabilize before taking any measurements. Once stabilized, record the temperature reading displayed on your thermometer or temperature indicator. The reading should be very close to zero degrees Celsius or 32 degrees Fahrenheit. If not, it may indicate that your RTD requires calibration.
Calibration involves adjusting the RTD to ensure that it provides accurate temperature readings. However, it’s essential to seek professional assistance for calibration if you’re unsure about how to perform it yourself. Trust us; it’s better to be safe than sorry.
Performing a zero-check calibration is a critical step in verifying the accuracy of your RTD. By following this step, you can ensure that your RTD is functioning correctly and providing accurate temperature readings. To summarize, here are the key points to remember:
- Submerge your RTD probe in an ice bath or mixture of ice and water.
- Wait for the temperature to stabilize before taking any measurements.
- Record the temperature reading displayed on your thermometer or temperature indicator.
- The reading should be very close to zero degrees Celsius or 32 degrees Fahrenheit.
- Seek professional assistance for calibration if you’re uncertain about how to perform it yourself.
Step 4: Perform a Span-Check Calibration
In the previous section, we discussed the importance of zero-check calibration and how it can help keep your RTD functioning at its best. But that’s not all – to ensure the accuracy of your device, you must also perform a span-check calibration. So let’s dive straight into it.
Performing a span-check calibration on your RTD involves checking its output at two or more known temperatures to verify that it follows a linear response curve. This process is crucial to ensure that your RTD remains accurate and reliable, especially when used in critical processes.
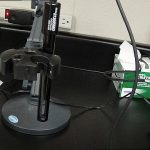
To start, you’ll need a temperature source or simulator capable of producing stable and accurate temperatures. Connect your RTD to your measuring instrument and apply a stable temperature to the device using your temperature source. Wait for the measurement reading to stabilize, and record the output value.
Repeat this process at another known temperature point and record the output value again. Make sure that the temperature source remains stable and accurate throughout each measurement.
Once you have recorded the output values at two or more temperature points, plot them on a graph and verify that they follow a linear response curve. If they don’t follow a linear curve, it may indicate that your RTD requires further calibration or repair.
But why is this step so important? Performing regular span-check calibrations will ensure that your RTD is operating accurately, preventing costly errors in your process control system. It’s recommended to perform span-check calibrations at least once per year or more frequently if the device is subjected to harsh operating conditions.
Remember, accuracy is key when it comes to measuring temperature in critical processes. By following these steps regularly, you can ensure that your RTD remains reliable and provides accurate measurements for all your critical processes.
Conclusion
In conclusion, the importance of checking the health of your RTD cannot be overstated. Neglecting this crucial task could lead to costly equipment damage and jeopardize the reliability and safety of your entire process. Fortunately, following a few straightforward steps can help you quickly determine whether your RTD is functioning correctly.
Firstly, it’s essential to ensure that the RTD is installed correctly and connected to the measuring instrument or control system. Secondly, check for any physical damage or defects that may affect its accuracy. Thirdly, use a high-quality multimeter with low measurement error tolerance to test the RTD’s resistance. Fourthly, perform a zero-check calibration by immersing the RTD in ice water and ensuring that the reading on the measuring instrument shows zero degrees Celsius. Finally, perform a span-check calibration by immersing the RTD in boiling water and ensuring that the reading shows 100 degrees Celsius.
Regular checks and maintenance of RTDs are critical to prevent potential harm or damage in industrial settings. Checking for physical damage or corrosion is vital to ensure accurate temperature readings. Performing regular span-check calibrations will ensure that your RTD remains reliable and provides accurate measurements for all your critical processes.
By following these steps regularly, you can guarantee that your RTD remains accurate and reliable while preventing costly errors in your process control system. Remember, accuracy is paramount when it comes to measuring temperature in critical processes.