Imagine this: it’s a gorgeous summer day, the sun is shining bright and the smell of sizzling meat fills the air.
You’re hosting an impromptu barbecue party and all your loved ones are gathered around the grill, eagerly waiting for their share of juicy goodness. But then, disaster strikes – the gas runs out.
Leaving your burgers and steaks half-cooked and rock-hard. What do you do?
Well, don’t fret because there’s another cooking method that can save your day – broiling on the grill. Broiling is a cooking technique that relies on high heat to quickly cook food.
When done on a grill, it adds an extra layer of smoky flavor to your meat and veggies, making them irresistible. But how exactly do you broil on a grill?
Fear not because in this article, we’ll walk you through the steps of broiling like a pro from fire preparation to cooking times and temperatures. You’ll learn how to arrange your food, position the grill just right, and adjust heat levels for that perfect sear.
So whether you’re a beginner or seasoned grill master, buckle up because we’re about to take your broiling game up a notch.
Contents
Benefits of Broiling on the Grill
One of the biggest advantages of broiling on the grill is its speed. With high heat coming from above, your food will cook evenly and quickly without needing to be flipped over. This makes it a great option for busy weeknights when time is at a premium. Plus, the grill adds an irresistible smoky flavor that can’t be replicated indoors.
But speed isn’t the only benefit – broiling on the grill also produces complex and delicious flavors. The high heat causes a chemical reaction called the Maillard reaction, which creates savory and rich flavors in your food. This results in a crispy exterior and juicy interior that will leave your taste buds wanting more.
In addition to its flavor benefits, broiling on the grill is also a healthy cooking option. Excess fat drips off the food and into the flames, reducing the overall fat content of the dish. Plus, since little to no added oil or butter is required, it’s a great way to prepare healthy meals without sacrificing taste.
But wait, there’s more. Here are some additional benefits of broiling on the grill:
- Broiling on the grill is versatile and can be used for a variety of foods, from steak and chicken to vegetables and fruit.
- It’s a great option for those who don’t have access to an oven or want to avoid heating up their kitchen during hotter months.
- The grill marks left on your food add a visually appealing touch that will impress any dinner guest.
- It’s easy to clean up – simply let the grill cool down and scrape off any leftover food debris.
To get started with broiling on the grill, preheat your grill on high heat and make sure the grates are clean and oiled. Place your food on the grates and close the lid to create an oven-like environment for cooking. Be sure to keep a close eye on your food to prevent burning, and flip it halfway through cooking for evenness.
Preparing Your Grill for Broiling
Whether you’re a seasoned pro or a newbie to the grill, it’s crucial to prepare your grill before broiling to ensure that your food cooks evenly and safely. As a grill prep expert, I’ve compiled some essential tips to help you prep your grill like a pro for broiling.
Cleaning your grill grates is the first step to getting your grill ready for broiling. Use a sturdy grill brush to scrape off any debris or leftover food particles from your last grilling session. This will ensure that your food doesn’t stick and tastes fresh.
Next, preheating your grill is essential for successful broiling. Turn all the burners on high and close the lid for 10-15 minutes to get the grill hot enough to sear your food and cook it thoroughly. If you’re using charcoal, light the coals and wait until they’re covered with ash before placing your food on the grill.
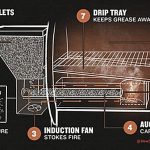
Creating a two-zone fire is crucial for broiling on the grill. This means that one side of the grill will be hot, while the other side will be cooler. You can create this setup by turning off one side of the burners or moving the coals to one side of the grill. Placing a drip pan on the cooler side of the grill will catch any drippings and prevent flare-ups.
Before placing your food on the grates, oil them up. This will prevent your food from sticking and make cleanup easier. Use a paper towel dipped in oil and rub it over the grates using tongs.
To summarize, here’s how to prepare your grill for broiling:
- Clean your grill grates thoroughly
- Preheat your grill by turning all burners on high or letting charcoal burn until covered with ash
- Create a two-zone fire by turning off one side of the burners or moving coals to one side of the grill and placing a drip pan on the cooler side
- Oil your grill grates before placing your food on them
Placing Food on the Grates
Grilling food is a beloved pastime, but it can be easy to make mistakes if you don’t know the proper way of placing food on the grates. As an expert, I’ve researched and compiled some tips and tricks to help you achieve that perfect char-grilled masterpiece.
To start, always clean your grill grates thoroughly and ensure they’re well-oiled before placing any food on them. This will prevent food from sticking and ensure that your grill marks come out beautifully.
When placing food on the grill grates, consider the thickness and size of your ingredients. Thicker cuts of meat or vegetables will require a lower heat setting or indirect heat to prevent burning on the outside while remaining raw inside. On the other hand, smaller or thinner pieces of food can be placed directly over the heat for quick searing.
Proper spacing between each piece of food is crucial when placing them on the grill grates. Leaving enough space allows for proper air circulation, ensuring that everything cooks evenly. Overcrowding the grill leads to inconsistent cooking and longer cook times.
Grilling vegetables can be tricky, but using a grill basket or skewers can prevent them from falling through the grates. Brush them with oil beforehand to avoid sticking.
Delicate foods such as fish or shrimp require extra care when placing them on the grill. Using a piece of foil or a grill mat can prevent sticking and ensure even cooking.
Closing the Lid of the Grill
It’s all about closing the lid of your grill when broiling. This small but crucial step can make a huge difference in the quality of your grilled meats and veggies.
Before you close that lid, make sure your grill is preheated to the right temperature. Give it a good 10-15 minutes to reach its maximum heat potential. This will ensure that your food cooks evenly and thoroughly, no matter what you’re grilling.
Now it’s time to start grilling. Place your food on the grill grates and close the lid immediately. It’s important to resist the urge to open it frequently or leave it open for long periods. Doing so will disrupt the temperature inside the grill and affect cooking time.
But why is closing the lid so important? The answer lies in the heat circulation. The lid traps the heat inside the grill, allowing it to circulate around your food and cook it from all sides. This method is especially useful when grilling thicker cuts of meat such as steaks and pork chops.
To further control the temperature inside your grill, don’t forget to adjust the vents. These handy little guys help regulate airflow and temperature. If you want to increase the heat, open up the vents to allow more oxygen in. Conversely, if you want to reduce the temperature, close down those vents.
Keeping an Eye on Your Food
Broiling on the grill can be a challenge, but with a few simple tips, you can cook your food to perfection. One of the most critical aspects of grilling is keeping an eye on your food. If you’re not careful, it’s easy to burn or overcook your meal. Here are some essential ways to monitor your food closely when broiling on the grill.
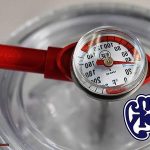
Firstly, using a meat thermometer is a game-changer when it comes to grilling. Insert the thermometer into the thickest part of the meat to check its internal temperature. This will ensure that your food is cooked all the way through without being overdone. Plus, it takes the guesswork out of cooking, allowing you to achieve the perfect level of doneness every time.
Secondly, using a timer is essential for broiling on the grill. Set a timer for the recommended cooking time and check your food periodically. This will help you avoid overcooking or burning your food. Plus, it frees up your attention to attend to other tasks or enjoy your company while cooking.
Furthermore, keeping the grill lid closed while broiling is crucial. The heat circulates around your food like a warm hug, and opening the lid frequently will cause temperature fluctuations, which can affect the cooking time and result in unevenly cooked food. So resist the urge to peek and let the grill work its magic.
Lastly, pay attention to flare-ups while grilling. Grease and fat from your food can cause flames to flare up, which can burn your food. If you notice a flare-up, move the food to a cooler part of the grill or use a spray bottle filled with water to extinguish the flames. This small step can save your meal from being ruined.
Flipping Your Food Halfway Through
As a grill master, you know that there is nothing worse than burnt food on one side and raw food on the other. Fear not. Flipping your food halfway through the broiling process ensures that it cooks evenly on both sides, resulting in a perfectly cooked meal every time.
Using tongs to carefully flip your food is essential to prevent damage or falling apart. Position it correctly on the grill and rotate it slightly to ensure even cooking all around. Remember, be gentle and cautious while flipping your food to avoid any mishaps.
Apart from flipping, it’s also crucial to keep an eye on the temperature of your grill. If your food is cooking too quickly or starting to burn, adjust the heat or move it to a cooler part of the grill. By making these adjustments, you can ensure that your food comes out perfectly cooked every time.
To summarize, the following tips are essential for flipping your food halfway through:
- Use tongs to gently lift and flip your food.
- Position your food properly on the grill and rotate it slightly.
- Keep an eye on the temperature of your grill and make adjustments as needed.
- But don’t just take our word for it – science has proven the benefits of letting your meat rest. A study published in the Journal of Food Science found that even just a five-minute resting period significantly increased the juiciness and tenderness of meat compared to immediately slicing it.
- So, how do you let your meat rest? It’s easy – simply remove it from the grill or broiler and place it on a cutting board or platter. Tent it with foil to keep it warm and let it sit for the recommended amount of time before carving or serving.
Knowing When It’s Done
Achieving the perfect broiled dish on the grill can be both exciting and daunting. But, knowing when it’s done is crucial for a mouth-watering meal. Overcooking can turn your food into a burnt and dry mess, while undercooking can leave you with raw and unsafe food. Here are some tips to help you master the art of knowing when it’s done.
First, a meat thermometer is your best friend. This tool allows you to check the internal temperature of your meat to ensure that it has reached the desired level of doneness. For example, a medium-rare steak should have an internal temperature of 130-135°F, while a well-done steak should have an internal temperature of 160°F or higher.
If you don’t have a meat thermometer, don’t worry. You can also use the touch test. This involves feeling the firmness of the meat with your fingertips. A rare steak will feel soft and squishy, while a medium-rare steak will feel slightly firmer but still have some give. A well-done steak will feel very firm and almost hard to the touch.
Once your food is cooked to perfection, it’s important to let it rest before serving. This allows the juices to redistribute throughout the meat instead of running out when you cut into it. As a general rule, meat should rest for about 5-10 minutes before serving. Not only does this result in a juicier and more flavorful dish, but it also gives you time to prepare any side dishes or sauces.
Letting It Rest Before Serving
You’ve got your meat cooked to perfection, and now it’s time for the final step – letting it rest before serving. Some may see this as an unnecessary delay, but trust us when we say that this step is crucial to achieving a mouth-watering, juicy dish that will leave your taste buds singing.
Why let your meat rest, you ask? Well, when you cook meat, the heat causes the juices to move towards the center. If you cut into it too soon, those precious juices will spill out onto the cutting board, leaving your meat dry and flavorless. Allowing your meat to rest for 5-10 minutes (or up to 20 minutes for larger cuts) gives those juices time to redistribute throughout the meat, resulting in a more tender and flavorful final product.
And if you’re cooking a larger cut like a roast or whole chicken, don’t rush it. Give it at least 20 minutes to rest and reach its full potential. Trust us, your patience will be rewarded with a succulent and satisfying meal.
Conclusion
In conclusion, broiling on the grill is a culinary technique that can elevate your grilling game and save the day when unexpected guests arrive. This method harnesses the power of high heat to quickly cook food while imparting a smoky flavor that tantalizes taste buds. Broiling on the grill offers numerous advantages, including speed, versatility, complex flavors, healthy cooking options, and easy cleanup.
To achieve professional results when broiling on the grill, you must prepare your grill correctly by scrubbing the grates clean, preheating it to the right temperature, creating a two-zone fire for optimal heat control and oiling the grates before placing food on them. When arranging food on the grates, take into account their thickness and size, proper spacing between each piece of food and using a grill basket or skewers for delicate foods or vegetables. Remember to flip your food halfway through cooking to ensure even cooking.
Closing the lid of your grill is crucial as it traps heat inside and allows it to circulate evenly around your food. Keeping an eye on your food by using a timer or meat thermometer is essential to prevent overcooking or burning. Finally, allowing your meat to rest before serving ensures that its juices redistribute throughout for maximum tenderness and flavor.
With these tips in mind, you’re now equipped with all you need to become a pro at broiling on the grill.