Welcome to our blog, where we’re gonna spill the beans on how to nail that low and slow cooking game on your green egg.
Picture this: tender meat that practically melts in your mouth, flavors so rich they’ll make you weak at the knees. Whether you’re a grill guru or just dipping your toes into the world of outdoor cooking, mastering the low and slow technique on the green egg is gonna take your culinary skills to new heights.
Let’s dive in and unlock the secrets to creating finger-lickin’ good meals on your green egg.
Contents
Cleaning and Preparing the Green Egg for Cooking
Experience the magic of low and slow cooking on a Green Egg. The tender meat, rich flavors, and captivating aroma of smoke create an unforgettable grilling experience. To help you achieve greatness, we’ve compiled a step-by-step guide on cleaning and preparing your Green Egg for low and slow cooking.
Step 1: Cleanliness is Key
Ensure your Green Egg is clean and free from residue. Remove ash and debris from the previous cook using a grill brush or scraper. Wipe down the exterior and interior surfaces with a mild dish soap and warm water solution. Avoid harsh chemicals that may damage the ceramic.
Step 2: Ventilation and Airflow
Proper airflow is crucial for low and slow cooking. Open the bottom vent fully for maximum airflow. Adjust the top vent to control heat and smoke levels. Experiment with settings within the ideal temperature range of 225°F to 275°F (107°C to 135°C).
Step 3: Charcoal Selection
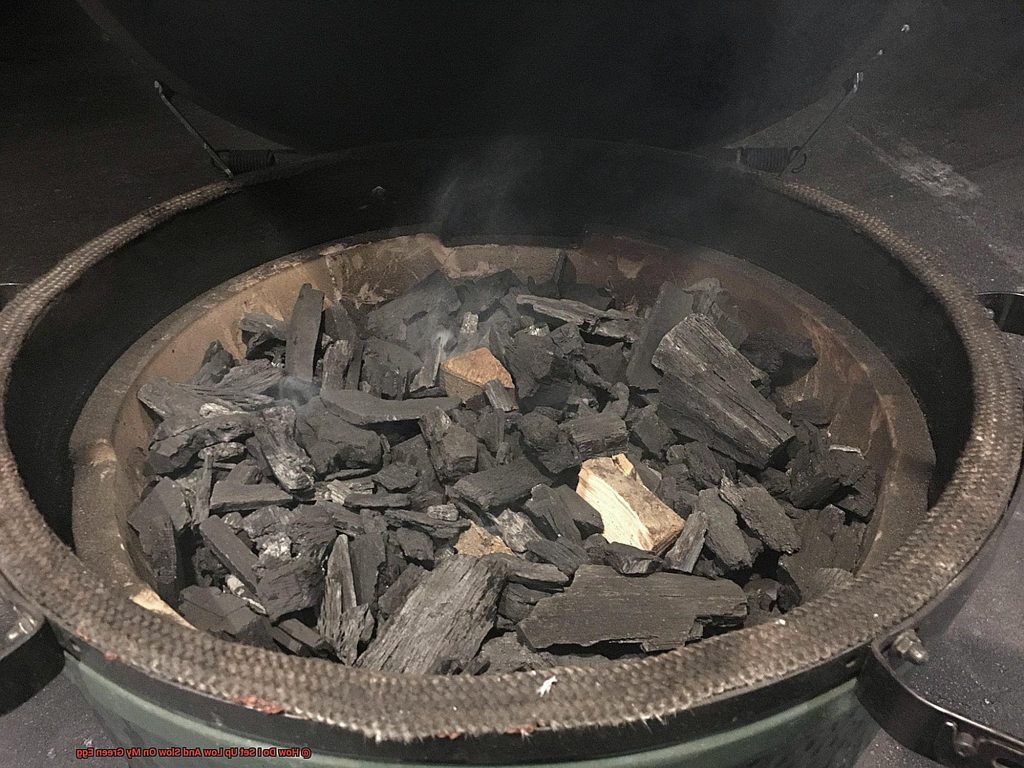
Choose natural lump charcoal for better flavor and consistent temperature. Fill the firebox with an appropriate amount based on desired cook duration and temperature range. Ignite the charcoal evenly using a charcoal or electric starter.
Step 4: Setting Up Indirect Cooking
Achieve low and slow cooking by placing a heat deflector plate or convEGGtor on top of the firebox. This barrier ensures heat circulates around the food. Use a drip pan filled with liquids under the cooking grate for added moisture.
Step 5: Preheating Your Green Egg
Close the lid of your Green Egg and allow it to preheat. This step ensures the ceramic walls reach the desired temperature, stabilizing heat during the cook. Preheat for at least 15-20 minutes or until your desired cooking temperature is achieved.
Step 6: Cleaning and Maintenance
After each cooking session, remove charcoal ash and debris from the firebox and ash drawer. Clean the cooking grates with a grill brush or scraper. Wipe down the exterior and interior surfaces with a mild dish soap and warm water solution. Regularly inspect and replace worn gaskets or damaged parts for optimal performance.
Setting up the Green Egg for Indirect Cooking
If you’re eager to unlock succulent meats, rich flavors, and a mesmerizing smoky aroma, you’ve come to the right place. In this comprehensive guide, we’ll walk you through the process of setting up your Green Egg for indirect cooking, ensuring every bite is a mouthwatering masterpiece.
Indirect cooking on a Green Egg involves circulating heat around the food rather than placing it directly under the heat source. This slow and gentle cooking method results in tender and flavorful dishes that will leave your taste buds begging for more.
To set up your Green Egg for indirect cooking, start by removing the cooking grid. This allows access to the bottom of the Egg where you’ll place a plate setter or heat deflector. These accessories act as a barrier between the charcoal and the food, preventing direct heat and ensuring even cooking.
Once the plate setter or heat deflector is in place, add a drip pan on top. This pan catches any drippings from the food and prevents flare-ups, keeping your cooking process smooth and hassle-free.
Next, arrange the charcoal by filling the firebox with high-quality lump charcoal. Leave a small space in the center for lighting. Lump charcoal provides better flavor and temperature control compared to briquettes, making it worth investing in.
Now comes the fun part – lighting the charcoal. Use a chimney starter to light a few pieces of charcoal until they are fully ignited and covered in ash. Once lit, carefully pour them into the space left in the center of the firebox. This method, known as the “Minion method,” provides a steady and consistent heat source for longer cooking sessions.
With all the charcoal in place, securely put the cooking grid back on top of the Green Egg. Ensure it is seated properly so that it doesn’t move during cooking.
Before adding your food, adjust the top and bottom vents to control the airflow and temperature inside the Egg. For low and slow cooking, keep both vents mostly closed to maintain a lower temperature. This allows your food to cook slowly and evenly, allowing those delicious flavors to develop.
To ensure accurate temperature monitoring, use an external thermometer. This provides a precise reading of the temperature inside the Green Egg, helping you achieve perfect results every time.
Now that everything is set up, it’s time to add your food to the cooking grid. Close the lid of the Green Egg and let it work its magic. The indirect heat will slowly cook your food, infusing it with smoky flavors and ensuring tender results.
Throughout the cooking process, resist the temptation to lift the lid too frequently. Each time you open it, you let out heat and disrupt the cooking process. Only check on your food when necessary, such as for basting or checking for doneness.
Adding Smoking Wood Chips or Chunks
Today, we’re diving into the secret to unlocking that irresistible smoky flavor – adding smoking wood chips or chunks. Get ready for a flavor symphony that will leave you craving more.
Choosing the Perfect Wood Flavor:
To start, let’s explore the wide array of wood flavors available. Whether you crave the robustness of hickory, the sweetness of applewood, or the boldness of mesquite, each type of wood imparts a unique character to your food. Pick your favorite flavor and let’s move on.
Soaking or Not Soaking? That is the Question:
One hotly debated topic among grill masters is whether to soak their wood chips or chunks. While soaking can create more smoke and prevent quick burning, it’s not necessary. It all comes down to personal preference. If you’re feeling adventurous, try both methods and let your taste buds decide.
Setting the Stage:
Now, let’s get those coals fired up. Light your charcoal and let it burn until it turns gray and ashy. This ensures a stable heat source for that slow and steady cooking process.
Scattering the Goodness:
Once your charcoal is ready, sprinkle a handful of soaked or dry wood chips or chunks over the hot coals like fairy dust. Ensure even distribution for consistent smoke throughout your cooking chamber.
Controlling the Flow:
Close the lid of your Green Egg grill and adjust those vents like a maestro conducting an orchestra. This regulates airflow and helps maintain a slow cooking environment. Remember, good smoke comes to those who wait.
The Smoke Show:
As your wood chips or chunks start to smolder, they release that magical smoke that infuses your food with tantalizing flavors. This can take a few minutes to an hour, depending on your desired level of smokiness.
Temperature Tango:
Keep an eye on the temperature like a pro. Aim for a low and slow cooking environment between 225°F and 275°F (107°C and 135°C). This ensures tender results and allows the smoke to work its magic.
Keep the Fire Burning:
For longer smoking sessions, you may need to add more wood chips or chunks to maintain a steady supply of smoke. Carefully lift the grill grate and add them near the hot coals, using tongs or heat-resistant gloves for safety.
The Grand Finale:
Once your culinary creation is complete, bid farewell to any remaining wood chips or chunks that didn’t burn. They’ve done their job and should be discarded. Remember, there’s no encore for used wood.
Lighting the Fire
If you’re ready to embark on a culinary journey of low and slow cooking with your Green Egg grill, you’ve come to the right place. In this comprehensive guide, we’ll walk you through each step of lighting the fire, setting up your grill for low and slow cooking, and unlocking the mouthwatering flavors that will have everyone coming back for more. So grab your apron, roll up your sleeves, and let’s dive in.
Step 1: Gather the Essentials
Before you begin, gather all the necessary equipment. Ensure you have high-quality, natural lump charcoal for a clean and consistent burn. Avoid using lighter fluid or briquettes as they can taint the flavor of your food. Quality fuel is the foundation of a successful low and slow cook.
Step 2: Setting the Foundation
To create an even distribution of heat throughout your cook, remove the cooking grid and fire ring from your Green Egg grill. This simple step enhances airflow, allowing for more precise temperature control.
Step 3: Igniting the Flame
Place a fire starter at the center of the charcoal grid, surrounded by a small pile of charcoal. Light the fire starter and let it burn for a few minutes until the charcoal begins to catch fire. This initial ignition is crucial for establishing a strong base.
Step 4: Building the Perfect Pyramid
Once the first batch of charcoal is lit, add more charcoal around it in a pyramid shape. This formation encourages optimal airflow between the pieces, facilitating an even burn. Remember to leave enough space for air circulation while avoiding overcrowding.
Step 5: Controlling Airflow
Close the lid of your Green Egg grill and open the bottom vent fully to maximize airflow. This influx of oxygen will keep your fire alive and kicking. Adjust the top vent to about halfway open to regulate the temperature during the cooking process. Mastering airflow is key to maintaining consistent heat.
Step 6: Patience is Key
Allow your fire to burn for approximately 10-15 minutes until all the charcoal is fully lit and covered with gray ash. This ensures that the fire is at its optimal temperature for low and slow cooking. Patience during this stage will reward you with a steady and reliable heat source.
Step 7: Enhancing Flavor
If you desire an extra burst of flavor, now is the time to introduce wood chunks or chips. These smoking agents infuse your food with tantalizing aromas. Experiment with different types of wood, such as hickory, apple, or mesquite, to find your signature flavor profile. Remember, a hint of smokiness can elevate your dishes to new heights.
Regulating the Temperature of the Green Egg
Achieving that perfect low and slow cooking requires precise control over the heat, and the Green Egg is designed to excel in this area. To successfully regulate the temperature, there are several factors to consider and techniques to employ.
First and foremost, ensuring a clean grill is essential. Any leftover ash or debris can hinder proper airflow and temperature control. Take the time to remove any remnants from previous cookouts before starting your low and slow journey. This simple step will set you up for success.
Once your Green Egg is clean, attention turns to the two main components that regulate temperature: the bottom vent and the top damper. The bottom vent, located at the base of the grill, controls the amount of oxygen that enters. By opening the vent, you invite more oxygen into the cooking chamber, which increases the heat. Conversely, closing the vent restricts airflow, resulting in a lower temperature. It’s important to make small adjustments to find that sweet spot without overshooting or undershooting your desired temperature.
The top damper, affectionately known as the daisy wheel, plays a crucial role in controlling both heat and smoke release. Positioned at the top of the Green Egg, this clever device can be opened or closed to regulate these elements. Opening the damper allows more heat and smoke to escape, while closing it retains heat and creates more intense smoke flavor. Experimenting with different positions will help you find that perfect balance between temperature control and smokiness.
Monitoring the temperature throughout your low and slow cooking adventure is crucial. Investing in a reliable digital thermometer with a probe will give you accurate readings and peace of mind. Simply insert the probe into your meat of choice and keep an eye on that internal temperature until it reaches your desired doneness. This ensures perfectly cooked results every time.
Another important aspect of low and slow cooking on a Green Egg is the addition of wood chunks or chips. Different types of wood impart unique flavors to your food, allowing you to customize your culinary creations. Whether you prefer the bold smokiness of hickory or the subtle sweetness of applewood, the choice is yours. Experiment with different woods to discover your favorite flavor profiles.
Preheating your Green Egg before adding food is a must. This step allows for a stable temperature from the start, minimizing any fluctuations that may occur during cooking. By preheating, you create an optimal environment for achieving consistent and delicious results.
Lastly, it’s important to note that practice makes perfect when it comes to regulating the temperature of a Green Egg. Each grill may have slight variations, so take the time to understand how your specific model behaves. With experience, you’ll become a master at maintaining the ideal temperature for low and slow cooking, and the mouthwatering results will be well worth the effort.
Monitoring and Maintaining Temperature Throughout the Cooking Process
Monitoring and maintaining temperature throughout the cooking process is crucial for achieving delicious, tender, and juicy results when using a Green Egg for low and slow cooking. The Green Egg’s design allows for precise temperature control, making it an ideal tool for this cooking method. Here are some key steps and tips to help you master temperature control:
- Setting up for low and slow cooking: Start by lighting your charcoal and letting it burn until it reaches a stable temperature. This may take some time, but it’s worth the wait. Once ready, evenly distribute the charcoal in your Green Egg to ensure even heat distribution.
- Adjusting airflow: The air vents and dampers on the Green Egg are your secret weapons for temperature control. By opening or closing these, you can control the amount of oxygen that reaches the charcoal, thus adjusting the temperature inside the grill.
- Target temperature: For low and slow cooking, aim to keep the temperature between 225°F and 275°F (107°C – 135°C). However, these are just guidelines, as different recipes or cuts of meat may require slightly different temperatures.
- Monitoring temperature: Use the built-in thermometer on the Green Egg as a guide, but also have an instant-read thermometer for more accurate readings. Regularly check the temperature throughout the cooking process to ensure it remains within your desired range.
- Making adjustments: If the temperature is too high, close some air vents or adjust dampers to reduce airflow. If it’s too low, open them slightly to increase airflow. Gradual adjustments are key to avoiding sudden fluctuations in temperature.
- Feeding the fire: Add more charcoal periodically to maintain a steady supply of heat. This ensures a consistent temperature throughout the cooking process.
- External factors: Be mindful of wind or rain as they can affect temperature. Make additional adjustments to vents and dampers to compensate for increased airflow caused by these factors.
Patience is Key: Low and Slow Cooking Takes Time
If you’re a fan of grilling and barbecue, you’ve probably heard of the low and slow cooking technique. This method involves cooking food at a low temperature for an extended period of time, resulting in tender and flavorful dishes. But before you fire up your grill and start cooking, there’s one important thing to remember – patience is key. In this blog post, we’ll explore why patience is crucial when it comes to low and slow cooking and how it can lead to mouthwatering results.
Flavors that Develop:
Low and slow cooking allows flavors to develop and intensify. Whether smoking a rack of ribs or braising a pot of chili, the long cooking time allows the ingredients to meld together, creating complex and delicious flavors. Patience allows the flavors to deepen and evolve, resulting in a truly memorable dining experience.
Tenderizing Tough Cuts of Meat:
Low and slow cooking has the remarkable ability to transform tough cuts of meat into succulent masterpieces. Collagen, a tough protein found in connective tissues, breaks down over time, turning into gelatin that adds moisture and tenderness to the meat. Whether cooking a brisket or a pork shoulder, patience is essential to achieve that fall-off-the-bone texture that we all crave.
Achieving the Desired Texture:
In addition to tenderizing meat, low and slow cooking allows you to control the texture of your dishes. Whether you prefer melt-in-your-mouth pulled pork or a perfectly caramelized crust on your smoked turkey, patience is essential. It gives you the time needed to achieve the desired texture without rushing the process or compromising on quality.
Allowing Time for Smoke Infusion:
One of the joys of low and slow cooking is infusing food with smoky flavors. Whether using wood chips, chunks, or charcoal, the slow cooking process allows the smoke to penetrate the food and impart a rich and distinctive taste. Patience is key here, as it gives the smoke enough time to work its magic and create that signature barbecue flavor.
Avoiding Fluctuations in Temperature:
Maintaining a consistent temperature is crucial when it comes to low and slow cooking. Fluctuations can lead to uneven cooking and potentially ruin your dish. Patience plays a vital role in this aspect, as it allows you to monitor and adjust the temperature gradually, ensuring that your food cooks evenly and perfectly.
Tips to Achieve Delicious Low and Slow Cooked Meals on your Green Egg
In this article, we will explore the essential tips and techniques that will help you achieve mouthwatering low and slow cooked meals on your Green Egg. Get ready to tantalize your taste buds with tender, juicy, and flavorful dishes that will leave your family and friends begging for seconds.
Start with Quality Ingredients:
The foundation of any great dish is high-quality ingredients. When it comes to low and slow cooking, choose fresh meats, vegetables, and seasonings that are free from spoilage or damage. Opting for premium cuts of meat ensures maximum flavor, while fresh produce adds vibrancy to your dishes. Remember, great ingredients lead to great flavors.
To elevate your dishes even further, consider marinating or brining your meats before cooking. This helps infuse them with additional flavors and keeps them tender during the long cooking process.
Control the Temperature:
Temperature control is crucial for successful low and slow cooking. The Green Egg’s superior heat retention capabilities allow you to maintain a consistent temperature throughout the cooking process. Use the top and bottom vents to regulate airflow and adjust the temperature accordingly.
For low and slow cooking, aim for a temperature between 225°F and 275°F (107°C and 135°C). This slow and gentle heat allows the flavors to develop and the meat to become tender. Be patient and resist the urge to increase the temperature, as this can result in tough meat.
Utilize Indirect Cooking:
Indirect cooking is the secret weapon for achieving perfectly cooked low and slow meals. By setting up your Green Egg for indirect cooking, you create a gentle heat source that envelops your food with tenderness. This method helps retain moisture and infuse flavors into every bite. Say goodbye to dry and bland dishes.
To set up your Green Egg for indirect cooking, place a heat deflector or plate setter on the grate, creating a barrier between the heat source and the food. This ensures that the food cooks evenly without direct contact with the flames.
Enhance Flavor with Wood Chunks or Chips:
Take your low and slow cooking to the next level by adding wood chunks or chips to your charcoal. Different types of wood impart distinct flavors, such as smoky hickory or fruity applewood. Soak the wood chips in water before adding them to the charcoal, ensuring a slow release of aromatic smoke that will elevate your dishes to new heights.
Experiment with different wood flavors to find your favorite combinations. Pecan, cherry, and maple are also popular choices that can add depth and complexity to your dishes.
Conclusion
Setting up low and slow on your green egg is a culinary art that requires precision and patience. To achieve the perfect low and slow cooking experience, you need to master the art of temperature control, airflow management, and flavor infusion.
Firstly, temperature control is crucial when it comes to low and slow cooking. The green egg’s ability to retain heat makes it ideal for this style of cooking. Start by lighting your charcoal and letting it burn until it reaches a consistent temperature of around 225-250 degrees Fahrenheit. This gentle heat will slowly cook your food, allowing the flavors to develop over time.
Next, airflow management is key in achieving the desired results. The green egg’s adjustable vents allow you to regulate the flow of oxygen, which directly affects the fire’s intensity. For low and slow cooking, you’ll want to partially close the bottom vent while leaving the top vent open just enough to maintain a steady stream of smoke. This balance ensures a controlled environment that promotes even cooking and smoky goodness.
To further enhance the flavor profile of your low and slow masterpiece, consider using wood chunks or chips for additional smoke infusion. Soak them in water beforehand to create a fragrant steam that permeates your food as it cooks. Popular wood varieties like hickory, applewood, or mesquite can add unique flavors that elevate your dishes to new heights.
As you embark on your low and slow journey with your green egg, remember that patience is key. Allow ample time for your food to cook slowly and tenderize into succulent perfection. Resist the temptation to rush the process; trust in the magic that unfolds within those ceramic walls.
In conclusion, setting up low and slow on your green egg requires careful attention to temperature control, airflow management, and flavor infusion. With practice and dedication, you’ll soon be creating mouthwatering dishes that showcase the true potential of this versatile grill.