You’ve got yourself a shiny new griddle and you’re itching to start whipping up delicious meals. But before you dive into your culinary adventures, it’s time to give your griddle some love and season it properly. Seasoning not only adds a burst of flavor to your food but also protects your griddle from rust and ensures it lasts longer.
In this blog post, we’ll walk you through the simple yet vital steps to season your griddle for the first time. So grab your favorite cooking oil and let’s embark on this flavorful journey together.
Contents
Step 1: Clean and Preheat
First things first, give your griddle a good scrub with mild soap and water. Rinse it thoroughly and make sure it’s bone dry. Now, place that beauty on a heated stove or grill, cranking up the heat to high. Let the griddle preheat for around 10-15 minutes. The heat will open up the metal pores, ready to soak in all that seasoning goodness.
Step 2: Choose the Right Oil
When it comes to seasoning, choose oils with high smoke points like vegetable oil, canola oil, or even flaxseed oil. These oils won’t burn easily at high temperatures and will create a tough seasoning layer on your griddle.
Step 3: Apply the Oil
Get yourself a trusty brush or cloth and gently apply a thin layer of oil all over the griddle – don’t forget those sides and edges. Make sure you distribute the oil evenly without any puddles or drips. Remember, less is more when it comes to oiling.
Step 4: Heat and Repeat
Now that you’ve oiled up that baby, turn down the heat to medium and let the griddle heat for another 10-15 minutes. This step helps the oil bond with the griddle surface, forming a protective coat. If you see the oil bubbling or smoking excessively, dial down the heat a bit.
Step 5: Cool and Wipe Off Excess Oil
Once the time’s up, turn off the heat and let your griddle cool completely. As it cools, that seasoning oil will solidify and cling to the metal surface. Once cooled, grab a clean paper towel or cloth and lightly wipe off any excess oil.
Your griddle is now seasoned and ready for some sizzling action in the kitchen.
What is Griddle Seasoning?
Grilling enthusiasts understand the importance of a well-seasoned griddle. It’s the secret sauce that creates a non-stick surface, unlocks flavors, and protects your griddle from the evil clutches of rust and corrosion. In this sizzling article, we will dive into the world of griddle seasoning, exploring the steps involved, suitable oils to use, and how to maintain your seasoned griddle for long-lasting performance.
Step 1: Clean Thoroughly
Before embarking on your griddle seasoning journey, your trusty griddle must be free from any debris or manufacturing residues. Grab your sponge, warm soapy water, and scrub away dirt and grease like a culinary artist in action. Rinse thoroughly, then dry it completely to ensure a pristine canvas.
Step 2: Choose the Right Oil
In this quest for griddle greatness, selecting the right oil is crucial. You need oils with high smoke points that can handle the blazing heat without burning or throwing tantrums. Vegetable oil, canola oil, and flaxseed oil are your knights in shining armor on this oily adventure.
Step 3: Apply Oil Evenly
With your chosen oil in hand, prepare for anointing your griddle with a thin layer of liquid gold. Grab a paper towel or brush and channel your inner Picasso as you gently glide the oil across the griddle’s surface. Ensure every nook and cranny is covered in this savory sheen. Excess oil must be banished with a paper towel to avoid any pooling or dripping disasters.
Step 4: Heat and Polymerize
Now comes the fiery moment where metal meets oil in a dance of chemistry. Crank up the heat to high and watch as your griddle reaches its smoking point. This is where the magic happens. The pores of the metal surface open wide, welcoming the oil to penetrate and bond like lifelong soulmates. Brace yourself for wisps of smoke as the oil polymerizes and forms a protective layer that will keep your griddle safe from harm.
Step 5: Cool Down Naturally
After the fiery display, it’s time to let your griddle cool down naturally. Resist the urge to douse it with water or soap immediately, for that would be a grave mistake. Instead, bask in the afterglow and gently wipe off any excess oil or food debris with a paper towel or cloth. Your griddle is now seasoned to perfection, ready to serve up mouthwatering delights.
Step-by-Step Guide for Seasoning a Griddle
Ready to up your grilling game? Unlock the secret to griddle seasoning with this comprehensive step-by-step guide. Get ready to create a non-stick surface, enhance flavors, and protect your griddle from rust and corrosion.
Step 1: Cleanse Like a Culinary Artist
Give your griddle a thorough cleaning. Scrape away debris and food particles using a spatula or scraper. Wash the griddle with warm soapy water, ensuring a clean canvas for your seasoning adventure.
Step 2: Dry It Down Like a Pro
Dry the griddle completely to avoid moisture interference during seasoning. Wipe away any remaining water with a clean cloth or paper towel.
Step 3: Choose Your Oil, Like a Knight in Shining Armor
Select the perfect oil for your griddle. Opt for oils with high smoke points like vegetable oil, canola oil, or flaxseed oil. Avoid butter or margarine as their lower smoke points may cause burning during seasoning.
Step 4: Anoint Your Griddle with Savory Sheen
Apply a thin layer of your chosen oil to the griddle surface using a paper towel or brush. Ensure even coverage across the entire surface, including the sides. This oily embrace creates a protective layer and enhances non-stick properties.
Step 5: Witness the Fiery Chemistry
Preheat your griddle on medium-high heat for about 10 minutes. This allows the oil to penetrate the metal, creating a beautiful protective layer. As the griddle heats up, expect some smoke and a slight odor – it’s all part of the seasoning magic.
Step 6: Cool Down Naturally, Achieve Griddle Perfection
After 10 minutes of heating, turn off the heat and let the griddle cool down completely. Don’t remove excess oil – it contributes to building up that fantastic seasoning layer. Let your griddle take a well-deserved siesta.
Step 7: Repeat for Griddle Awesomeness
Repeat the process of applying oil, heating, and cooling two to three more times to achieve a well-seasoned griddle. Each time you season, you’re building up layers of seasoning that make your griddle perform like a culinary superstar.
Step 8: Ongoing Maintenance for Long-Lasting Love
Remember, seasoning is not a one-time event. Regularly clean and re-season to prolong the life and performance of your griddle. After each use, scrape off residue and wipe it down with a damp cloth. Avoid abrasive cleaners or steel wool as they can damage the seasoning layer.
Clean the Griddle Thoroughly
Before you dive into culinary bliss, there’s one essential step you simply can’t overlook: cleaning your griddle thoroughly before seasoning it. Trust me, the extra effort will pay off in spades. Let’s explore why cleaning is the secret ingredient to unlocking griddle greatness.
Banishing Debris and Residue:
As you unbox your griddle, be prepared for unwelcome guests like manufacturing residue, sneaky dust particles, or even mysterious microscopic substances. These intruders can sabotage proper seasoning and compromise the quality of your cooking surface. Arm yourself with a trusty scraper or spatula and gently banish any food particles or stubborn residue from previous use. It’s time for a fresh start.
Bid Farewell to the Past:
Now that the larger debris is vanquished, it’s time for some soapy water action. Equip yourself with a sponge or soft cloth and scrub every inch of the griddle surface. Pay special attention to those tenacious grease spots and clinging food residue. Rinse away all traces of soap residue – we don’t want any lingering sudsy flavors invading our future meals.
Dry as a Desert:
Moisture is the arch-nemesis of griddles. Any lingering dampness on the surface can lead to rust or uneven seasoning. Grab a clean towel or a stack of paper towels and meticulously dry your griddle until not a trace of moisture remains. We’re aiming for bone-dry perfection here.
The Enchanting Ritual of Seasoning:
Now that your griddle sparkles with cleanliness and is drier than the Sahara, it’s time for the main event – seasoning. Seasoning creates a protective layer on your griddle, enhances its non-stick properties, and imparts delectable flavor to your cooking. Choose your preferred oil – be it versatile vegetable oil, robust canola oil, wholesome flaxseed oil, or even luscious lard – and apply a thin, even layer across the entire surface. Don’t forget the corners and edges – we want an all-around extraordinary cooking experience.
Ignite the Magic:
To unlock the full potential of the oil’s enchantment, heat up your griddle to medium-high temperature and let it work its wonders for approximately 15-20 minutes. This process allows the oil to polymerize, creating a resilient coating that transforms your griddle into a virtually non-stick marvel.
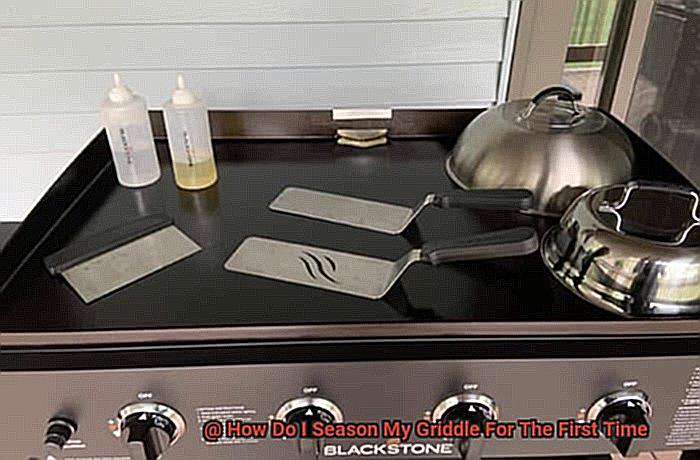
Apply Oil to the Surface of the Griddle
Before embarking on a journey of sizzling flavors, it is essential to properly season your griddle. In this guide, we will walk you through the process of applying oil to the griddle’s surface. This step is crucial in creating a non-stick coating that not only enhances flavor but also safeguards against rust and corrosion. So let’s dive into the world of griddle seasoning and unlock the full potential of your cooking experience.
The Significance of Applying Oil:
When you apply oil to your griddle, you bestow upon it a protective layer akin to a superhero’s shield. This layer prevents food from sticking to the surface, ensuring effortless cooking and easy cleanup. Additionally, it enhances the flavors of your culinary creations, making each bite a delightful explosion on the palate.
Choosing the Perfect Oil:
Not all oils are created equal when it comes to griddle seasoning. Opt for oils with high smoke points, such as vegetable oil, canola oil, or flaxseed oil. These oils possess the resilience to withstand high temperatures without breaking down or producing unpleasant smoke.
Preparing the Griddle:
Before commencing the oil application process, ensure your griddle is pristine and free from any remnants of previous meals. Treat it to a gentle scrub using warm water and mild detergent, rinsing thoroughly and drying completely.
The Artful Application:
There are two effective methods for applying oil to your griddle’s surface. You can either imbue a cloth or paper towel with oil, tenderly caressing it across every inch of the griddle (including the sides), or employ a spray bottle to mist the oil, creating an ethereal dew.
Spreading and Enkindling the Oil:
Once the oil has found its place on the griddle’s surface, unleash your inner artist. Use a heat-resistant brush or cloth to deftly spread the oil, ensuring an even and seamless coating. Now, ignite the flames beneath your griddle, allowing it to bask in medium-high temperatures for 15-20 minutes, or until wisps of light smoke dance upon its surface. This step forges a bond between the oil and the griddle, birthing the coveted non-stick coating.
The Ritual of Cooling and Repeating:
As your griddle cools, bask in the anticipation of culinary greatness. Once it has reached a state of serenity, repeat the oil application process two or three more times. Each repetition strengthens the non-stick properties and fortifies the seasoning’s durability, paving the way for extraordinary cooking adventures.
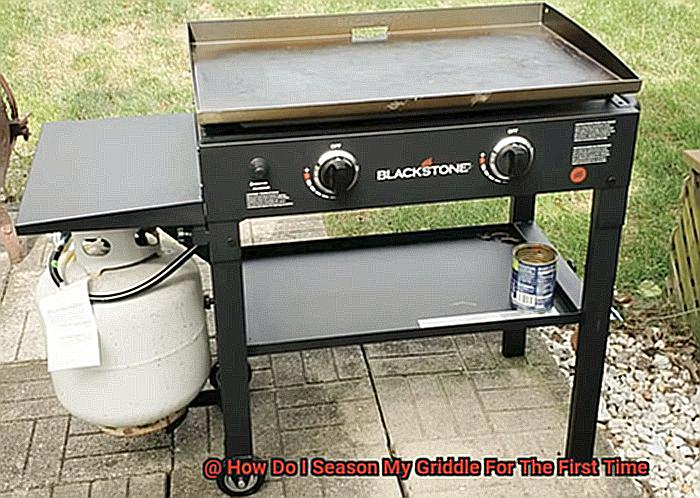
Heat Up the Griddle
You’ve got your griddle all clean and prepped, ready to embark on the journey of seasoning. But before you dive in, it’s crucial to heat up the griddle properly to ensure that protective layer of oil forms just right. Don’t worry, I’ve got you covered with a step-by-step guide to get your griddle sizzling hot.
- Cleanliness is Key: To begin, make sure your griddle is sparkly clean. Grab a mild detergent and warm water, and give that surface a good scrub. Rinse off any residue with clean water and dry it thoroughly using a cloth or paper towels. We want a fresh canvas for our seasoning masterpiece.
- Heat It Up Gradually: Now that your griddle is squeaky clean, it’s time to fire it up. Place it on a stovetop burner or grill with a heat source, and set the heat to medium or medium-high. Give it about 10-15 minutes to gradually heat up. This will ensure even distribution of heat and prevent any pesky hot spots.
- The Water Test: Want to know if your griddle is hot enough? Well, it’s time for the classic water test. Sprinkle a few drops of water onto the surface – if they sizzle and evaporate quickly, you’re good to go. If not, give it a bit more time to heat up.
- The Oil Application: Now comes the fun part – applying that protective layer of oil. Grab an oil with a high smoke point, like vegetable oil or flaxseed oil. Pour a small amount onto the griddle and spread it evenly using a brush or cloth. Make sure to cover every nook and cranny, including those edges.
- Heat Until It Smokes: Once you’ve applied the oil, let it heat up on the griddle for a few minutes. Watch as the oil starts to dance and smoke lightly – that’s a good sign. It means the oil is polymerizing and forming that durable protective layer we’re after. Let it work its magic.
- Cool Down and Wipe Clean: After the oil has done its job, turn off the heat and allow the griddle to cool completely. This will help set the seasoned layer and make it more resilient. Once cooled, gently wipe off any excess oil using a clean cloth or paper towels.
Voila. Your griddle is now seasoned and ready to unleash its full grilling potential. That protective layer of oil will not only enhance flavors but also safeguard against rust and corrosion. Get ready to create mouthwatering meals with ease, knowing your griddle is in prime condition.
Allow the Griddle to Cool Down and Wipe Off Excess Oil
Before you fire it up and start grilling those mouthwatering meals, it’s vital to allow the griddle to cool down and wipe off any excess oil. This step is not only important for your safety but also for maintaining a smooth and hassle-free grilling experience. Let’s explore why cooling down and wiping off excess oil are essential.
Safety First:
The cool-down period is paramount for your safety. By allowing the griddle to cool completely, you eliminate the risk of accidental burns or injuries. So, take a moment to let the griddle chill out before moving on.
Removing Excess Oil:
Wiping off excess oil after cooling down ensures that there are no pooled or surplus oil left on the griddle’s surface. These excess oils can become sticky and create an uneven cooking surface, leading to inconsistent results. By removing them, you guarantee a smooth and enjoyable grilling experience every time.
Preserving Non-Stick Properties:
While wiping off excess oil, it’s crucial not to remove the seasoned oil that has penetrated into the pores of the griddle. This seasoned oil creates a protective layer that enhances the non-stick properties of your griddle. It forms a barrier between your food and the griddle’s surface, preventing sticking and making cleanup a breeze.
Gentle Cleaning Methods:
When wiping off excess oil, it’s important to avoid using harsh cleaning agents or abrasive materials that could damage the griddle’s surface. Stick to gentle wiping motions using a clean cloth or paper towel. If needed, use soft-bristle brushes or gentle scouring pads specifically designed for griddles to remove stubborn residue without causing any harm.
Re-seasoning Your Griddle Regularly
Grilling is an art form, and just like any artist, you need to take care of your tools to create masterpieces. That’s why we’re diving into the world of re-seasoning your griddle regularly. Trust me, it’s a game-changer.
Imagine this: you fire up your griddle, ready to cook mouthwatering burgers or sizzling veggies. But disaster strikes as soon as you start flipping – food sticking everywhere, uneven cooking, and frustration taking over. Not the grilling experience you envisioned, right? Well, fear not, because re-seasoning your griddle is here to save the day.
First things first, let’s get down to the nitty-gritty of re-seasoning. Start by giving your griddle a thorough cleaning. Grab a scraper or spatula and rid that surface of any pesky leftover food bits or residue. Once you’ve cleared the way, wash your griddle with warm soapy water and a non-abrasive sponge. Rinse it off and make sure it’s bone dry before moving on to the next step.
Now it’s time for the magic ingredient – oil. Grab your favorite high-smoke point oil like vegetable oil, canola oil, or flaxseed oil. Give your griddle a nice even coat, making sure to cover every nook and cranny. Use a paper towel or cloth to spread that oil around in a thin layer of deliciousness.
Next up, let’s heat things up. Fire up your griddle to medium-high temperature and let it work its magic for about 10-15 minutes. You’ll know it’s ready when you see some smoke rising from the surface. That smoke is the sign that the oil is bonding with the griddle and creating that protective shield we all love.
Once you’ve reached griddle perfection, turn off the heat and let it cool completely. Then, wipe away any excess oil with a clean cloth or paper towel. What you’re left with is a smooth and shiny griddle surface, ready to take on any grilling challenge.
Now, here’s a pro tip: make re-seasoning a regular part of your griddle maintenance routine. Every few months or as needed, give your griddle some love and attention. Not only will it prevent rusting and improve heat distribution, but it’ll also keep that non-stick goodness going strong.
To keep your griddle in top shape, follow these additional tips:
- Be gentle: Avoid using metal utensils that can scratch the surface. Opt for wooden or silicone tools instead.
- Clean with care: After each use, clean your griddle with mild dish soap and warm water. No need for harsh chemicals or abrasive scrubbers – a gentle touch is all it takes.
Maintenance Tips for Your Griddle
A griddle is a versatile cooking tool that can create mouthwatering meals, but proper maintenance is crucial to ensure its longevity and optimal performance. By following these maintenance tips, you can keep your griddle in top condition for years to come. In this article, we will delve into five key areas of griddle maintenance: regular cleaning, proper seasoning, safe storage, tackling stubborn stains, and gentle care.
Regular Cleaning:
Regular cleaning is essential to keep your griddle in prime condition. After each use, remove any food residue or grease by scraping it off with a spatula or grill scraper. Once the surface is cleared, wipe it down with a damp cloth or paper towel. Avoid harsh cleaners that can damage the griddle’s surface and stick to mild dish soap mixed with warm water for a deeper clean.
Proper Seasoning:
Seasoning your griddle creates a protective layer that prevents rust and enhances its non-stick properties. Before the first use, apply a thin layer of high smoke point oil, such as vegetable oil or flaxseed oil, all over the surface. Heat the griddle on medium-high heat until the oil starts to smoke, then allow it to cool before wiping off any excess oil. Repeat this process periodically to maintain the non-stick properties of your griddle.
Safe Storage:
To prevent rust, ensure your griddle is completely dry before storing it. Disconnect the propane tank if you have a gas griddle and store it separately. Cover your griddle with a protective cover or find a dry spot away from dust and moisture.
Tackling Stubborn Stains:
Stubborn stains or burnt-on food residue can be tackled with baking soda. Sprinkle it over the affected area and scrub with a sponge or brush. For tougher stains, create a paste with water and baking soda, apply it to the stain, let it sit for a few minutes, then scrub it away. Commercial griddle cleaners or degreasers can also be used for more stubborn stains, following the manufacturer’s instructions.
Gentle Care:
Avoid using abrasive tools like steel wool or metal brushes, as they can scratch and damage the griddle’s surface. Opt for non-abrasive cleaning tools such as nylon scrub brushes or soft sponges. Regular maintenance should include checking for loose screws or parts, inspecting gas connections (if applicable), and lubricating moving parts as needed.
Conclusion
When it comes to seasoning your griddle for the first time, there are a few key steps you need to follow.
First and foremost, make sure your griddle is clean and free of any dirt or debris. Then, apply a thin layer of oil all over the surface of the griddle.
This will help create a non-stick coating and prevent rusting. Next, heat up your griddle on high heat for about 15 minutes to allow the oil to penetrate into the metal.
You may notice some smoke during this process, but don’t worry, it’s completely normal. After heating, let the griddle cool down and wipe off any excess oil with a paper towel.
Your griddle is now seasoned and ready to use for all your cooking adventures.
Remember, proper seasoning is essential for maintaining the longevity and performance of your griddle, so be sure to repeat this process regularly.