Are you tired of serving up dry, overcooked meat or raw, underdone chicken on your Traeger grill? Fear not, dear reader. The solution to your grilling woes is as simple as using a temperature probe.
This nifty tool comes standard with most Traeger grills and allows you to monitor the internal temperature of your meat in real-time. Say goodbye to guesswork and hello to perfectly cooked meats every time.
But how exactly do you use a temperature probe? If you’re feeling a bit intimidated by this new gadget, don’t worry – we’ve got you covered. In this guide, we’ll walk you through the basics of using the temperature probe on your Traeger grill like a pro.
We’ll cover everything from inserting the probe into your meat correctly to connecting it to your grill and reading the temperature accurately. Plus, we’ll share some insider tips and tricks for taking your grilling game to new heights with the help of your trusty temperature probe.
Whether you’re an experienced pitmaster or just starting out on your grilling journey, this guide is for you. So sit back, relax, and get ready to learn how to use the temperature probe on your Traeger grill like a boss – because perfectly cooked meats are just a few clicks away.
Contents
Preheating the Grill
The secret to achieving perfectly cooked meals on your Traeger grill lies in preheating. This step is crucial in ensuring that your food cooks evenly and tastes delicious.
To preheat your Traeger grill, start by turning it on and setting the temperature according to your recipe or preference. Thanks to the digital controller, setting the temperature is a breeze. Just turn the dial to your desired temperature and wait for the grill to preheat.
But how long should you preheat for? It’s recommended that you give your grill at least 15 minutes to reach its maximum temperature before inserting the temperature probe. This ensures that your food will cook to perfection, without any undercooked or overcooked sections.
While preheating, take a moment to clean the grill grates with a brush or scraper. This will remove any debris or leftover food particles from previous cooks, ensuring that your food has a clean surface to cook on.
Once your grill is preheated, it’s time to insert the temperature probe into the thickest part of your meat. Be sure not to touch any bones or gristle as this can affect the accuracy of the temperature reading.
The digital controller on your Traeger grill makes it easy to set your desired internal temperature for your meat. As it cooks, keep an eye on its internal temperature using the digital display on your grill. This allows you to adjust the temperature or cooking time as needed, ensuring that your meal is cooked to perfection.
When your meat has reached its desired internal temperature, it’s time to remove it from the grill and let it rest for a few minutes before serving. This allows the juices to settle, resulting in tender and juicy meat that will have everyone asking for seconds.
Inserting the Temperature Probe
Cooking is an art that requires precision and attention to detail, and nothing exemplifies this more than using a Traeger grill. But before you can master the grill, you need to understand how to insert the temperature probe into it – a crucial step that can make or break your cooking experience.
First and foremost, safety comes first. It’s essential to turn off your Traeger grill and ensure that it’s disconnected from any power source before inserting the probe. Once you’ve done that, locate the temperature probe port on your grill, which can usually be found near the cooking grate on either side of the grill.
With the port located, gently insert the probe into it until you hear a click or snap, indicating that it’s securely in place. Don’t forget to double-check that it’s properly inserted to ensure accurate temperature readings throughout your cooking process.
Once you’ve inserted the probe, it’s time to turn on your Traeger grill and set it to your desired temperature. This will be displayed on your digital controller or display, which you can monitor using the temperature probe throughout the cooking process.
To recap, here are some key steps to keep in mind when inserting the temperature probe into your Traeger grill:
- Turn off your Traeger grill and ensure that it’s disconnected from any power source.
- Locate the temperature probe port on your grill near the cooking grate.
- Gently insert the probe into the port until you hear a click or snap.
- Double-check that it’s securely in place for accurate temperature readings.
- Turn on your Traeger grill and set it to your desired temperature, monitoring it throughout the cooking process using the temperature probe.
Setting the Desired Internal Temperature
Grilling is an art form, and no masterpiece can be created without precision. When it comes to grilling, the internal temperature of your food is the key to unlocking flavorful perfection. Luckily, with a Traeger grill, setting the desired internal temperature is easier than ever.
To begin, insert the temperature probe into the thickest part of your food, taking care not to touch any bones or fat. With the probe in place, use the arrow keys on your grill’s controller to set the desired internal temperature. It’s important to note that different types of food require different internal temperatures; refer to a cooking chart or recipe for guidance.
With the desired temperature set, your Traeger grill steps up to the plate. Its advanced technology automatically adjusts the heat output to maintain a consistent internal temperature throughout the cooking process. This means you can sit back, relax, and let your Traeger do its job while you enjoy a cold beverage with friends and family.
But that’s not all. With this feature, you can also cook your food to a specific doneness level. From rare to well-done, you’ll have full control over the outcome of your meal.
Monitoring the Internal Temperature
Grilling is an art, and like any artist, a skilled griller needs precision tools. One of the most vital tools for Traeger grills is the temperature probe. With this little device, achieving flavorful perfection is easier than ever. However, it’s crucial to know how to use a temperature probe properly to cook your meat to perfection.
To begin, ensure that the temperature probe is properly plugged into the control panel of your Traeger grill. Once it’s connected, insert the probe into the thickest part of your meat, being mindful not to let it touch any bones or fat as this can lead to inaccurate readings. Insert the probe at a 90-degree angle and deep enough into the meat for an accurate reading.
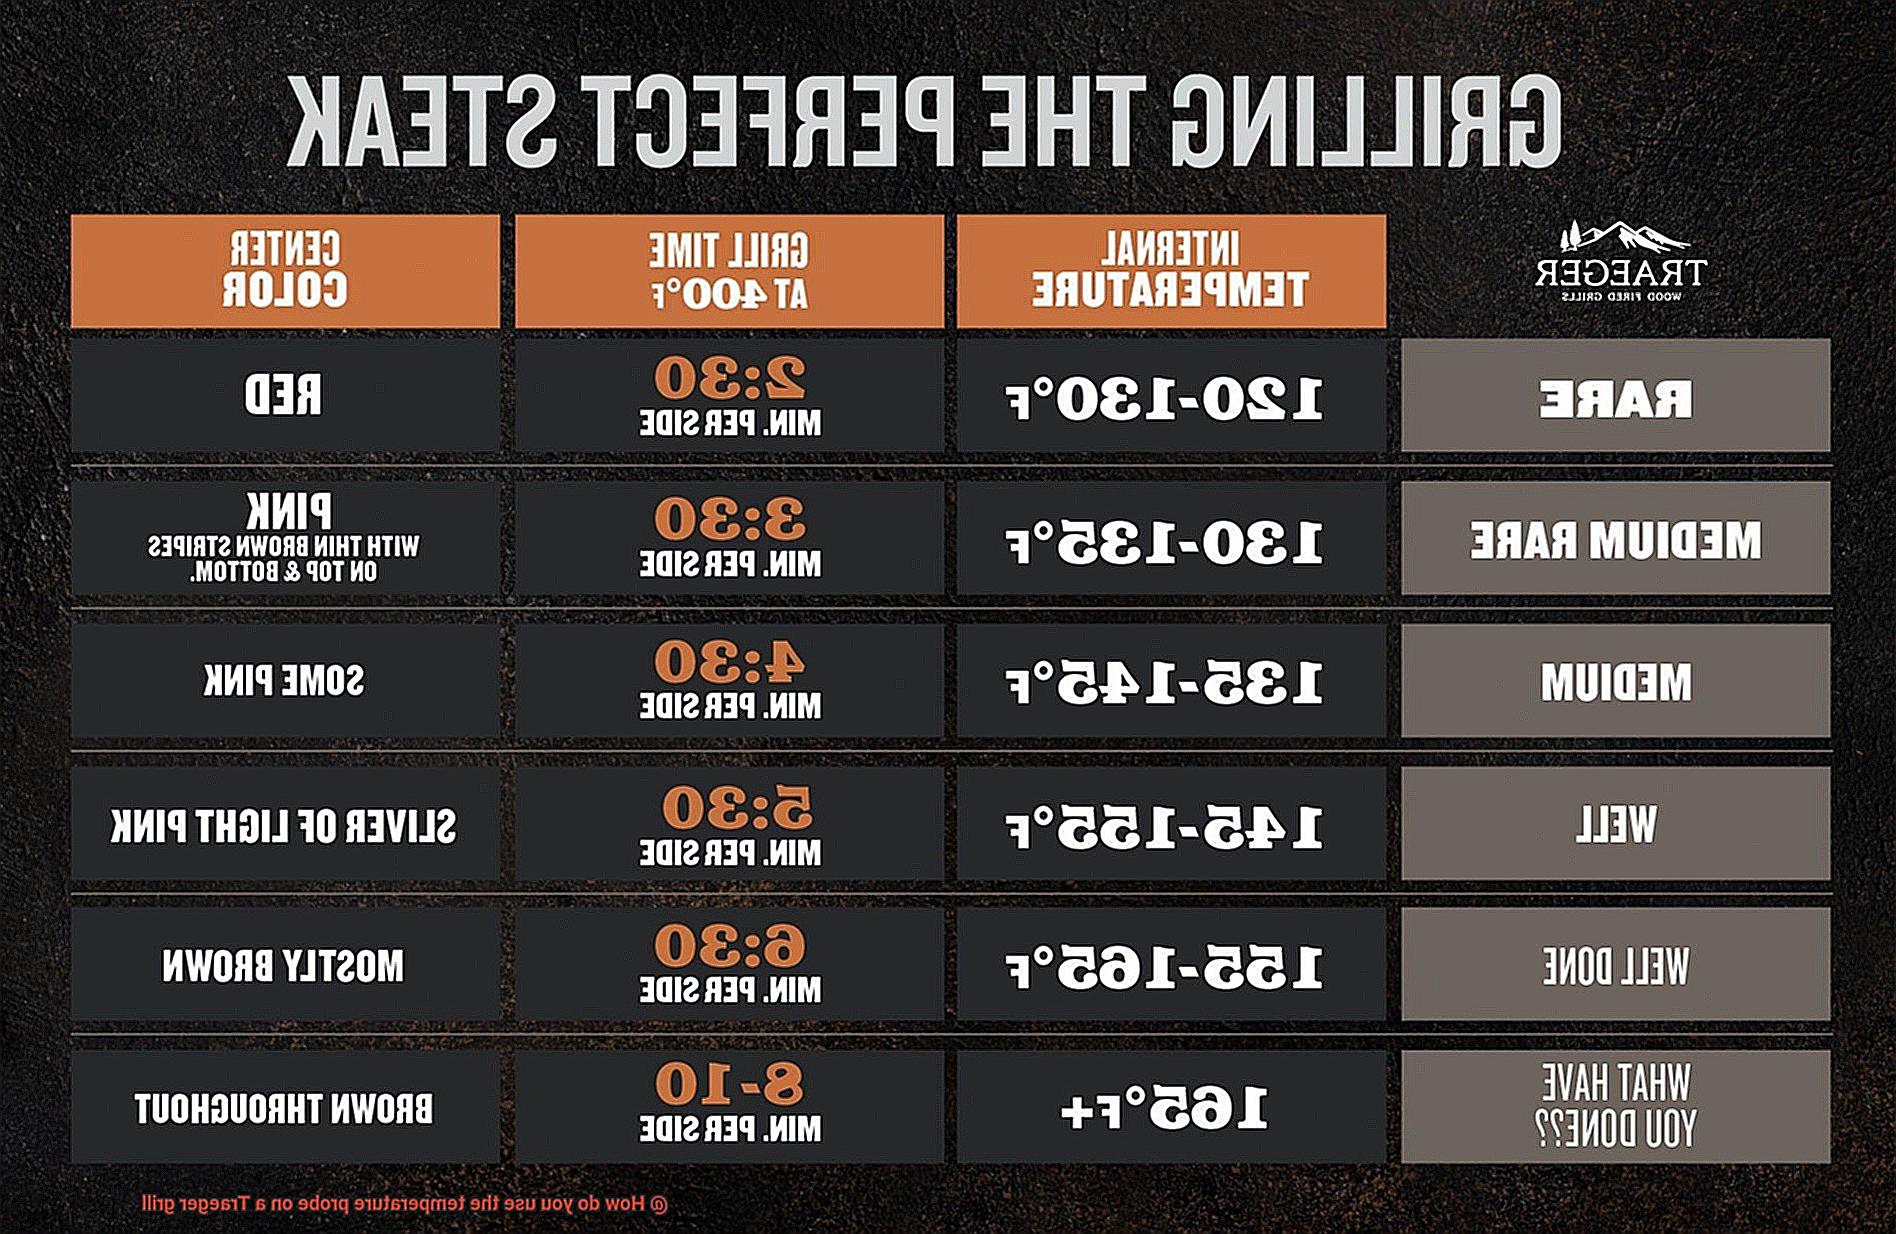
After inserting the probe, close the lid of your grill and wait a few minutes for the temperature reading to stabilize. The temperature will appear on the control panel of your grill, allowing you to monitor it remotely. Remember that different meats have different optimal internal temperatures, so it’s essential to do some research beforehand to determine what temperature your meat should be cooked to. For example, chicken should be cooked to an internal temperature of 165°F while medium-rare steak should be cooked to an internal temperature of 135°F.
In addition to monitoring the internal temperature of your food, it’s also essential to let your meat rest for a few minutes before serving. This allows the juices to redistribute throughout the meat, creating a more flavorful and tender final product.
Traeger grills’ temperature probes make monitoring your food’s internal temperature remotely an easy task. By following proper insertion techniques and doing some research beforehand on optimal internal temperatures for different meats, you’ll be well on your way to grilling like a pro. So fire up that Traeger grill and get ready to create delicious masterpieces. Remember to rest your meat before serving for optimal results.
Removing the Meat from the Grill
Grilling is an art, and removing the meat from the grill is the final act of this culinary masterpiece. However, knowing when your meat is cooked to perfection can be a challenge. Luckily, with the help of a temperature probe on a Traeger grill, you can achieve that perfect cook every time.
Before removing your meat from the grill, it’s essential to know the recommended internal temperature for the type of meat you’re cooking. Whether it’s a medium-rare steak or a well-done burger, knowing the right temperature ensures your meat is safe to eat and cooked to perfection.
Using the temperature probe on your Traeger grill is easy. Simply insert it into the thickest part of the meat without touching any bones or gristle. This avoids false readings and allows for precise monitoring of your meat’s internal temperature. Wait for the temperature reading to stabilize before removing it from the grill.
But, let’s not forget about resting time. Different types of meat require different resting times after being removed from the grill. A steak should rest for about 5 minutes before it’s sliced or served, while a turkey may require up to 30 minutes of resting time. Resting allows the juices in the meat to redistribute, resulting in a tender and juicy cut.
To summarize, here are some key points to remember when removing your meat from the grill:
- Know the recommended internal temperature for your specific type of meat
- Use a temperature probe to get an accurate reading
- Avoid hitting any bones or gristle when inserting the probe
- Wait for the temperature reading to stabilize before removing from grill
- Allow your meat to rest for an appropriate amount of time
Letting Your Meat Rest
Mastering the art of grilling requires more than just knowing how to cook meat. To achieve a perfectly cooked piece of meat, it’s crucial to let it rest after cooking on a Traeger grill. As an expert on this topic, I can tell you why this step is so important.
Firstly, inserting a temperature probe into the thickest part of the meat ensures that you achieve the desired temperature. This ensures that your meat is not undercooked or overcooked. Once the perfect temperature has been achieved, it’s time to take your meat off the grill and let it rest.
During this resting period, the juices inside the meat redistribute themselves evenly throughout the meat. You might be tempted to cut into your meat right away, but if you do, all those delicious juices will escape and leave you with a dry and tough piece of meat. This is where patience comes in.
So, how long should you let your meat rest? A minimum of 5-10 minutes under foil or lid cover should do the trick. In fact, the bigger the cut of meat, the longer it should rest. This waiting time may seem tedious, but trust me, it’s worth it.
To summarize, letting your meat rest after cooking on a Traeger grill is essential to achieving perfectly cooked, juicy, and flavorful results every time. Here are some key takeaways:
- Use a temperature probe to ensure that your meat has reached its desired internal temperature.
- Take your meat off the grill and let it rest for at least 5-10 minutes.
- Cover your meat with foil or a lid during resting time.
- Don’t cut into your meat right away; be patient and wait for the juices to redistribute.
- The bigger the cut of meat, the longer it should rest.
Benefits of Using a Temperature Probe on a Traeger Grill
That’s why using a temperature probe on your Traeger grill offers numerous benefits, taking your grilling game to the next level.
Firstly, precise and consistent cooking results are guaranteed when using a temperature probe. With this tool, you can say goodbye to guessing whether your meat is cooked to perfection. You’ll have accurate temperature readings every time, ensuring that your meats never come out undercooked or overcooked.
Multi-zone cooking is another excellent benefit of using a temperature probe on your Traeger grill. The grill’s different temperature zones can each be monitored independently with a temperature probe, allowing for efficient cooking of various meats or dishes at the same time. No more waiting for one piece of meat to finish before you start another.
Using a temperature probe saves time and effort. You no longer need to keep opening the grill to check on the meat’s progress, which can cause heat loss and extend cooking time. Instead, you can monitor the temperature in real-time without disrupting the cooking process. This feature is especially useful when cooking large cuts of meat or smoking meat for extended periods.
Finally, food safety is critical when it comes to grilling and smoking meats. A temperature probe on a Traeger grill ensures that meats are cooked to recommended internal temperatures before consumption. This is especially important when cooking poultry or pork, which can harbor harmful bacteria if not cooked thoroughly.
Tips for Ensuring Perfectly Cooked Food Every Time
Grilling can be a tricky business, especially when it comes to getting the temperature just right. But fear not, because by using a temperature probe on your Traeger grill, you can ensure that your food is cooked to perfection every time. Here are five essential tips for using a temperature probe correctly on your Traeger grill.
Invest in a Reliable and Accurate Temperature Probe
The first step in achieving perfectly cooked food is investing in a high-quality temperature probe. A reliable and accurate probe will ensure that you get precise readings and avoid undercooked or overcooked meat. Don’t skimp on this crucial tool – it’s worth the investment.
Check the Internal Temperature of Your Meat
When grilling meats like chicken or pork, it’s crucial to cook them to a specific internal temperature. Use your temperature probe to check the temperature in multiple spots to ensure it’s fully cooked through. This will prevent any unpleasant surprises at dinner time and guarantee both safety and flavor.
Let Your Meat Rest After Cooking
After grilling your meat, let it rest for a few minutes before serving. This allows the juices to redistribute throughout the meat, resulting in a more flavorful and tender dish. Use your temperature probe to check the internal temperature as the meat rests, ensuring it stays at a safe and optimal temperature.
Monitor the Temperature Throughout the Cooking Process
While Traeger grills have built-in digital controllers, it’s still important to periodically check the temperature with your probe. This ensures that the cooking temperature remains consistent and that your food is cooking evenly. Don’t rely solely on the grill’s thermometer – always double-check with your own probe.
Preheat Your Grill Before Inserting the Probe
To get an accurate reading, preheat your grill before inserting the probe. This guarantees that the temperature reading you get is accurate and reflective of the actual cooking temperature. Insert the probe into the thickest part of the meat, avoiding any bones or fat, for the most precise reading and to prevent undercooked or overcooked meat.
zEkKeRDmD-4″ >
Conclusion
In conclusion, the temperature probe is the ultimate tool for achieving mouth-watering meats on your Traeger grill. By investing in a reliable and accurate probe, you can take the guesswork out of grilling and ensure consistent results every time.
To use the temperature probe like a pro, follow these simple steps: check the internal temperature of your meat, let it rest after cooking, monitor the temperature throughout the cooking process, preheat your grill before inserting the probe, and use multi-zone cooking to optimize your grilling game.
Not only does using a temperature probe guarantee precise and consistent cooking results, but it also saves you time and effort by eliminating the need to constantly check on your meat’s progress. Plus, it ensures food safety by cooking meats to recommended internal temperatures.
So go ahead and fire up that Traeger grill with confidence. With these tips and tricks for using a temperature probe like a pro, you’ll impress your friends and family with perfectly cooked meats every time.