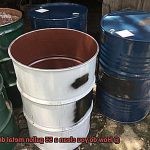
Fuel drums are a crucial component for any industrial facility that handles and stores fuels. But over time, these drums can get dirty and contaminated, which can lead to hazardous conditions. That’s why it’s essential to know how to clean a fuel drum properly.
Cleaning a fuel drum is not just about keeping it looking spick and span. A dirty drum can result in contamination of the fuel inside, which can have severe consequences on its quality. In some cases, it can even lead to dangerous situations like fires or explosions.
In this blog post, we’ll take you through the process of cleaning a fuel drum step-by-step. We’ll cover everything from what materials you need to safe practices you should implement. So if you’re looking to keep your fuel drums clean and safe, keep reading.
Whether you’re new to handling fuel drums or have been doing it for years, this guide will provide valuable insights into maintaining the longevity and safety of your equipment. With our tips and tricks, you’ll be able to ensure that your fuel drums stay in top condition for as long as possible.
Contents
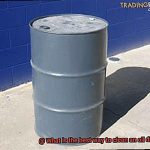
Determine Type of Fuel Stored in Drum
Determining the type of fuel is crucial because different types require specific cleaning methods to ensure safe and efficient use of the drum. Here’s how you can accurately determine the type of fuel stored in a drum:
- Check for labeling or marking on the drum: The easiest way to determine the type of fuel is by looking for visible labeling or markings on the drum. Fuel drums are typically labeled with information about the type of fuel they contain, such as “Diesel,” “Gasoline,” or “Kerosene.”
- Utilize a fuel testing kit: In case you cannot find any visible labeling or markings on the drum, using a fuel testing kit is another way to determine the type of fuel stored in it. These kits can be purchased at hardware stores or online and use a chemical reaction to identify the type of fuel based on its properties.
It’s vital to know what type of fuel is present before cleaning to avoid dangerous situations. Using the wrong cleaning method can result in hazardous outcomes, such as explosions or fires due to the flammable nature of some fuels.
Once you have determined the type of fuel, you can proceed with cleaning the drum using appropriate methods and safety measures. Here are some tips:
- Drain any remaining fuel from the drum and dispose of it safely.
- Rinse the drum with water to remove any remaining residue.
- Fill the drum with a cleaning solution, such as a mixture of water and detergent or a commercial fuel tank cleaner, and leave it for a few hours to ensure thorough cleansing.
- Scrub the interior of the drum with a brush to remove any remaining residue.
- Clean the exterior of the drum with a suitable cleaner and wipe it down with a clean cloth.
- Before using the drum again, ensure that it’s entirely dry and free of any cleaning solution residue. You can leave it in direct sunlight or use a fan to dry it out thoroughly.
Draining Remaining Fuel from Drum
Safety is our top priority, and draining any remaining fuel is the first step in ensuring that we handle flammable liquids with care. As an expert in this area, I’m here to guide you through the necessary steps to get this done safely and efficiently.
Step One: Determine the Type of Fuel
Knowing the type of fuel stored in the drum is crucial for choosing the right equipment and safety procedures. Checking for labeling or using a fuel testing kit will help you identify the type of fuel and proceed accordingly.
Step Two: Remove the Fuel
To remove the fuel, you’ll need a pump or siphon. If your drum has a spout, attach a hose to it and let gravity do its job by emptying the contents into a container. However, if there’s no spout, you’ll need to use a pump or siphon to remove the fuel. It’s essential to have a large enough container to hold all of the fuel.
Step Three: Dispose of the Fuel Responsibly
Once you’ve removed as much fuel as possible, it’s crucial to dispose of it properly. Contact your local waste management facility or hazardous waste disposal company for guidance on how to safely dispose of the fuel. Don’t forget that improper disposal can lead to environmental hazards.
Step Four: Clean the Drum Thoroughly
Even after draining, some fuels can leave residue in the drum, posing a safety risk. To ensure that the drum is entirely clean and safe, follow additional cleaning steps after draining the fuel. This will help you avoid potential accidents caused by residual flammable liquids.
Rinsing Drum with Water
It’s a vital step that ensures any remaining debris or residue is removed from the inside of the drum, leaving it safe for storing flammable liquids in the future.
Before rinsing, it’s crucial to remove any visible debris from the drum. Then, using clean water is essential to avoid further damage and contamination. Contaminated water could cause corrosion or leave behind residue, which could be hazardous for the contents stored in the drum.
To rinse the drum thoroughly, it’s recommended to use a high-pressure hose or power washer. Multiple rinses with clean water ensure that all debris and residue are entirely removed from the inside of the drum.
After rinsing, it’s vital to allow the drum to dry completely before storing anything in it. This prevents corrosion and guarantees that the drum is safe for storing flammable liquids.
Here are some additional tips to consider when rinsing:
- Avoid using any chemicals or detergents during the rinsing process.
- Check that the water used for rinsing is free from any contaminants that could cause damage or corrosion.
- Use protective equipment such as gloves and goggles when handling flammable liquids and during the cleaning process.
Filling Drum with Cleaning Solution
Cleaning fuel drums is a crucial process that requires attention to detail and the right tools. As an expert in this field, I understand the importance of using the appropriate cleaning solution to ensure that all residue is effectively removed, making the drum safe for storing flammable liquids in the future.
The first step in filling a drum with a cleaning solution is to empty any remaining fuel or chemicals from it. This step is crucial as it ensures that the cleaning solution can reach all areas of the drum.
Once the drum is empty, it’s time to choose the right cleaning solution suitable for the type of residue that needs to be removed. Using the wrong cleaning solution can damage the drum or make it unsafe for future use, so it’s essential to read the manufacturer’s instructions carefully.
Mix the cleaning solution according to instructions and pour it into the drum until it’s about 1/4 to 1/2 full. Then seal and agitate the drum to ensure that the cleaning solution reaches all parts of it. Agitation can be achieved by rolling or shaking the drum or by using specialized machines designed for this purpose.
Allowing the drum to agitate for at least 30 minutes ensures that all residue is loosened and removed. After agitation, empty the cleaning solution from the drum and dispose of it safely.
Next, rinse the drum thoroughly with water to remove any remaining residue and cleaning solution. Thorough rinsing ensures that no harmful chemicals are left in the drum, making it safe for future use.
Finally, inspect the drum for any damage or defects. If any issues are present, they should be addressed before using the drum again.
Allowing Cleaning Solution to Remain in Drum
Well, let me tell you, it’s an essential step in the cleaning process that should not be overlooked.
When you leave the cleaning solution in the drum for the recommended time, it allows the solution to break down any lingering fuel or residue inside. This is similar to marinating your favorite meat – you want to give it time to absorb all those delicious flavors. Similarly, allowing the cleaning solution to sit in the drum lets it work its magic and leave your drum shining like new.
However, it’s important to note that the amount of time the solution should stay in the drum varies depending on the type of cleaner used and the level of contamination. While some cleaners may only need 30 minutes to an hour, other industrial-strength cleaners may require up to 24 hours for maximum effectiveness. It’s vital to read and follow the manufacturer’s instructions for your specific cleaner to ensure optimal results.
During this time, make sure to secure the drum tightly to prevent spills or leaks. If there are any holes or cracks in the drum, repair them before using a cleaning solution. Safety always comes first.
Once the recommended time has passed, drain the cleaning solution from the drum and rinse thoroughly with clean water. It’s crucial to dispose of both used cleaning solution and rinse water properly, as they are often hazardous materials that can harm the environment. Follow local regulations and guidelines when disposing of these materials.
Draining Out Cleaning Solution
As a specialist in this area, I can provide you with a detailed guide on how to accomplish this task flawlessly.
To start, make sure that you have allowed the cleaning solution enough time to break down any fuel or residue inside the drum. Once the recommended time has passed, it’s time to drain out the solution.
Begin by slowly tilting the fuel drum to pour out as much of the cleaning solution as possible. It’s crucial to be mindful during this step to avoid any harm. That’s why it is recommended that you wear protective gloves and eyewear while handling the fuel drum. This will help prevent any hazardous splashes from causing harm.
After draining out most of the cleaning solution, it’s time to rinse the inside of the fuel drum thoroughly with water. This step is paramount as it ensures that all remaining cleaning solution and debris are flushed out from the drum. A comprehensive rinse will also prevent any unwanted smells or tastes from lingering in your drum.
Once you finish rinsing, inspect the fuel drum for any signs of damage or wear and tear. Any dents or deformations in the drum can compromise its safety and effectiveness. If you find any damage, it’s highly recommended that you replace the fuel drum before using it again.
Scrubbing Interior of Drum
The process of scrubbing the interior of a fuel drum is essential for ensuring that the drum is free from any residue that can be hazardous. As an expert in this field, I’m here to guide you through the process step by step, ensuring that your drum is safe to use.
To begin, gather all of the supplies that you will need: a scrub brush, soap or detergent, and water. With these items in hand, fill the drum with hot water and add a generous amount of soap or detergent. Take your time as you use the scrub brush to thoroughly clean every inch of the drum’s interior. Don’t overlook any areas where residue may have accumulated, such as corners or crevices.
After you’ve given the interior of the drum a good scrubbing, it’s time to rinse out the soap with clean water. Be sure to remove all traces of soap or detergent from the drum. If there are any stubborn areas that were not cleaned with just soap and water, consider using a specialized cleaner designed for removing fuel residue. Always read the instructions carefully before using any cleaner and follow all safety precautions.
Once you’ve completed this step, it’s important to dry the drum thoroughly before using it again. You can use a clean towel or rag to dry the inside of the drum, or leave it out in the sun to dry naturally. Removing all moisture from the drum is crucial in preventing rusting or other damage.
In summary, here are the steps necessary for scrubbing the interior of a fuel drum:
- Gather your supplies: scrub brush, soap or detergent, and water.
- Fill the drum with hot water and add a generous amount of soap or detergent.
- Thoroughly scrub every inch of the interior with the scrub brush.
- Rinse out all soap or detergent with clean water.
- Dry the drum thoroughly before using it again.
Cleaning Exterior of Drum
Over time, the exterior surface of your drum can accumulate dirt, grime, and debris, which can be hazardous when exposed to high temperatures during grilling. To avoid any potential risks and prolong your equipment’s lifespan, it’s essential to clean the exterior of your fuel drum regularly.
To get started, gather all the necessary supplies such as a bucket, mild soap or detergent, a sponge or soft-bristled brush, and a hose or pressure washer. First, remove any loose debris from the exterior surface of the drum using a dry cloth or brush. Once that’s done, fill a bucket with warm water and add a small amount of mild soap or detergent.
With the soap solution ready, dip your sponge or soft-bristled brush into it and start scrubbing the exterior surface of the drum in circular motions. Be sure to pay attention to areas where dirt and grime have accumulated, such as around the edges of the drum or near the handles. However, don’t scrub too hard as this can damage the paint or coating on the drum’s surface.
After scrubbing all areas thoroughly, rinse off the drum using a hose or pressure washer. Ensure that all soap residue is removed from the surface of the drum before allowing it to air dry completely. By following these simple steps regularly, you can maintain your fuel drum’s integrity and ensure its safety for many years to come.
To summarize, here are some key takeaways:
- Gather all necessary supplies such as a bucket, mild soap or detergent, a sponge or soft-bristled brush, and a hose or pressure washer.
- Remove any loose debris from the exterior surface of the drum using a dry cloth or brush.
- Fill a bucket with warm water and add a small amount of mild soap or detergent.
- Dip your sponge or soft-bristled brush into the soapy water and gently scrub the exterior surface of the drum in circular motions, paying particular attention to areas where dirt and grime have accumulated.
- Rinse off the drum using a hose or pressure washer, ensuring that all soap residue is removed from the surface of the drum before allowing it to air dry completely.
9o_vTPm1gUc” >
Conclusion
In conclusion, cleaning a fuel drum is more than just a cosmetic concern. It is an essential safety measure that prevents contamination and ensures the safe storage of flammable liquids. Before starting the cleaning process, it’s crucial to identify the type of fuel stored in the drum as different fuels require specific cleaning methods.
To begin with, draining any remaining fuel from the drum and disposing of it safely should be your top priority. Next, rinsing the drum with clean water and using appropriate cleaning solutions are vital steps in thoroughly cleansing the interior of the drum. Don’t forget to scrub both the interior and exterior surfaces to remove any residue or debris that could pose a hazard.
When handling flammable liquids, always follow proper safety procedures by wearing protective gear such as gloves and goggles. Disposing of used cleaning solution and rinse water properly is also essential to prevent environmental hazards.
By following these simple yet critical steps, you can maintain your fuel drums’ integrity, prolong their lifespan, and ensure their safety for many years to come.