Say goodbye to guessing and hello to perfectly cooked ribs every time. The secret lies in the magic of thermodynamics.
That’s right, we’re about to dive into the captivating world of checking the internal temperature of ribs. Whether you like them tender enough to fall off the bone or with a juicy bite, nailing the right temperature is crucial.
Get ready to wow your friends and unleash your inner rib aficionado.
Contents
What You Need to Check the Internal Temperature of Ribs
Achieving the perfect level of doneness when grilling or smoking ribs is crucial for a mouthwatering result. To ensure both safety and desired tenderness, checking the internal temperature is essential. This guide will explore the tools and techniques you need to accurately measure the internal temperature of ribs, guaranteeing delicious and tender results every time.
Tools for Accuracy:
- Instant-Read Meat Thermometer: For quick and accurate temperature readings, this handheld device is a must-have. Simply insert the probe into the thickest part of the rib, avoiding contact with bones, for precise measurements.
- Wireless Meat Thermometer with Probes: This thermometer is ideal for remote monitoring, allowing you to keep an eye on multiple ribs simultaneously. Insert the probes into each rib, and the wireless monitor will display real-time readings so you can achieve perfection without constant hovering.
- Digital Meat Thermometer with Remote Monitor: Offering convenience and flexibility, this thermometer lets you monitor the internal temperature from a distance. Insert the probe into the rib and view accurate readings on a remote monitor, giving you freedom to multitask while ensuring perfectly cooked ribs.
Techniques for Success:
- Insertion Technique: To get accurate readings with a meat thermometer, insert the probe into the thickest part of the rib meat, away from bones. This ensures precise measurements without interference from the grill grate.
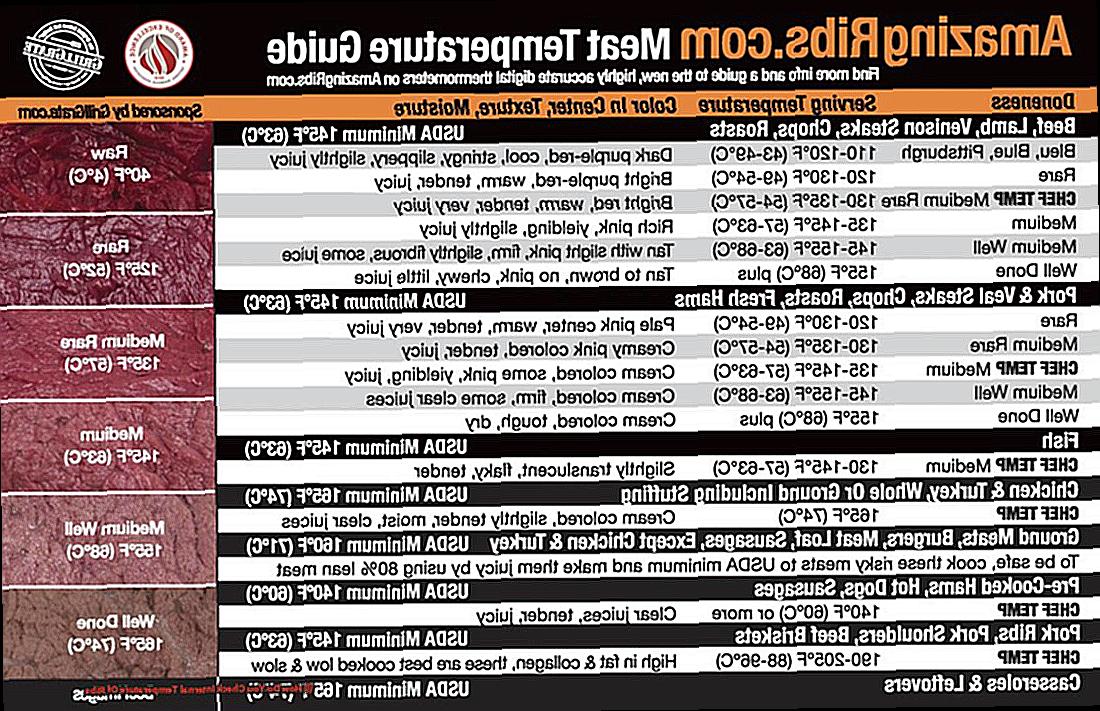
- Recommended Temperature Range: Pork ribs should reach a minimum internal temperature of 145°F (63°C) for safe consumption. However, for fall-off-the-bone tenderness that leaves your guests in awe, many opt to cook them to around 195°F (90°C) or higher.
- Multiple Readings: Consistency is key. Take multiple temperature readings from different parts of the ribs to account for variations in thickness. By doing so, you ensure that every area is cooked to perfection.
- Doneness Testing: While a meat thermometer is essential for food safety, you can also use the touch test to gauge doneness. Perfectly cooked ribs will offer slight resistance with a little give, indicating tender, juicy perfection.
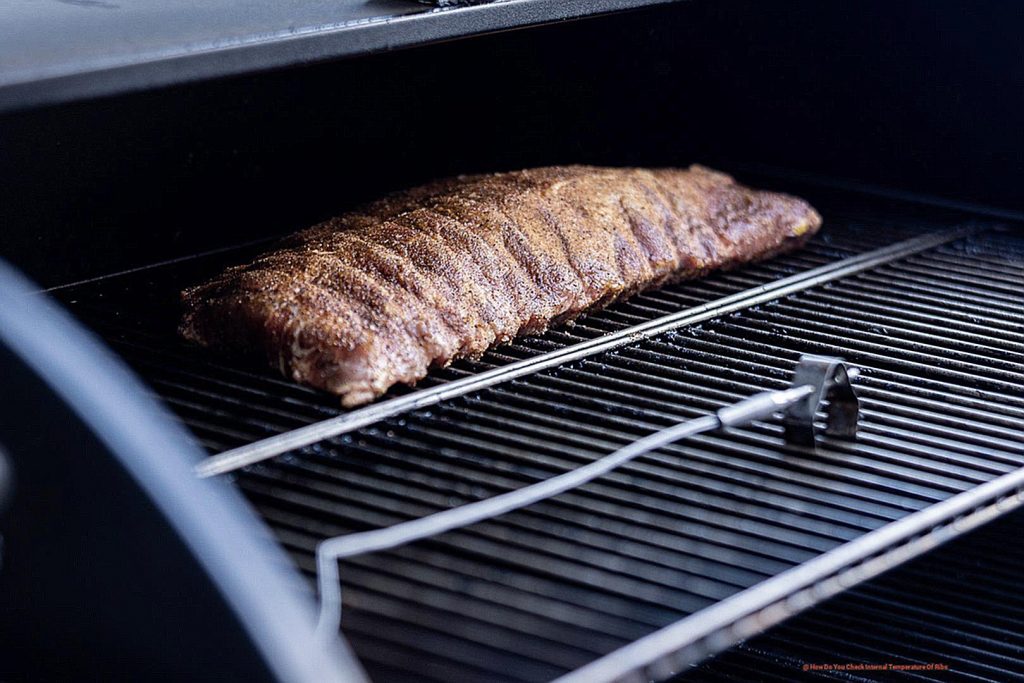
Inserting the Probe of a Meat Thermometer
First things first, let’s talk about the different types of meat thermometers available. You have the classic analog thermometer, reminiscent of traditional grilling, or you can opt for the precision and ease of a digital one. The choice is yours, my friends.
Now that you’ve chosen your weapon, let’s find the sweet spot for that probe insertion. Locate the thickest part of the meat without touching the bone. We’re after precise readings here, so avoid fatty areas or accidentally hitting that bone.
With finesse and grace, gently insert the probe into the meat at a 45-degree angle. Remember, we’re not trying to break any records here; we want those succulent ribs to remain intact.
Once the probe is securely in place, wait a few seconds until you get your reading. For accuracy’s sake, check the temperature in multiple spots. We don’t want any surprises when it comes to doneness.
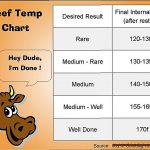
Now comes the fun part – understanding those temperature readings. For medium-rare ribs, aim for an internal temperature of 145°F (63°C). If you prefer them medium, go for 160°F (71°C), and for well-done ribs, aim for around 170°F (77°C). It’s all about personal preference here.
Pro tip: leave that trusty probe in place while your ribs cook. This way, you can monitor the temperature without any guesswork. No more anxiously peeking under the lid every few minutes – you’ve got this under control.
Once your mouthwatering ribs have been devoured and you’ve basked in the glory of your grilling prowess, it’s time to clean and sanitize that probe. We’re all about food safety here, folks. Give it a good wash with warm, soapy water or follow the manufacturer’s instructions.
Checking the Internal Temperature with a Touch Test
Well, get your tongs ready because today we’re going to dive into the art of checking the internal temperature of your ribs using a touch test. It’s like playing a symphony on your taste buds.
Now, before we get into the nitty-gritty, let me tell you that this method requires a bit of experience and knowledge about the desired level of doneness for your ribs. But don’t worry, with a little practice, you’ll be able to perfect those finger-poking skills in no time.
So, here’s how it goes:
Step 1: Get hands-on
Gently press your fingers onto the surface of the ribs. You’re looking for that perfect balance between tenderness and resistance. Think Goldilocks – not too firm, not too soft. It’s like caressing a cloud made of meaty goodness.
Step 2: Multi-point inspection
Different parts of the ribs may cook at different rates, so be sure to perform the touch test in multiple areas. Glide your fingers across the rack, feeling for any inconsistencies in texture. You don’t want any surprises when you sink your teeth into that juicy goodness.
Step 3: Trust your instincts
If your ribs feel too tough and firm, they need more time on the grill. Give them a little more love and let that heat work its magic. But if they feel mushy and overly soft, you may have ventured into overcooked territory. It’s like finding the sweet spot between a soft pillow and a firm handshake.
Now, while the touch test can be quite reliable in judging doneness, it’s always a good idea to have a trusty meat thermometer by your side as a backup plan. Safety first, after all. Just like a reliable sidekick, it’ll ensure your ribs are cooked to perfection every time.
Remember, becoming a touch test pro takes practice and experimentation. Trust your senses and don’t be afraid to experiment with different cooking times and techniques until you find that perfect harmony of flavors. It’s like conducting an orchestra of smoky deliciousness.
Relying Solely on the Touch Test
Grilling is an art form that requires finesse and skill to achieve mouthwatering results. One technique that can take your grilling game to new heights is relying solely on the touch test to check the internal temperature of ribs. In this blog post, we will explore the advantages and disadvantages of this approach, providing you with the insights you need to become a grilling maestro.
Advantages of the Touch Test:
- No need for fancy gadgets: Say goodbye to fumbling with meat thermometers or worrying about dead batteries. The touch test allows you to rely on your senses and instincts alone to determine the doneness of your ribs.
- Time-saving technique: Mastering the touch test means you can quickly assess the doneness of your ribs without waiting for a thermometer reading. This is particularly handy when hungry guests are eagerly awaiting their barbecue fix.
- Enhances your grilling intuition: Developing a sense of touch will make you feel like a grilling Jedi. With practice, you’ll be able to gauge the doneness of your ribs with precision, impressing friends and family with your culinary prowess.
Disadvantages of the Touch Test:
- Subjectivity at play: The touch test is subjective, relying on personal experience and sensitivity. It may take some trial and error to find the perfect balance between tenderness and resistance that suits your taste.
- Variability with different rib types: Each rib type has its own unique texture, which can affect how they feel during the touch test. Being aware of these differences is essential to avoid overcooking or undercooking your ribs.
- External factors come into play: Factors such as cooking method, temperature, and rib thickness can impact touch test results. It’s crucial to consider these variables and adjust your cooking techniques accordingly.
Implications of the Touch Test:
Mastering the touch test can elevate your grilling game, but it’s important to remember that using a meat thermometer in conjunction with the touch test provides a more accurate measurement of the internal temperature.
Using a Digital Meat Thermometer
Grilling ribs is an art form, and achieving the perfect level of tenderness and juiciness requires precision. Say goodbye to guesswork and hello to mouthwatering results with the help of a digital meat thermometer. In this guide, we’ll walk you through the steps to ensure your ribs are cooked to perfection, leaving your family and friends begging for more.
Step 1: Get Acquainted with Your Digital Meat Thermometer
Before diving into the grilling process, it’s essential to understand how this magical tool works. Most digital thermometers consist of a probe and a display unit connected by a wire. The probe is inserted into the meat while the display unit shows the temperature readings.
Step 2: Preheat Your Grill and Get Those Ribs Ready
Preheat your grill to the desired temperature and prepare your seasoned ribs for grilling. Remember, patience is key here. Avoid opening the lid frequently as it can cause temperature fluctuations that may impact the cooking process.
Step 3: The Moment of Truth – Checking the Internal Temperature
When you suspect your ribs are almost done, it’s time to check the internal temperature. Open the grill lid and carefully insert the probe into the thickest part of one of the ribs, ensuring it doesn’t touch any bones or grill grates. Close the lid and wait for a few seconds until the temperature stabilizes.
Step 4: Comparing Readings and Reaching Perfection
The display unit will show you the current internal temperature of the meat. Note this reading and compare it to the recommended internal temperature for ribs. Ribs are typically done when they reach an internal temperature of 190-203°F (88-95°C). If your reading falls within this range, your ribs are ready to be taken off the grill.
Step 5: Patience Pays Off – Continue Grilling if Needed
If the internal temperature hasn’t reached the desired range yet, give your ribs a few more minutes on the grill and then check the temperature again. Repeat this process until your ribs reach that perfect internal temperature.
Step 6: The Final Touch – Removing and Resting the Ribs
Once your ribs have reached the desired internal temperature, it’s time to remove them from the grill. Use tongs or a spatula to carefully lift the ribs off the grill grates and transfer them to a cutting board or serving platter. Allow the ribs to rest for a few minutes before serving, ensuring that the juices redistribute and the meat remains tender.
Step 7: Cleaning Up for Next Time
After enjoying your deliciously grilled ribs, don’t forget to clean your digital meat thermometer. Most models can be easily cleaned with warm, soapy water. Check the manufacturer’s instructions for specific cleaning guidelines.
Using an Analog Meat Thermometer
Grilling ribs is an art form, and nothing ruins a perfectly planned barbecue like overcooked or undercooked meat. But fear not, my grilling gurus, because today I’m here to enlighten you on the wonders of using an analog meat thermometer to achieve rib-tastic perfection.
To begin, ensure that your trusty analog meat thermometer is in tip-top shape. Give it a quick clean and make sure it’s in good working condition. Now, onto the juicy part.
Start by grabbing your slab of ribs and locating the thickest section. This is where we’ll be taking our temperature reading. Gently insert the probe into the meat, being careful to avoid any bones. Those sneaky bones can throw off our accuracy, and we’re all about precision here.
Now, we don’t want to just skim the surface; we want to get right into the heart of the matter. So, push that probe deep enough to reach the center of the meat but be careful not to pop out on the other side like a jack-in-the-box.
Give your thermometer a few seconds to stabilize and work its magic. You’ll notice a dial or a digital display showing you the temperature. Read that number like your favorite novel and bask in the glory of knowledge.
But how do you know when your ribs are perfectly cooked? Different folks have different preferences, so here’s a general guideline: aim for an internal temperature of around 145°F to 165°F for pork ribs and 160°F to 175°F for beef ribs. Just remember, these are approximate numbers – feel free to dance with your own taste buds.
Ah, but before you do a victory dance with those perfectly cooked ribs, remember that the internal temperature will continue to rise slightly even after removing them from the grill. So be a savvy grill master and take them off a few degrees below your desired final temperature.
Last but not least, my food safety warriors, always clean and sanitize your analog meat thermometer after each use. We want to keep our taste buds happy and healthy.
Removing Ribs from the Grill and Letting Them Rest
After hours of carefully tending to your grill, seasoning your ribs just right, and slowly cooking them to perfection, the mouthwatering aroma fills the air. You can practically taste those juicy, flavorful bites. But hold on. Before you dive in, there’s a crucial step you mustn’t overlook – removing the ribs from the grill and letting them rest.
So, why is this step so important? Allow me to break it down for you.
First and foremost, when it comes to removing ribs from the grill, handle them with utmost care. You don’t want all your hard work to go to waste by having your ribs fall apart or lose their shape. So grab a sturdy pair of tongs or a spatula and gently lift those beautiful slabs off the grill grates.
But before you dig in, take a moment to check if your ribs are cooked to perfection. To ensure accuracy, use a meat thermometer. Insert its probe into the thickest part of the meat, avoiding bones or fatty areas. This will give you an accurate reading of the internal temperature.
Speaking of temperatures, for pork ribs, the recommended internal temperature is 145°F (63°C). However, if you prefer your ribs to be melt-in-your-mouth tender and fall-off-the-bone, aim for around 190°F (88°C). It’s all about personal preference here.
Now comes the crucial part – letting those ribs rest. This resting period allows the flavorful juices within the meat to redistribute, resulting in a taste explosion with each bite. It also helps in maintaining moisture. As the meat cools slightly, it retains its succulent juices instead of releasing them when cut into.
To rest your ribs properly, place them on a cutting board or a platter and loosely cover them with aluminum foil. This will keep them warm while allowing any excess steam to escape.
The length of the resting period can vary depending on personal preference and the size of the rack. But a general guideline is to let them rest for 10-15 minutes. Use this time to prepare any additional mouthwatering sauces or delectable sides to accompany your rib feast.
By following these steps, you can ensure that your ribs are cooked to perfection, reaching the desired internal temperature. Removing them from the grill and letting them rest will reward you with tender, succulent, and flavor-packed ribs that are bound to impress your guests.
Conclusion
In conclusion, mastering the art of checking the internal temperature of ribs is essential for consistently achieving mouthwatering results. With a variety of tools and techniques at your disposal, you can ensure both accuracy and tenderness in every bite.
Enter the instant-read meat thermometer or wireless meat thermometer with probes – your trusty companions in real-time temperature monitoring. Simply insert the probe into the thickest part of the rib, away from any bones, and let it work its magic. Multiple readings from different areas guarantee even cooking and unwavering consistency.
But wait, there’s more. The touch test adds an extra layer of expertise to your rib-cooking repertoire. Gently press your fingers onto the surface of the ribs to gauge that perfect balance between tender surrender and subtle resistance.
Now, here’s where things get interesting. While relying solely on the touch test might leave room for subjectivity, pairing it with a trusty meat thermometer takes precision to new heights. You’ll have an accurate measurement of that elusive internal temperature – no guesswork involved.
Digital or analog? It doesn’t matter – as long as you wield your chosen meat thermometer with finesse, inserting that probe correctly and reading the temperature accurately, you’re well on your way to rib-cooking glory.
But hold on just a moment. Your journey isn’t complete until you’ve mastered the art of proper resting. Once those ribs reach their desired internal temperature, it’s time to remove them from their fiery abode and grant them a well-deserved rest. This allows those precious juices to redistribute themselves throughout each succulent slab, ensuring tender bites bursting with flavor.
So there you have it – armed with these techniques and armed with precision tools, you’re primed to become a master at checking the internal temperature of ribs. Prepare to dazzle friends and family alike with your grilling prowess.