Imagine this: you’ve poured your heart and soul into preparing the ultimate brisket. You’ve marinated it with precision, lovingly seasoned it with a secret blend of spices, and patiently waited for the intoxicating aroma of smoke to permeate every fiber. Everything seems to be going swimmingly until suddenly, you hit a roadblock – the dreaded brisket stall. The temperature of your meat stubbornly refuses to budge, leaving you in a state of panic and uncertainty.
But fear not, my fellow BBQ enthusiasts. In this comprehensive guide, we will unravel the mysteries behind the brisket stall and equip you with foolproof techniques to conquer this culinary challenge. Whether you’re a weekend warrior or aspire to be the next pitmaster extraordinaire, these tips and tricks will empower you to elevate your brisket game and achieve that coveted melt-in-your-mouth perfection.
Contents
How do you beat the brisket stall?
Understanding the Brisket Stall:
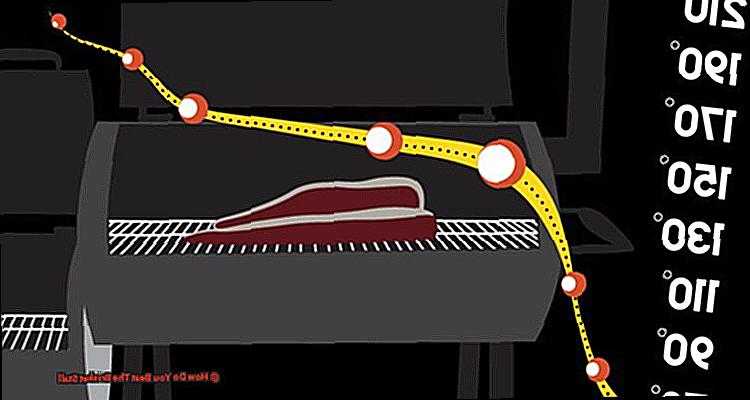
The brisket stall is an inevitable phenomenon that occurs during low and slow cooking. As your brisket’s internal temperature reaches around 150°F to 160°F (65°C to 71°C), you may notice that time appears to stand still as your thermometer readings plateau or even drop. This stall can persist for hours on end, testing both your patience and resolve.
Prominent Theories:
Various theories attempt to explain the enigma of the brisket stall. One popular belief suggests that evaporating moisture from the meat creates a cooling effect, causing temperatures to level off. Another theory revolves around collagen breakdown; as collagen transforms into gelatin, it requires time and moisture.
Conquering the Stall: Techniques and Tips:
- Embrace Patience: Recognize that embracing the stall is crucial for achieving exceptional results. Rushing through this phase can lead to lackluster outcomes.
- The Art of Wrapping: To power through the stall, consider wrapping your brisket in butcher paper or aluminum foil. This technique helps retain moisture, expedites cooking, and minimizes moisture loss.
- Spritz or Mop: Combat the drying effects of the stall by regularly spritzing or mopping your brisket with flavorful liquids like apple juice or a vinegar-based solution.
- Amp Up the Heat: If time is of the essence, cautiously increase the cooking temperature slightly to navigate through the stall. However, exercise caution to preserve tenderness and flavor
What is the Brisket Stall?
If you’ve ever embarked on the mouthwatering adventure of smoking a brisket, you’ve likely encountered the enigmatic phenomenon known as the brisket stall. But don’t let it dampen your spirits, for understanding and conquering this culinary challenge is the key to achieving that perfectly tender and flavorful brisket. In this article, we’ll dive into the science behind the brisket stall, explore effective techniques to overcome it, and share expert tips to elevate your BBQ game.
The Science Behind the Brisket Stall:
The brisket stall occurs when the internal temperature of the meat reaches a critical point (typically around 160-170°F) and seemingly comes to a halt or even drops slightly. This plateau can persist for hours, leading to doubts and anxieties about whether your brisket will ever reach its desired doneness. However, it’s important to understand that this stall is not an obstacle but an essential part of the cooking process.
During the stall, collagen, a tough protein found in meat, begins to break down and transform into gelatin. This collagen breakdown is responsible for turning sinewy and tough meat into tender morsels of succulence. While it may appear that your brisket is at a standstill, rest assured that magical transformations are occurring beneath the surface.
Techniques to Overcome the Brisket Stall:
- The Texas Crutch: One effective technique is wrapping your brisket in aluminum foil or butcher paper, creating a sealed environment that traps moisture and heat. This method accelerates cooking times while preserving tenderness and juiciness.
- Increase Cooking Temperature: If you’re pressed for time, consider slightly raising your cooking temperature. However, exercise caution not to sacrifice tenderness for speed. Finding the delicate balance between efficiency and optimal results is paramount.
- Embrace Patience: The brisket stall tests even the most seasoned pitmasters’ patience, but remember that great things come to those who wait. Have faith in the process and resist the urge to intervene too frequently.
Tips to Elevate Your BBQ Game During the Stall:
- Amplify Flavor: Utilize the stall as an opportunity to infuse your brisket with a tantalizing array of flavors. Apply a generous amount of seasoning or spritz it with a flavorful liquid like apple juice or beef broth. This will create a delectable crust, known as the bark, adding layers of complexity and depth to your final masterpiece.
- Water Pan: Incorporate a water pan into your smoker setup to maintain a consistent temperature and introduce moisture into the cooking environment. This counterbalances the evaporative cooling effect and promotes even heat distribution, resulting in a succulent end product.
- Proper Resting: Once your brisket reaches its desired internal temperature, remove it from the smoker and allow it to rest for at least 30 minutes to an hour. This crucial step allows the juices to redistribute within the meat, ensuring maximum tenderness and flavor in every bite.
Technique 1: Wrapping in Aluminum Foil or Butcher Paper (The Texas Crutch)
Brisket, that heavenly cut of beef known for its smoky flavor and melt-in-your-mouth tenderness. But every BBQ enthusiast knows the frustration of the brisket stall, where time seems to stand still, and the meat refuses to reach its peak temperature. Fear not, my fellow grillers, for I bring you the secret weapon to conquer this culinary roadblock – “The Texas Crutch.” Join me as we unwrap this technique and unlock the secrets to perfect brisket every time.
Understanding the Brisket Stall:
Before we dive into the technique, let’s briefly understand what causes the infamous brisket stall. As the brisket cooks, moisture within the meat evaporates, cooling the surface and creating a moisture barrier. This evaporation process leads to a plateau or even a decrease in internal temperature, causing frustration and prolonging cooking time. But fear not. “The Texas Crutch” is here to save the day.
“The Texas Crutch” Technique:
“The Texas Crutch” involves wrapping the brisket in either aluminum foil or butcher paper during the cooking process. This method accelerates cooking time by pushing through the stall, resulting in a more consistent and evenly cooked brisket. Let’s explore how to execute this technique flawlessly.
Aluminum Foil Versus Butcher Paper:
- Aluminum foil: Create a steamy environment that breaks down collagen and connective tissues for perfect tenderness. Wrap with shiny side inward for maximum heat retention.
- Butcher paper: Allows some airflow while retaining moisture, resulting in slightly drier bark but excellent tenderness. Experiment with both options to find your preferred style.
Wrapping Like a Pro:
Place the brisket on a large sheet of foil or butcher paper and fold up the sides and ends tightly, creating a secure seal. This ensures no steam escapes, trapping all the moisture and flavors inside.
Pushing Through the Stall:
Return the wrapped brisket to the grill or smoker and continue cooking until it reaches the desired internal temperature. The foil or paper will help push through the stall, allowing for more even and efficient cooking.
Resting for Perfection:
Once the brisket has reached the desired temperature, consider briefly unwrapping it and returning it to the grill or smoker. This step, known as “resting,” helps re-crisp the bark on the outside of the meat, adding that extra layer of flavor and texture.
Technique 2: Increasing Cooking Temperature
Are you ready to elevate your brisket game, my fellow grill enthusiasts? Get ready to conquer the notorious brisket stall with a technique that will make your taste buds dance and have your guests begging for seconds. Allow me to introduce you to Technique 2: Increasing Cooking Temperature.
We all know the frustration of that eternal plateau in the internal temperature of the brisket. But fear not, my friends, because increasing the cooking temperature is here to save the day.
So how does this technique work? It’s simple yet powerful. By cranking up the heat, you can power through that stubborn stall and slash the overall cooking time. But hold your horses, we don’t want to go from zero to inferno and end up with a dry and tough brisket. We need to be patient and take it step by step.
Here’s how you can master this technique:
- Gradually increase the temperature: Start by raising the heat by about 25 degrees Fahrenheit (14 degrees Celsius). Keep a watchful eye on your brisket, monitoring its progress. If the stall persists, continue increasing the temperature incrementally until you witness a breakthrough in the plateau.
- Embrace the two-step cooking method: Begin by smoking your brisket at a lower temperature, preferably around 225 degrees Fahrenheit (107 degrees Celsius), until it reaches an internal temperature of approximately 160 degrees Fahrenheit (71 degrees Celsius). This allows the meat to soak up that intoxicating smoke flavor and develop an irresistible bark.
- Kick it up a notch: Once your brisket has reached this stage, it’s time to transfer it to a higher heat environment, such as an oven or grill set at around 275-300 degrees Fahrenheit (135-149 degrees Celsius). This increased temperature will help blast through that stubborn stall and accelerate the cooking process without compromising tenderness or juiciness.
Consistency is key. Ensure a steady heat throughout the cooking process to avoid any unevenly cooked or charred spots. And don’t forget your trustworthy meat thermometer—it’s your best ally in guaranteeing that your brisket achieves the ideal doneness without overcooking.
Technique 3: Patience is Key
In the world of barbecue, patience is often the secret weapon that separates the amateurs from the true grill masters. And when it comes to conquering the notorious brisket stall, patience is absolutely key. So, gather around, my fellow grill enthusiasts, as we dive into the art of being patient and unlocking mouthwatering perfection.
Now, let’s quickly recap what the brisket stall is all about. It’s that frustrating moment during the smoking process when the internal temperature of your brisket seems to hit a wall and refuses to budge. It’s like your meat is playing a game of hide-and-seek, teasing you with its unfinished state. But fear not, my friends, because with a little patience, you can overcome this hurdle and emerge victorious.
You see, the brisket stall happens because of science. As the meat sweats and evaporates moisture, it creates a cooling effect that counteracts the heat from your trusty smoker. This can cause the temperature to plateau for hours on end, leaving you with beads of sweat on your forehead and an uncooked brisket. But here’s the thing: you can’t rush perfection.
Trying to force your brisket through the stall by cranking up the heat will only result in disappointment. Instead, trust in the process and allow your brisket to cook at its own pace.
Now, if you’re feeling a bit antsy and want to speed things up a bit, there are a couple of techniques that can help. One of them is called “crutching.” This involves wrapping your brisket tightly in foil or butcher paper once it hits a certain temperature during the stall. The crutch helps retain moisture and creates a more controlled cooking environment, which can give your brisket that extra push it needs to break through.
Another technique is spritzing or mopping. This involves periodically spraying or brushing your brisket with a liquid, like apple juice or a vinegar-based solution. The moisture from these spritzes helps cool down the surface of the meat and can potentially help break through the stall. Plus, it adds some extra flavor and makes your brisket look even more impressive.
But let’s not forget, my friends, that patience is still the ultimate key to beating the brisket stall. The stall happens because the collagen in the meat is breaking down, and that takes time. By embracing the stall as part of the cooking journey, you’ll end up with a tender and flavorful brisket that will have your guests begging for seconds.
Technique 4: Utilizing a Water Pan
Mastering the art of brisket smoking requires skill, patience, and the right techniques. One such technique that often goes unnoticed but yields exceptional results is utilizing a water pan. In this comprehensive guide, we will explore the advantages and disadvantages of using a water pan when smoking brisket, equipping you with the knowledge to elevate your brisket game to new heights.
Advantages of Using a Water Pan:
- Temperature Regulation: The water pan acts as a heat sink, deftly absorbing and releasing heat to maintain a consistent cooking temperature. Bid farewell to temperature fluctuations and embrace a more controlled cooking process.
- Moisture Retention: Embrace the power of moisture. The water pan keeps the cooking environment humid, preventing your precious brisket from succumbing to the dreaded dryness. Prepare yourself for a tender and juicy end result that will leave your taste buds singing.
- Bark Control: Slow down, tenderize that bark. The water pan decelerates the formation of a tough bark on the surface of your brisket. This extended cooking time allows the flavors to permeate the meat while ensuring a delectably tender final product.
- Flavor Enhancement: Infuse your brisket with an explosion of flavors. By adding aromatic ingredients or seasonings to the water, you can take your taste experience to dizzying new heights. Experiment with herbs, spices, or even fruit juice to unlock an array of enticing flavor profiles.
Disadvantages of Using a Water Pan:
Bark Texture: Beware the siren call of excessive steam. Too much liquid in the water pan can compromise the texture of the bark, resulting in a softer exterior. Strive for balance between moisture and bark texture to achieve barbecue nirvana.
Tips for Grilling with a Water Pan:
- Opt for a disposable aluminum foil pan for effortless cleanup.
- Fill the water pan with hot water before placing it in the smoker, ensuring rapid temperature regulation.
- Keep a watchful eye on the water level throughout the cooking process, refilling as needed to maintain optimal moisture levels.
- Position the water pan on the side of the smoker opposite the heat source, allowing for indirect heat and avoiding direct contact with flames.
- Select a water pan size that aligns with your smoker’s dimensions, providing ample space for proper airflow around the brisket.
Technique 5: Properly Resting the Brisket After Cooking
We’ve covered a lot of ground in our quest for the perfect brisket, from using a water pan to achieve moist and flavorful meat to creating the perfect bark. But there’s one last technique that often gets overlooked – properly resting the brisket after cooking. Trust me, this step is crucial if you want a tender and succulent end result.
So why is resting so important? Well, when you cook a brisket, all those delicious juices get trapped inside the meat. If you were to cut into it right away, those juices would spill out, leaving you with a dry and disappointing brisket. But fear not. Resting allows the juices to redistribute throughout the meat, resulting in a moist and mouthwatering masterpiece.
Timing is everything when it comes to resting your brisket. Give that bad boy at least 30 minutes to rest, but don’t be afraid to let it kick back for up to an hour or more for larger cuts of meat. Trust me, your patience will be rewarded with melt-in-your-mouth goodness.
Now, let’s talk temperature. You want to keep your brisket warm during its resting period, but not too hot. Wrap it in foil or butcher paper and stash it in a cooler or low-temperature oven (around 150-175°F). This gentle warmth will preserve those precious juices without continuing to cook the meat.
To prevent your brisket from turning into a soggy mess, loosely tent it with foil or butcher paper while it rests. This helps retain heat and moisture while allowing excess steam to escape. Your brisket will stay moist and flavorful, with a perfectly formed crust that’s begging to be devoured.
Hold off on carving until just before serving. I know the temptation is strong, but trust me, waiting is worth it. Slicing too soon can lead to a disappointing dry brisket, and nobody wants that. By patiently allowing your brisket to rest, you’ll ensure maximum juiciness and flavor in every bite.
Now, I know waiting can be tough, especially when the tantalizing aroma of smoky goodness fills the air. But trust me, my fellow grill masters, patience is key. Resting allows the meat to continue cooking internally, resulting in a tender and flavorful brisket that will have your guests begging for seconds.
Tips for Successfully Overcoming the Brisket Stall
The brisket stall can be a frustrating obstacle for grill masters aiming to achieve tender and juicy brisket. However, with the right techniques and a bit of patience, you can successfully overcome the stall and create mouthwatering brisket that will impress your friends and family. In this guide, we’ll explore five essential tips to help you conquer the brisket stall like a pro.
Embrace the Stall and Be Patient:
The first tip is to embrace the stall as an essential part of the cooking process. The stall occurs because of evaporative cooling, which helps break down collagen and make the brisket tender. Remember, good things take time. So resist the urge to increase the heat or rush through the stall. Instead, be patient and let nature work its magic.
Wrap it Up:
Wrapping your brisket during the stall is a game-changer. Whether you use foil or butcher paper, wrapping helps retain moisture, accelerate cooking, and power through the stall more quickly. The trapped moisture creates a controlled cooking environment, resulting in a more evenly cooked and juicy brisket. So don’t forget to wrap it up.
Monitor and Adjust Cooking Temperature:
Temperature control is crucial when overcoming the brisket stall. Fluctuations in temperature can prolong or even worsen the stall. Keep a close eye on your cooking temperature using a reliable meat thermometer and make adjustments as needed. By maintaining a steady temperature, you’ll navigate through the stall more smoothly.
Spritz or Mop to Keep It Moist:
During the stall, spritzing or mopping your brisket can work wonders. Spritzing involves misting the surface with liquids like apple juice or vinegar, while mopping involves applying a sauce or marinade with a brush. Both techniques help keep the meat moist, prevent drying out, and contribute to a more tender and flavorful brisket.
Rest for Perfection:
Once your brisket has reached its desired internal temperature, resist the temptation to slice it immediately. Instead, let it rest for at least 30 minutes to an hour. Resting allows the juices to redistribute, resulting in a more succulent and mouthwatering final product. Trust us, the wait will be worth it.
Conclusion
To conquer the brisket stall, you must be armed with knowledge and patience. It’s a battle of wills between you and the meat, but with these tips in your arsenal, victory is within reach.
Firstly, embrace the power of low and slow cooking. This means maintaining a consistent temperature around 225°F (107°C) for an extended period of time. The slow heat allows the connective tissues in the brisket to break down gradually, resulting in tender, juicy meat.
Next, wrap your brisket in foil or butcher paper when it hits the stall. The stall is when the internal temperature of your brisket plateaus and seems to stop rising. This can be frustrating, but fear not. Wrapping helps to push through this plateau by trapping moisture and heat close to the meat.
Don’t forget to give your brisket some love during this process. Spritzing it every hour or so with a mixture of apple cider vinegar and water will keep it moist and add flavor. Plus, it gives you an excuse to peek at that beautiful piece of meat on your smoker.
Now comes the waiting game. Patience is key here because breaking through the stall can take several hours. Resist the temptation to crank up the heat or rush the process – trust me, it’s worth it in the end.
And finally, don’t neglect resting your brisket after it’s done cooking. Letting it rest for at least an hour allows all those delicious juices to redistribute throughout the meat, ensuring each bite is succulent and full of flavor.