Are you getting ready to host a backyard BBQ party and wondering how to add charcoal to your offset smoker? No need to stress, we’ve got you covered. Offset smokers are perfect for slow-cooking meats and infusing them with that delicious smoky flavor. However, the key to achieving the perfect cook is mastering the art of charcoal addition.
Before we dive into the process of adding charcoal, let’s talk about why it’s so important. Charcoal generates both heat and smoke, which are crucial components for cooking meat low and slow. Adding the right amount of charcoal at the right time is essential for maintaining a steady temperature and delivering that mouth-watering smoky flavor.
To ensure an even burn and consistent temperature in your offset smoker, there are a few things you should keep in mind before adding charcoal. For example, make sure to clean out any ash from your firebox and choose the right type of charcoal for your specific needs.
In this blog post, we’ll walk you through each step of adding charcoal to your offset smoker – from prepping your smoker all the way through lighting up the coals and monitoring the temperature. Plus, we’ll share some tips and tricks that will help guarantee perfectly cooked meat every time. So let’s get ready to fire up those smokers and become experts in the art of charcoal addition.
Contents
What You Need to Know Before Adding Charcoal to an Offset Smoker
Before you do, there are some important things that you need to know. As an expert in adding charcoal to an offset smoker, I’m here to guide you through the process and help you achieve deliciously smoky results every time.
Let’s start with the type of charcoal you need to use. There are two main types: lump charcoal and briquettes. Lump charcoal is made from chunks of wood and burns hotter and faster than briquettes. It also produces less ash and imparts a stronger smoky flavor to the meat. Briquettes, on the other hand, are made from compressed sawdust and burn longer and more evenly than lump charcoal. They are also cheaper, but they produce more ash and have a milder flavor.
Once you’ve chosen your charcoal, it’s time to determine how much you need for your cook. This will depend on several factors, including the size of your smoker, the temperature you want to maintain, and the duration of your cook. As a general rule of thumb, use about one pound of charcoal per hour of cooking time.
Before adding charcoal to your smoker, make sure it’s clean and free from debris or ash. Use a wire brush to remove any excess ash or debris from the grates and interior. This will ensure that your fire burns evenly and that your meat cooks properly.
Now it’s time to add your charcoal. Start a fire in your smoker’s firebox and let it burn down to hot coals before adding your charcoal. It’s essential to add the charcoal gradually to keep the temperature consistent. Use a chimney starter to light your charcoal before adding it to the firebox, which can help speed up the process and ensure that your charcoal is evenly lit.
As you add your charcoal to the firebox, spread it out evenly and avoid piling it up in one spot. This will help ensure that your food cooks evenly and doesn’t burn in certain areas. You may also want to consider placing a water pan beneath the cooking grate to help regulate the temperature and prevent flare-ups.
Choosing the Right Type and Amount of Charcoal for Your Smoker
Choosing the right type and amount of charcoal is essential for achieving mouth-watering, flavorful meat. As an expert in this field, I’m thrilled to share my knowledge with you.
First off, let’s discuss two main types of charcoal: briquettes and lump charcoal. Briquettes burn longer and more consistently than lump charcoal, making them perfect for longer smokes. However, they do contain additives that can affect the taste of your meat. Lump charcoal, on the other hand, burns hotter and faster, resulting in a more natural flavor.
It’s important to consider the size of your smoker and the length of your cook when choosing the right amount of charcoal. As a general rule of thumb, use 1-2 pounds of charcoal per hour of cooking time. But keep in mind that this can vary depending on your smoker’s size and the temperature you’re trying to maintain.
In addition to considering the type and amount of charcoal, the wood you use as a smoke source can also impact your meat’s flavor. Hickory adds a robust smoky flavor while applewood gives a sweeter taste. Mesquite is known for its bold flavor.
Here are some sub-topics to help you choose the right type and amount of charcoal for your smoker:
- Briquettes vs. Lump Charcoal: Pros and Cons
- Additives in Briquettes: How They Affect Flavor
- How Much Charcoal Do You Need? Factors to Consider
- Tips for Maintaining Temperature with Charcoal
- Choosing the Right Wood for Your Smoke Source
Prepping the Smoker for Charcoal Addition
As a true BBQ aficionado, you understand that prepping your smoker for charcoal addition is a crucial aspect of achieving the perfect smoky flavor. It’s the foundation of your smoking process, and it can make or break the end result. By following these simple steps, you can ensure that your offset smoker is ready to produce mouth-watering, flavorful meat.
The first step in prepping your smoker is to give it a thorough interior cleaning. Use a wire brush or scraper to remove any leftover ash, grease, or debris from previous smoking sessions. This will ensure that your smoker is in top-notch condition and ready for another round of smoking.
Next, line the firebox with aluminum foil for easy cleanup. You can also add a layer of sand or lava rocks at the bottom of the firebox to help retain heat and distribute it evenly. This step might seem small, but it can make a huge difference in your overall smoking experience.
Before adding charcoal, check that your smoker’s vents are open and functioning correctly. Proper airflow is essential to maintaining a consistent temperature throughout the smoking process.
Now it’s time to add the charcoal. For best results, use high-quality lump charcoal as it burns hotter and longer than briquettes. Start by placing a layer of unlit charcoal on top of the lava rocks or sand at the bottom of the firebox. Add some wood chips or chunks on top of the unlit charcoal for added flavor. Finally, light a few pieces of charcoal using a chimney starter or lighter fluid and place them on top of the unlit charcoal.
Throughout the smoking process, keep an eye on the temperature and adjust the vents accordingly to maintain consistency. By following these simple steps, you’ll be well on your way to producing perfectly smoked meats with your offset smoker.
Adding Charcoal to the Firebox
Then it’s time to master the art of adding charcoal to your offset smoker firebox. As a seasoned expert in all things barbecue, I’ve compiled some essential steps to guide you through the process.
Step 1: Clean the Firebox
Begin by removing any ash or debris that may have accumulated from previous use. A clean firebox ensures that your new charcoal will burn evenly and efficiently without being clogged up by old ash.
Step 2: Choose the Right Charcoal
Choosing high-quality lump charcoal or briquettes is essential for achieving delicious, smoky flavors. However, if you want superior flavor and longer burn time, go for the lump charcoal. Trust me; it’s worth the investment.
Step 3: Light the Charcoal
Properly lighting your charcoal is crucial for ensuring an even burn. You can use a chimney starter or an electric starter, whichever method you prefer. Once the charcoal is lit, carefully pour it into the firebox, taking care not to spill any hot coals on yourself or the surrounding area.
Step 4: Monitor Temperature and Add Charcoal as Needed
Throughout the smoking process, keep an eye on the temperature gauge and add more charcoal as needed. To avoid sudden temperature spikes that can ruin your meat, add small amounts of charcoal at a time.
Step 5: Adjust Airflow
Adjusting the airflow in your smoker by adjusting the vents on the firebox and smokestack is crucial for maintaining a consistent temperature. Increasing airflow will raise the temperature, while decreasing airflow will lower it.
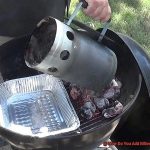
Lighting the Charcoal in a Chimney Starter
Before you throw those juicy cuts of meat onto your offset smoker, it’s important to ensure your charcoal is properly lit. And the best way to do that is with a chimney starter – the ultimate tool for evenly lit coals.
Let’s dive into the steps. First, grab your desired amount of lump charcoal and fill up your chimney starter. Lump charcoal is recommended for smoking as it burns hotter and produces less ash than briquettes.
Next, add crumpled newspaper or paraffin cubes to the bottom of the chimney starter. This will serve as kindling to light the charcoal. Don’t be shy with the newspaper – the more, the merrier for even lighting.
Now it’s time for some fire. Light the newspaper or paraffin cubes with a lighter or match, and let the chimney starter sit for 10-15 minutes until the coals are hot and covered in white ash. This step is crucial as it ensures even lighting, which is key to a successful smoking session.
Before dumping those hot coals into your smoker, put on heat-resistant gloves and use tongs to handle them. Safety first, always.
Once your coals are ready, carefully dump them into the charcoal basket or firebox of the offset smoker. Spread them out evenly and add any additional wood chunks or chips for extra smoke flavor.
Now that your charcoal is lit and ready to go, it’s time to add those mouth-watering cuts of meat onto your smoker and let them do their thing. Sit back, relax, and enjoy the smoky goodness that follows.
In summary:
- Use a chimney starter for even lighting
- Choose lump charcoal for hotter burning and less ash
- Add plenty of crumpled newspaper or paraffin cubes for kindling
- Light coals until hot and covered in white ash
- Handle hot coals with heat-resistant gloves and tongs for safety
- Spread coals evenly in the smoker and add wood chunks or chips for extra smoke flavor
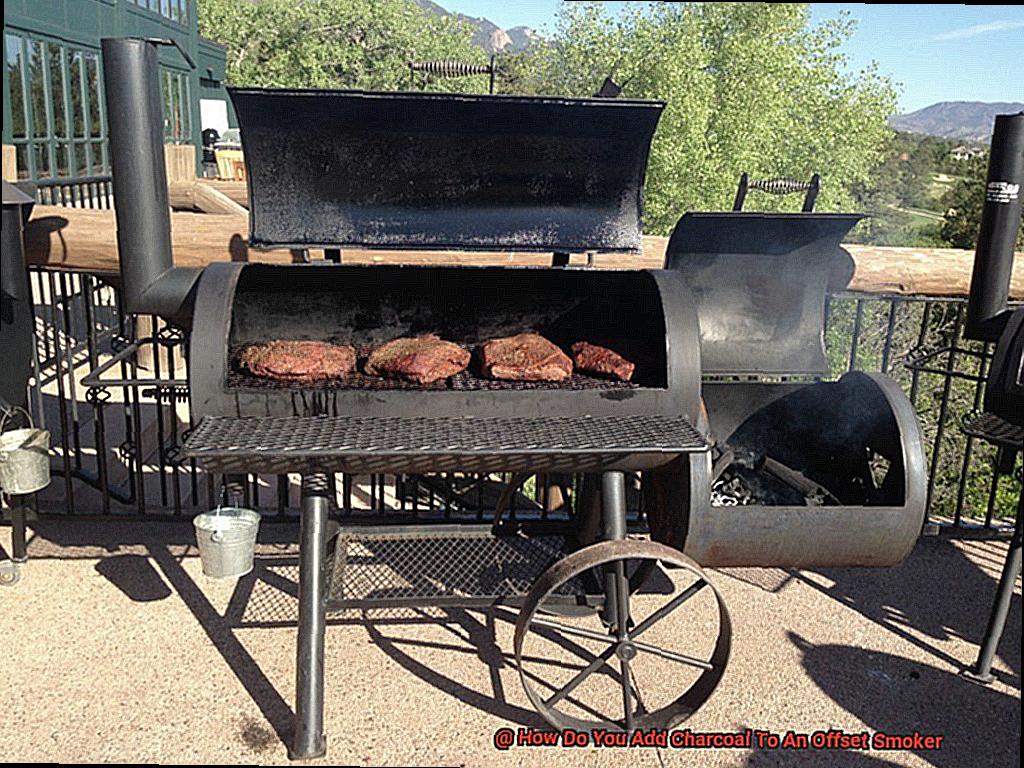
Spreading Out the Charcoal Evenly in the Firebox
If you’re ready to take your grilling skills to the next level, it’s time to get your hands dirty with some offset smoking. But before you start planning your menu and inviting guests over, there’s one crucial step that you must master: spreading out the charcoal evenly in the firebox.
This step is critical because it ensures consistent heat and smoke flow throughout the cooking process. No one wants to bite into a juicy piece of meat that’s burnt on one side and raw on another. To achieve consistent results, start by using high-quality charcoal that produces a consistent burn and minimal ash.
Once you’ve got your charcoal, it’s time to arrange it in your firebox. Spread it out evenly to cover the entire surface area. This will help ensure that every inch of your food gets cooked to perfection. Then, add some small pieces or chunks of wood on top of the charcoal. The type of wood you use will depend on your personal preference and what kind of food you’re cooking. Popular options include hickory, mesquite, and applewood.
It’s time to light up the charcoal. There are several methods for doing this, but make sure that all of the charcoal is lit and has turned white before adding any food to the smoker. Now comes the fun part: cooking.
During the cooking process, maintain a consistent temperature by periodically adding more charcoal and adjusting the vents as needed. When adding more charcoal, make sure to spread it out evenly over the existing coals to maintain an even heat distribution. This step will ensure that your meat is cooked evenly, with no hot or cold spots.
Placing a Water Pan Beneath the Cooking Grate
Look no further than the simple yet crucial step of placing a water pan beneath the cooking grate. Let’s dive into why this step is so important and how to do it right.
First and foremost, the water pan acts as a temperature regulator inside the smoker. Placing it directly beneath the cooking grate creates a barrier between the heat source and your meat, preventing hot spots and temperature fluctuations that can ruin your cook.
But wait, there’s more. The water pan also adds much-needed moisture to the air inside the smoker. This moisture is key in keeping your meat juicy and flavorful throughout the long cooking process. Without it, your meat could dry out and become tough. And let’s be honest, nobody wants tough meat.
Now, what size water pan should you use? It ultimately depends on the size of your smoker and the amount of meat you’re cooking. A larger offset smoker may require a larger water pan to ensure enough moisture in the air. Don’t forget to periodically check the water level and add hot water as needed.
Conclusion
In conclusion, adding charcoal to an offset smoker is the key to achieving mouth-watering, flavorful meat that will leave your taste buds singing. To master this art, it’s crucial to choose the right type and amount of charcoal, prep your smoker for charcoal addition, light the charcoal correctly, and spread it out evenly in the firebox. Additionally, placing a water pan beneath the cooking grate will regulate temperature and add moisture to the air.
When selecting your charcoal, consider burn time, ash production, and flavor. Lump charcoal burns hotter and faster than briquettes but produces less ash while imparting a stronger smoky flavor. Briquettes burn longer and more evenly but produce more ash with a milder flavor.
Before adding your charcoal to the firebox, ensure it’s clean and free from debris or ash. Use a wire brush to remove any excess ash or debris from the grates and interior. This step guarantees even burning of your fire resulting in perfectly cooked meat.
To light your charcoal properly, use a chimney starter or lighter fluid. Once lit, spread it out evenly in the firebox while adding wood chunks or chips for that extra smoke flavor. Throughout the smoking process, monitor temperature using vents on the firebox and smokestack.