Hey there, foodies. Get ready to tantalize your taste buds with the BGB Chopped Challenge A Frame Chicken edition. We’re about to take you on a wild culinary ride with this versatile and oh-so-juicy protein – chicken. But hold up, it’s not just any old chicken we’re talking about here. We’re talking about the A Frame cut – a chef’s secret weapon for tender, melt-in-your-mouth meat.
Whether you’re a seasoned pro or a kitchen newbie, this challenge is sure to get your creative juices flowing. So strap on your apron, grab your trusty knives, and prepare to whip up some seriously mouthwatering dishes. From sizzling stir-fries to succulent roasts, the possibilities are endless when it comes to the BGB Chopped Challenge A Frame Chicken.
So why wait? Let’s dive headfirst into this flavor-packed adventure and see what deliciousness we can create together. Are you up for the challenge? Let’s do this.

Contents
Selecting the Right Chicken for Grilling
Grilling chicken is a beloved pastime for many, but selecting the right chicken can make all the difference in achieving a mouthwatering and flavorful outcome. In this ultimate guide, we will explore the essential factors to consider when choosing the perfect chicken for grilling. Whether you’re a fan of bone-in, skin-on cuts that retain moisture and yield juicy results, or leaner options like boneless, skinless breasts that require some extra care to prevent dryness, we’ve got you covered.
Freshness and Quality:
To ensure a delicious result, prioritize freshness and quality when selecting your chicken.
- Look for organic or free-range chickens for exceptional flavor and texture.
- Check for freshness by ensuring the chicken has a firm texture and no unpleasant odor.
Cut of Meat:
- Different cuts of chicken offer unique grilling experiences and flavors.
- Bone-in, skin-on cuts like drumsticks, thighs, and wings are a griller’s delight, as they retain moisture and deliver succulent meat.
- Leaner boneless, skinless chicken breasts are a healthier option but require extra care to prevent dryness; marinating or brining them will enhance their tenderness.
Size of Chicken Pieces:
- Consider the size of the chicken pieces to match your cooking preferences and time constraints.
- Larger cuts such as whole chickens or spatchcocked birds require longer cooking times but promise rewarding results.
- Smaller cuts like chicken kebabs or boneless thighs cook quickly and are perfect for time-sensitive meals.
Flavor Profile:
- Determine your desired flavor profile to elevate your grilled chicken experience.
- For a milder taste, opt for plain or lightly seasoned chicken.
- Infuse bold flavors into your grilled chicken by marinating it with a variety of spices, herbs, and sauces.
Preparing the Chicken for Grilling
Preparing the chicken for grilling is a vital step that sets the foundation for a mouthwatering and perfectly cooked meal. To elevate your grilling game, it is crucial to start with fresh, high-quality chicken that has been properly handled and stored. This not only guarantees its safety but also sets the stage for delicious results.
Once you have your chicken, it’s time to give it a thorough cleaning. Rinse it under cold water to remove any dirt or bacteria that may be lurking on the surface. Then, gently pat it dry with paper towels to remove excess moisture. This step is essential for achieving that coveted crispy exterior.
Now comes the fun part – marinating. Create a flavorful mixture of herbs, spices, oils, and other ingredients that excite your taste buds. Allow the chicken to soak up this deliciousness for a while, allowing the flavors to penetrate the meat and make it juicy and full of flavor. But remember, safety first. Always marinate in a sealed container or zip-top bag and refrigerate it to prevent any cross-contamination or bacterial growth.
Next, let’s prepare the chicken for grilling. One popular technique is butterflying or spatchcocking. Simply remove the backbone and flatten the chicken to create an even cooking surface. This reduces cooking time and ensures that every bite is evenly cooked and scrumptious.
Before grilling, don’t forget about seasoning. While salt and pepper are classics, don’t be afraid to get creative. Experiment with different herbs, spices, and marinades to create your own unique flavor profiles. Your taste buds will thank you.
Finally, it’s time to fire up that grill. But first, don’t forget to preheat it. This ensures even cooking and prevents the chicken from sticking to the grates. For gas grills, preheat on high for 10-15 minutes. For charcoal lovers, light the charcoal and let it burn until it’s nice and ashy.
Flattening the Chicken into an A-Frame Shape
Flattening the chicken into an A-Frame shape is a game-changer for your grilling adventures. It’s like giving your grill a makeover, taking it from ordinary to extraordinary. This technique not only ensures even cooking and maximum flavor, but it also adds serious style points to your presentation. Who doesn’t love a juicy and flavorful chicken that looks as good as it tastes?
To achieve this A-Frame masterpiece, start by placing the chicken breast-side down on a clean cutting board. With steady hands and finesse, carefully cut along both sides of the backbone from tail to neck. Remove the backbone and save it for making stocks or soups – waste not, want not.
Now comes the fun part. Flip the chicken over so that it’s breast-side up and give it a good press down on the breastbone with the palm of your hand. Don’t be alarmed if you hear a little crack – that just means you’re doing it right. This step helps to flatten the chicken completely and ensures that it lies flat on the grill.
With the chicken now in its A-Frame glory, it’s time to season it up. Reach into your spice cabinet and grab your favorite seasonings – whether it’s a classic salt and pepper combo or a blend of herbs and spices that make your taste buds dance. Make sure to season both sides of the chicken evenly for a balanced flavor explosion.
If you’re feeling fancy, you can also marinate the flattened chicken for extra tenderness and flavor. Place it in a container or zip-top bag and pour your desired marinade over it. Let it hang out in the refrigerator for at least an hour or overnight if you really want those flavors to seep in.
Now let’s fire up that grill. Preheat it to medium-high heat and make sure those grates are clean and lightly oiled. Lay the flattened chicken on the grill, skin-side down, and close the lid. Let it cook for about 10-15 minutes until the skin is golden brown and crispy – that’s when you know it’s time to flip.
Using your trusty tongs or spatula, carefully flip the chicken over and let it continue cooking for another 10-15 minutes. Keep an eye on that internal temperature too – you want it to reach a safe 165°F (74°C) to ensure it’s fully cooked.
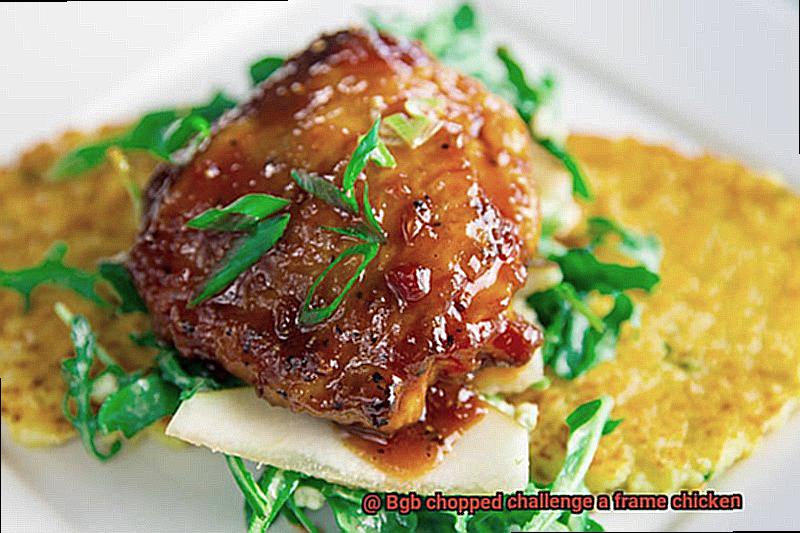
Once that A-Frame chicken is grilled to perfection, remove it from the grill and let it rest for a few minutes. This step is crucial because it allows the juices to redistribute throughout the meat, giving you a moist and tender result. Trust me, this extra waiting time is totally worth it.
Now it’s time to carve or serve that beautiful chicken. You can either keep it intact for a stunning centerpiece or carve it into pieces for easy sharing. Either way, get ready for some serious compliments and satisfied taste buds.
Seasoning Tips to Enhance Flavor
Grilled chicken is a versatile and delicious dish that can be enjoyed year-round. The key to creating a flavorful grilled chicken lies in the seasoning. In this article, we will explore various techniques and seasonings that can be used to elevate the taste of your grilled chicken. Get ready to tantalize your taste buds and take your grilled chicken to new heights of flavor.
The Magic of Dry Rubs:
Dry rubs are a simple yet effective way to enhance the flavor of grilled chicken. Create a blend of herbs and spices like paprika, cayenne pepper, garlic powder, and dried herbs such as rosemary or thyme. Generously coat the chicken with the dry rub, gently massaging it into the meat. Let it sit for at least 30 minutes before grilling to allow the flavors to penetrate the chicken, resulting in a mouthwatering taste experience.
Bold Flavors with Wet Marinades:
Wet marinades are a fantastic way to infuse intense flavor into grilled chicken. Combine ingredients like soy sauce, Worcestershire sauce, lemon juice, olive oil, minced garlic, and herbs like basil or oregano. Place the chicken in a resealable bag or container, pour the marinade over it, and let it marinate in the refrigerator for at least 2 hours, preferably overnight. The longer the marination time, the more flavorful and tender the chicken will become.
Citrus Zest for a Burst of Freshness:
Citrus zest can add a bright and refreshing dimension to grilled chicken. Use a microplane grater or citrus zester to grate the outer layer of oranges, lemons, or limes directly onto the chicken. The citrus oils released from the zest will infuse into the meat as it grills, providing a burst of tangy and aromatic flavor.
Herb-infused Butter Basting:
Basting the chicken with herb-infused butter during grilling adds richness and depth to the flavor. Melt butter and mix it with minced fresh herbs like thyme, rosemary, or parsley. Brush the herb-infused butter onto the chicken while it cooks, allowing the flavors to seep into the meat and create a luscious, herbaceous taste.
Sweet and Savory Glazes:
Glazes can take grilled chicken to a whole new level of deliciousness. A combination of sweet and savory ingredients like honey, soy sauce, Dijon mustard, or balsamic vinegar can be used to create mouthwatering glazes. Brush the glaze onto the chicken during the last few minutes of grilling, allowing it to caramelize and create a sticky, flavorful coating.
Preheating and Oiling the Grill
Grilling chicken is a culinary art that requires attention to detail and a passion for creating tender, juicy, and flavorful meat. Among the many factors that contribute to a successful outcome, preheating and oiling the grill are two essential steps that should never be overlooked. In this article, we will delve into the importance of these steps and provide expert tips to ensure that your grilled chicken becomes a crowd-pleasing masterpiece.
The Science Behind Preheating
Preheating the grill is not just a preliminary step; it is the foundation of achieving optimal cooking results. By preheating the grill, you create an environment that allows for even heat distribution, ensuring that your chicken cooks to perfection. To achieve this, start by turning on all the burners to their highest setting and closing the lid. Give it approximately 10-15 minutes to reach the desired temperature range of 400-450 degrees Fahrenheit. This high heat will sear the chicken, locking in its natural juices while creating a tantalizing charred exterior.
The Art of Oiling the Grill Grates
Oiling the grill grates is a crucial step to prevent your chicken from sticking and tearing apart when you try to flip it. There are several methods you can employ to oil your grates effectively. One popular method is using a brush or paper towel dipped in oil. Opt for cooking oils with high smoke points like canola or vegetable oil. Dip the brush or paper towel in oil and evenly coat the grates before placing your chicken on them. Alternatively, you can use a non-stick cooking spray specifically designed for grills. A light coating on the grates will ensure a non-stick surface without overwhelming the flavor of your chicken.
Putting It All Together
With the grill preheated and the grates properly oiled, you are now ready to embark on your grilling journey. Carefully place your marinated or seasoned chicken on the hot grill, close the lid, and let it work its magic. Remember to monitor the internal temperature with a meat thermometer to ensure that it reaches a safe minimum of 165 degrees Fahrenheit. To achieve even cooking, flip the chicken halfway through the cooking process. Lastly, embrace the concept of resting time, allowing your grilled chicken to retain its juiciness and develop deeper flavors.
Grilling the A-Frame Chicken
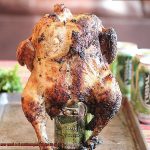
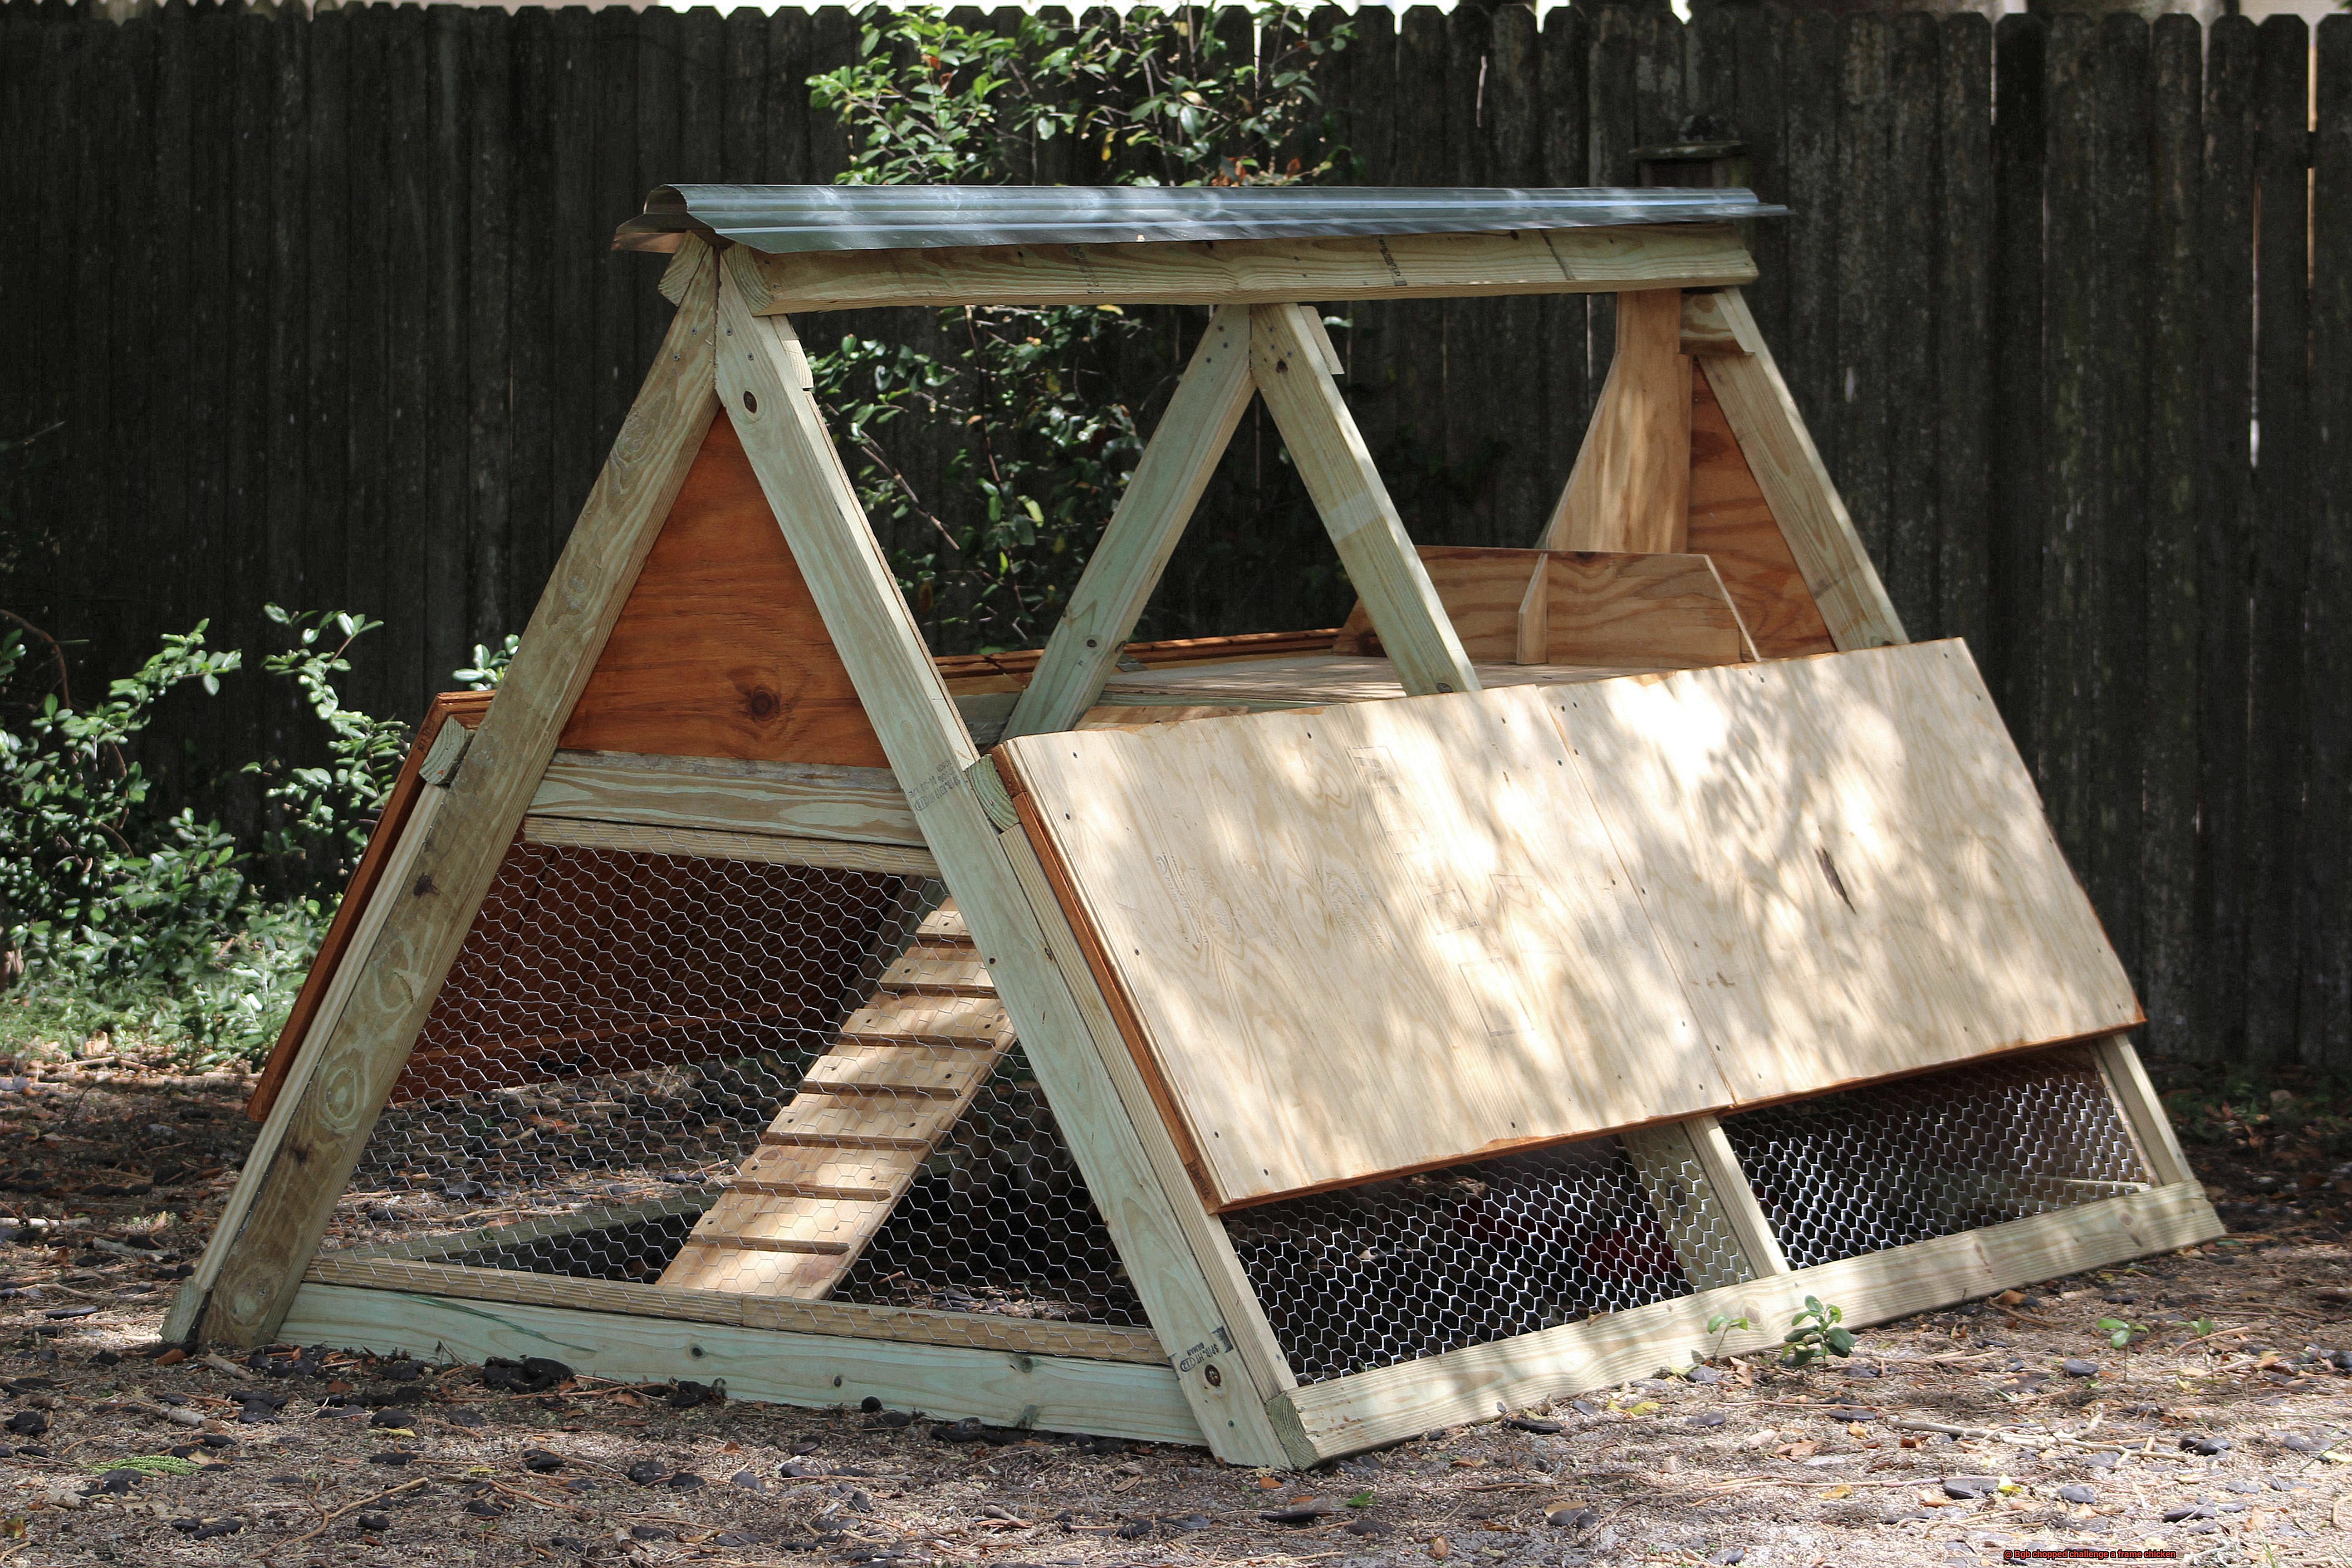
Looking to take your grilling skills to new heights? The A-Frame Chicken technique is here to deliver a mouthwatering experience like no other. By suspending the chicken vertically on a frame or stand, this unique method ensures even cooking and locks in those natural juices. Prepare yourself for a tender and flavorful bird that will steal the show at any barbecue or cookout.
To get started, you’ll need a specially designed frame or stand that securely holds the chicken upright. This genius setup guarantees all sides of the chicken cook evenly while allowing excess fat to drip away, resulting in a tantalizingly crispy skin and moist meat. But first, don’t forget the seasoning. Embrace the power of bold flavors by generously applying a dry rub or marinade of your choice. Think garlic, paprika, black pepper, and fragrant herbs like rosemary or thyme. Ensure every inch of the chicken is coated for maximum flavor infusion.
Once perfectly seasoned, delicately position the chicken onto the A-Frame stand, taking care to achieve proper balance and security. Preheat your grill to medium-high heat, placing the A-Frame Chicken in the center, away from direct flames. Close the lid, and let the magic unfold for approximately 1 to 1.5 hours, depending on your chicken’s size.
Throughout the grilling process, resist the urge to fiddle with perfection. Allow the chicken to cook undisturbed, enabling the heat to penetrate evenly for a succulent outcome. Keep an eye on the internal temperature using a meat thermometer – it should reach a safe 165°F (74°C) for consumption.
To achieve that coveted crispy skin, unleash an irresistible basting session during the last 15 minutes of cooking time. Slather your favorite barbecue sauce or glaze onto the chicken, adding an extra layer of flavor and creating a mesmerizing caramelized finish.
When the chicken reaches its desired temperature, handle it with care as you remove it from the grill. Give it a few minutes to rest before carving, allowing the juices to redistribute throughout the meat, ensuring maximum juiciness in every bite. Finally, carve it into your preferred pieces and serve it piping hot alongside your favorite side dishes.
Monitoring and Adjusting Heat During Cooking
In this article, we will focus on the BGB Chopped Challenge A-Frame Chicken recipe, an impressive technique that guarantees juicy and flavorful chicken. So grab your apron, fire up the grill, and let’s dive into the art of heat control.
The Mighty Meat Thermometer:
The first step in mastering heat control is investing in a reliable meat thermometer. This simple tool will be your guiding light throughout the cooking process, ensuring safe consumption with an internal temperature of 165°F (74°C).
Preheat for Success:
Before placing your chicken on the grill, preheat it to the desired temperature. This ensures even cooking and those mesmerizing grill marks we all love. Adjust the heat by using gas control knobs or positioning charcoal closer or further away from the cooking grate.
Zone Control:
Create different heat zones on your grill to have more control over the cooking process. Arrange charcoal or turn on only some burners on a gas grill to create both direct and indirect heat zones. Searing the chicken over high heat and then moving it to a lower heat zone allows for a beautiful caramelization while ensuring even cooking.
Dance with the Flames:
While grilling, constant monitoring and adjustments are key. If you notice excessive browning or charred spots, lower the heat by reducing gas flames or moving the chicken away from direct heat. Conversely, if you desire more browning or faster cooking, increase the heat accordingly.
The Lid’s Secret Power:
Harnessing the power of your grill lid can create an oven-like environment, promoting even heat distribution. However, remember to lift the lid occasionally to check on the chicken and make any necessary heat adjustments. This prevents sudden temperature fluctuations and guarantees consistent cooking.
Rest and Reap the Rewards:
Once your chicken reaches perfection, remove it from the heat source and let it rest for a few minutes. This allows the juices to redistribute throughout the meat, resulting in a succulent and flavorful chicken. Keep in mind that residual heat will continue cooking the chicken slightly during this resting period.
Carving and Serving the A-Frame Chicken
Carving and serving the A-Frame chicken is a crucial step in creating a delicious and visually appealing dish. This unique chicken preparation, with its crispy skin and juicy meat, requires special attention to ensure that each slice is perfect.
Before diving into the carving process, give the chicken a few minutes to rest. Allowing the juices to redistribute throughout the meat ensures maximum tenderness and flavor. Patience is key here, folks.
Now, armed with a sharp knife, it’s time to start carving. Begin by removing the legs and wings. Carefully cut through the joints, separating them from the body. Keeping the wings intact adds an extra crunch for those who love it.
Moving on to the breasts, make a vertical cut along the breastbone. Slice the succulent meat away from the bone and continue until you reach the bottom. Trust me, this step is worth every effort.
Once you’ve conquered the carving, it’s time to slice those breasts into thin pieces for serving. This makes it easier for your guests to savor every tender bite.
Don’t forget about that carcass. It’s perfect for making a flavorful chicken stock or soup. Simply toss it into a pot with water, vegetables, and seasonings of your choice. Let it simmer for hours and voila.
Now that your A-Frame chicken is beautifully carved, it’s time to present it in all its glory. Arrange the carved pieces on a platter or individual plates. Add some garnishes like fresh herbs or citrus slices for an extra wow factor.
To complete the meal, pair your A-Frame chicken with some roasted vegetables or a fresh salad. It’s all about balance, my friends.
And don’t forget to equip your guests with utensils and condiments to enhance their dining experience. Tangy barbecue sauce or a squeeze of fresh lemon juice make great companions for this flavorful dish.
0RMhM3hIiH8″ >
Conclusion
The bgb chopped challenge has taken the culinary world by storm, pushing chefs to think outside the box and create innovative dishes using a frame chicken. With its unique format and intense time constraints, this competition pushes contestants to their limits, testing their creativity and culinary skills. The challenge requires participants to break down a whole chicken into various cuts and utilize every part of the bird in their dishes. From succulent breasts to flavorful thighs, no part goes to waste in this high-stakes cooking battle.
The concept of using a frame chicken adds an extra layer of difficulty to the competition. Unlike traditional chickens, which are already broken down into individual cuts, a frame chicken is presented as a whole carcass with minimal preparation. Contestants must possess expert butchery skills to dismantle the bird efficiently while keeping each cut intact for presentation.
As the clock ticks down, tension fills the air as chefs scramble to create mouth-watering dishes that showcase the versatility of the frame chicken. They must balance flavors, textures, and presentation in order to impress the discerning judges. Every decision counts – from seasoning choices to cooking techniques – as they strive for perfection in each bite.
The bgb chopped challenge not only tests the technical abilities of chefs but also highlights their ability to think on their feet and adapt quickly. With limited ingredients and time constraints, contestants must rely on their instincts and ingenuity to transform simple cuts of chicken into extraordinary culinary creations.
In conclusion, the bgb chopped challenge featuring a frame chicken is a thrilling display of culinary talent and innovation. It pushes chefs beyond their comfort zones, demanding creativity, precision butchery skills, and quick thinking under pressure.