Are you ready to cook up a storm on your brand-new stove, only to find that you can’t plug it in? Don’t worry, we’ve got your back. Wiring a 4-prong stove outlet might seem daunting at first, but it’s a necessary step to ensure your appliance works correctly and safely.
If you’re feeling overwhelmed by wires, grounded connections, and terminology you’ve never heard of before, fear not. In this blog post, we’ll guide you through the entire process in straightforward terms. We’ll show you how to identify the wires and install the new outlet with ease.
But why do you need a 4-prong stove outlet in the first place? Well, old 3-prong outlets can pose a risk of electrical shock or fire hazards. So if you recently upgraded to a 4-prong stove, it’s essential to follow the specific wiring connection required for safety reasons.
In this post, we’ll provide valuable tips and tricks along the way. And don’t worry if you’re not a handy DIY enthusiast – our step-by-step guide is perfect for beginners too.
So let’s get started on wiring your 4-prong stove outlet. By the end of this post, you’ll have all the knowledge and confidence necessary to safely and securely install it yourself. Get ready to cook up some delicious meals without any pesky plug problems.
Contents
Safety Considerations
Wiring a 4-prong stove outlet is a task that requires careful attention and safety measures. Electrical work can be hazardous, and it’s crucial to prioritize safety by following proper procedures and guidelines to avoid accidents and injuries.
The first and foremost safety consideration is to turn off the power supply before commencing any electrical work. You can do this by shutting off the circuit breaker or removing the fuse that powers the outlet. To confirm that there is no electrical current running through the wires, use a voltage tester.
It’s also essential to use the right tools and equipment for the job. Electrical work requires specialized tools such as wire strippers, pliers, screwdrivers, safety goggles, and gloves. These tools will protect you from potential hazards whilst working.
Grounding the wires is another critical safety consideration when wiring a 4-prong stove outlet. Proper grounding helps protect against electric shocks and other hazards. Ensure that the green grounding wire is securely connected to the grounding screw on the outlet and to the metal frame of the stove.
Lastly, be sure to follow all applicable building codes and regulations when wiring a 4-prong stove outlet. If you’re not familiar with these requirements, it’s always best to seek guidance from a licensed electrician or other qualified professional who can provide advice.
Removing the Old Outlet
Before you can install the new outlet, you must first remove the old one. In this guide, I will walk you through the process of removing the old outlet step by step.
First and foremost, safety is key. Be sure to turn off the power supply to the outlet before beginning. You can do this by flipping the circuit breaker that controls the outlet or unplugging it from the socket. Once you have turned off the power, it’s time to get to work.
Start by removing the cover plate from the old outlet and unscrewing it from the electrical box. As you do this, take note of how the wires are connected to the old outlet. You can make this process easier by taking a photo or labeling each wire with tape.
Now it’s time to detach all wires from the old outlet. The wires are typically connected to screws on the sides of the outlet, which can be loosened with a screwdriver. If there are any wires connected using wire nuts, be sure to loosen them as well.
Once all wires are disconnected, carefully remove the old outlet from its electrical box. You may need to use a screwdriver to loosen any screws holding it in place. It’s essential to inspect the electrical box for any damage or wear and tear once you’ve removed the old outlet. This will help you determine if it needs to be replaced before installing your new 4-prong stove outlet.
Preparing the New Outlet
Before you start cooking up a storm, it’s crucial to prepare the new outlet with care and precision. As an expert on this topic, I’ve compiled some research notes to guide you through the process. Let’s dive in.
Firstly, gather all necessary tools and materials, including a screwdriver, wire stripper, electrical tape, and of course, a new 4-prong stove outlet. Safety should always come first, so turn off the power supply to the circuit you’ll be working on. Use a voltage tester to ensure that no current is flowing through the wires.
Next, remove the old outlet from the wall and label the wires correctly for easy identification. If they are not labeled, use a multimeter to test them. Remember to inspect the wires for any damage or wear and tear and replace them before proceeding.
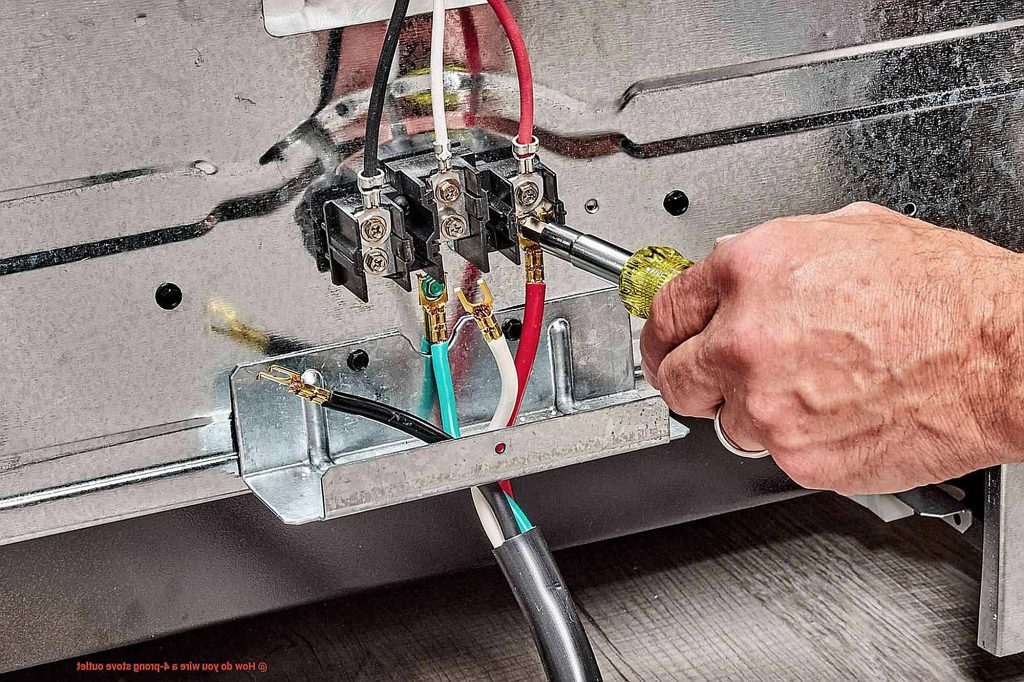
Now it’s time to connect the wires to the new 4-prong stove outlet. Ensure that each wire is connected to its corresponding terminal – ground wire to green screw terminal, neutral wire to silver screw terminal, and two hot wires to brass screw terminals.
Before securing the new outlet in place, double-check that all connections are tight and secure. Wrap electrical tape around each connection for added safety. Attach the new outlet to the wall box using screws and install a cover plate over it.
Once everything is in place, turn on the power supply and use a voltage tester to check if your newly installed 4-prong stove outlet is functioning correctly.
Connecting the Wires to Their Corresponding Terminals
Cooking is a beloved pastime for many people, but it’s important to remember that safety should always come first. When wiring a 4-prong stove outlet, connecting the wires to their corresponding terminals is a crucial step that requires precision and attention to detail.
To begin this process, it’s important to identify the four terminals on the outlet. These are labeled as “X” (red), “Y” (black), “W” (white), and “G” (green). The “X” and “Y” terminals are the hot terminals, while the “W” terminal is the neutral terminal and the “G” terminal is the ground terminal.
Connecting the ground wire is the first step in this process. The ground wire is usually green or bare copper and should be connected securely to the green “G” terminal on the outlet. This wire serves as a safety measure by providing a path for electrical current to flow safely into the earth, rather than through a person or object.
Next, connect the neutral wire to the “W” terminal on the outlet. The neutral wire is usually white and carries current back to the power source. It’s crucial to make sure that this wire is connected securely as loose connections can cause electrical problems such as overheating or short circuits.
Finally, it’s time to connect the two hot wires (red and black) to the “X” and “Y” terminals on the outlet. These wires carry current from the power source to the appliance and are responsible for heating up the stove burners. It’s important to ensure that these wires are connected correctly as reversing them can cause damage to your appliance or even lead to electrical shock.
In summary, connecting the wires to their corresponding terminals on a 4-prong stove outlet requires careful attention and precision. By following these steps carefully, homeowners can safely wire their stove outlet and enjoy cooking without any electrical hazards.
Mounting the New Outlet
Installing a new 4-prong stove outlet might be just the thing you need, and the good news is that mounting it is not as complicated as it may seem. With the right tools and a little bit of patience, you can do it yourself and save some money in the process.
But before we dive into the steps for mounting your new outlet, let’s talk about safety. Always remember that safety should come first when dealing with electrical wiring. Make sure that you turn off the power at the circuit breaker or fuse box before starting any work on the outlet.
Step 1: Cut a Hole in the Wall or Cabinet
The first step in mounting your new 4-prong stove outlet is to decide on the location where you want to install it. Once you have chosen the perfect spot, use a saw to cut a hole in the wall or cabinet. The size of the hole should match the size of the outlet box that you are using. Take your time with this step and measure carefully.
Step 2: Secure the Outlet Box
After cutting the hole, insert the outlet box into it and secure it with screws. Ensure that the box is flush with the wall or cabinet surface.
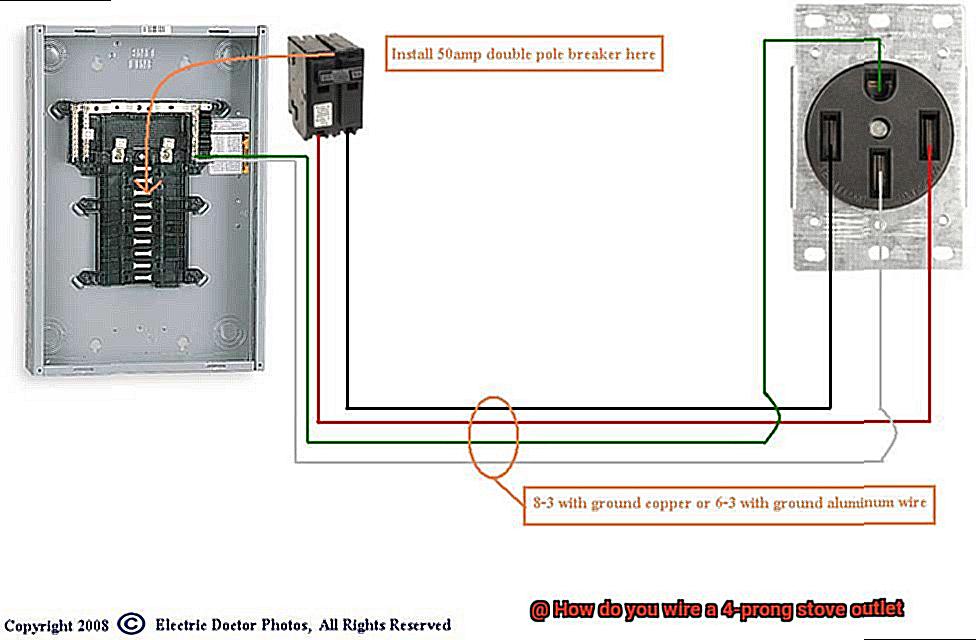
Step 3: Run a Cable to the Outlet Box
Next, run a cable from the circuit breaker or fuse box to the outlet box. Strip about 6 inches of insulation from each end of the cable and feed it through a cable clamp that is attached to the back of the outlet box. Tighten the clamp screws to hold the cable securely in place.
Step 4: Wire the Outlet
Now it’s time to wire your new 4-prong stove outlet. This step might seem tricky, but don’t worry – we’ve got your back. Connect each wire to its corresponding terminal on the outlet. The black wire goes to the brass-colored terminal, the white wire goes to the silver-colored terminal, and the green or bare copper wire goes to the green-colored terminal.
Step 5: Tuck in the Wires and Attach the Cover Plate
Once all the wires are connected, carefully tuck them into the outlet box and attach the outlet cover plate with screws. Make sure that everything is secured tightly.
Testing the New Outlet
Don’t skip the essential step of testing your outlet first. It’s crucial to ensure that your outlet is correctly installed and can handle the required voltage and amperage for your appliances’ safety.
Testing the new outlet is no rocket science, thanks to a handy device called the multimeter. This tool measures electrical current, voltage, and resistance, making it a must-have for electrical work. However, before you start testing, ensure that you turn off the power supply to the outlet by turning off the circuit breaker or unplugging it from the wall.
Now, let’s get testing. Set your multimeter to measure AC voltage and touch one of the probes to the neutral wire, which is typically white, and the other probe to the hot wire, usually black or red. Confirm that the voltage reading matches your outlet’s voltage rating – if it’s rated for 240 volts, then your multimeter should display a reading close to that number.
Moving on, touch one of the probes to the ground wire, which is green or bare copper, and the other probe to either of the hot wires. You should see a voltage reading of zero or close to it. If not, there might be an issue with your wiring or grounding.
Finally, check for continuity between the ground pin on the outlet and the ground wire by setting your multimeter to measure continuity or resistance. Touch one of the probes to the ground pin on the outlet and the other probe to the ground wire. If there’s no continuity, it’s time to check your wiring or replace the outlet.
Common Mistakes to Avoid When Wiring a 4-Prong Stove Outlet
Wiring a 4-prong stove outlet is a task that requires precision and attention to detail. However, there are some common mistakes that people make which can lead to serious safety hazards. To help you avoid these mistakes, we’ve compiled some research notes to guide you in your wiring journey.
First and foremost, always turn off the power supply before beginning any work on the outlet. This may seem like common sense, but it’s crucial to prevent electrocution or electrical fires. Take this step seriously and double-check that the power supply is off before proceeding.
Another crucial mistake to avoid is using the wrong gauge wire. It’s important to use wire that is rated for at least 50 amps so that it can handle the electrical load without overheating. Using anything less can lead to dangerous situations like sparks or fires. Make sure to use the right gauge wire to ensure your safety.
In addition, it’s important to ensure that all wires are tightly secured and properly connected. Loose wires can cause sparks and other dangerous situations, so it’s vital to double-check everything before turning on the power supply. Follow the manufacturer’s instructions or local codes closely as these guidelines are in place for a reason and must be followed exactly as they are outlined.
Moreover, local codes may have specific requirements that must be met for safety reasons, so it’s important to research these codes before beginning any work on the outlet. This will give you an idea of what’s allowed and what isn’t, ensuring that you don’t overlook any critical safety measures.
Finally, don’t overload the outlet by plugging in too many appliances at once. This can cause the circuit breaker to trip or even start a fire, so it’s important to be mindful of how much power is being used at any given time. Take note of how much power each appliance uses and avoid plugging in too many appliances at once.
C2hj6ng0YDM” >
Conclusion
In summary, wiring a 4-prong stove outlet may seem daunting, but it’s a critical step to ensure your appliance operates safely and correctly. Upgrading from an outdated 3-prong outlet is vital to avoid electrical shock or fire hazards.
Prioritizing safety is essential when wiring a 4-prong stove outlet. Ensure you adhere to proper procedures and guidelines to prevent accidents and injuries. This includes turning off the power supply before starting any electrical work, using the correct tools and equipment, grounding wires securely, and following all applicable building codes and regulations.
Wiring a 4-prong stove outlet involves several necessary steps, such as removing the old outlet, preparing the new one, connecting wires to their corresponding terminals, mounting the new outlet, and testing it. However, there are common mistakes people make that can lead to serious safety hazards. Avoid using the wrong gauge wire or overloading the outlet with loose connections.
By taking these steps carefully and avoiding common mistakes when wiring a 4-prong stove outlet, homeowners can safely wire their stove outlets and enjoy cooking without any electrical hazards.