Imagine this: the sun is shining, the birds are chirping, and the mouth-watering smell of grilled food is filling the air. But there’s a problem – your charcoal grill just can’t keep up. You’re either left with undercooked food or constantly adding charcoal every few minutes, which is not only frustrating but also time-consuming. Don’t worry though, my dear reader. In this post, we’ll share some pro tips on how to keep your charcoal grill going for hours, ensuring perfectly cooked meals every time.
First things first – proper preparation is key. We’ll dive into why it’s important to prep your grill before you start cooking. Then we’ll explore different types of charcoal and how to choose the perfect one for your grill. From there, we’ll move onto lighting techniques and maintaining an even temperature throughout your cooking session. Plus, we’ll throw in some handy tools and accessories that can make grilling a breeze. And last but not least, we’ll wrap up with some crucial safety tips that every grill master should know.
By the end of this post, you’ll have all the knowledge you need to keep your charcoal grill going strong and impress your friends and family with perfectly grilled meals that will leave them craving more. So let’s get started. Fire up that grill and let’s cook up a storm together.
Contents
Preparing the Grill for Long Hours of Grilling
Grilling is a beloved pastime for many, and there’s nothing quite like the taste of perfectly grilled food. However, for those who want to grill for extended periods, it’s essential to prepare your grill correctly. By taking the time to prepare your charcoal grill, you can ensure that your food is cooked evenly and that your grill stays well-maintained.
To start, thoroughly clean your grill by removing any ashes, debris, and leftover food particles from the previous grilling session. A clean grill not only ensures that your food tastes great but also prevents any flare-ups while cooking.
Once your grill is clean, make sure you have enough charcoal to last for the whole grilling session. It’s always better to have too much than too little. Use a chimney starter to light the charcoal evenly, eliminating any chemical flavors from lighter fluid. Adjust the vents on your grill to control the airflow and temperature.
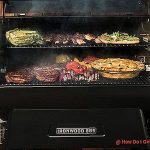
Creating different temperature zones on your grill is also essential. Arrange your charcoal in a way that there are hot spots and cooler spots on the grill. This allows you to have more control over the cooking temperature and cook different types of food at the same time.
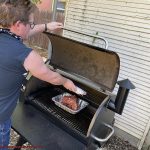
Using a drip pan underneath your food can prevent flare-ups while adding moisture and flavor. Additionally, oiling your grill grates before starting to cook helps prevent sticking and keeps your grill grates well-maintained. To do this, use a paper towel dipped in vegetable oil or spray non-stick cooking spray directly on the grates.
One of the most critical things to remember when grilling for long periods is to resist constantly checking on your food. Trust your temperature gauge and only check on your food when necessary. Every time you lift the lid of your grill, you let out heat and disrupt the cooking process.
Cleaning the Grill
Properly cleaning your grill after every use is essential for its longevity and preventing any potential health hazards from food contamination. Here are some steps to help you clean your grill effectively.
Step 1: Let It Cool Down
Before you start cleaning your grill, make sure to let it cool down completely after use. No one wants to risk getting burned or accidentally starting a fire while cleaning their grill.
Step 2: Remove Debris
Once your grill has cooled down, remove any leftover ashes and debris from the grill grates and ash pan using a scraper or brush. This step is crucial to avoid any flare-ups during future use and to prevent any unwanted flavors from affecting your food.
Step 3: Clean The Grates
After removing the debris, use warm, soapy water and a sponge or cloth to clean the grill grates thoroughly. Rinse the grates with clean water and dry them with a towel before putting them back on the grill. This will help prevent rust formation on the grates and ensure your food doesn’t stick during future grilling sessions.
Step 4: Wipe Down The Exterior
To wipe down the exterior of the grill, use a multi-purpose cleaner or stainless steel cleaner to clean the surfaces. Avoid using abrasive cleaners or scrubbers that could scratch the surface of the grill. A clean exterior not only looks great but also helps prevent rust formation.
Step 5: Check And Clean The Burner Tubes And Ignition System
Regularly check and clean the burner tubes and ignition system using a wire brush or toothbrush to remove any debris or buildup around these areas. This step will ensure your grill heats evenly and ignites properly during future use.
Bonus Tips:
- Use a grill cover when your grill is not in use to protect it from the elements.
- Deep clean your grill at least once a year, including removing and cleaning the burners and inspecting the gas lines for any damage.

Using a Chimney Starter to Light Charcoal
Grilling is one of the most popular summertime activities, but getting the charcoal lit can be a frustrating experience. Lighter fluid is often used, but it can leave a lingering unpleasant taste on your food and pose safety hazards. Fortunately, there’s a better way to light your charcoal: using a chimney starter.
A chimney starter is a simple yet effective device that can make a big difference in your grilling experience. It’s a metal cylinder with a grate at the bottom and a handle on the side. Here are some reasons why using a chimney starter to light your charcoal is the way to go:
Quick and Easy:
One of the main advantages of using a chimney starter is how quick and easy it is. In just 15-20 minutes, you’ll have hot coals ready to use, which is much faster than other methods like using lighter fluid. All you have to do is fill the cylinder with charcoal and light a piece of newspaper underneath the grate. The fire will catch the charcoal and start it burning, no fuss required.
No Unpleasant Taste:
Using lighter fluid can leave an unpleasant taste on your food, but using a chimney starter won’t affect the flavor at all. You’ll get pure, clean heat that won’t taint the taste of your meat or vegetables.
Keep Your Grill Hot for Hours:
To keep your grill hot for hours, you can add more charcoal as needed. As the charcoal burns down, simply add more to keep the heat going. This feature is especially useful if you’re cooking something that takes a long time, like a brisket or ribs.
Safe and Environmentally Friendly:
Another benefit of using a chimney starter is that it’s safer than other methods like using lighter fluid. Lighter fluid can be dangerous if not used properly, whereas using a chimney starter is very straightforward and safe. Additionally, using lighter fluid can produce harmful chemicals that are not good for the environment. By using a chimney starter, you’ll be doing your part for the planet.
Adjusting Vents to Control Temperature
Grilling is more than just cooking food; it’s an art that requires mastery of technique and tools. As a charcoal grilling expert, one of the most crucial techniques to learn is adjusting your vents to control temperature.
To start, locate your grill’s intake and exhaust vents. The intake vent is located at the bottom of the grill and controls the amount of oxygen that flows into the grill. The exhaust vent is located at the top and controls the amount of heat and smoke that escapes from the grill.
Once you’ve found these vents, you can start adjusting them like a pro. To increase the temperature, open up both vents to allow more oxygen in and more heat out. To decrease the temperature, close both vents partially or entirely to restrict oxygen flow. But remember to make small adjustments gradually while monitoring the temperature constantly.
Avoid sudden changes in temperature as it can shock your food and ruin the cooking process. Patience is key when adjusting vents. Rome wasn’t built in a day, and your perfect steak won’t be grilled in a minute.
To ensure that you’re cooking at a consistent temperature, it’s essential to use a thermometer. This way, you can avoid overcooking or undercooking your food and achieve that perfect doneness every time.
Adding Charcoal Carefully
It’s not just about knowing how much charcoal to use, but also how to add it in a way that maintains consistent heat and prevents flare-ups.
The first step in adding charcoal carefully is to make sure you have enough on hand. There’s nothing worse than running out of fuel halfway through cooking, so it’s always better to have more than you think you’ll need.
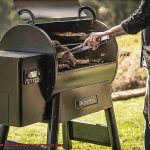
When it comes time to add the charcoal, don’t make the mistake of dumping a bunch of fresh charcoal on top of hot coals. This can cause uneven cooking and flare-ups that can ruin your food. Instead, add small amounts of fresh charcoal at a time and spread them out evenly across the grill.
Timing is also crucial when adding charcoal. You want to add fresh charcoal before the existing coals have burned out completely to maintain a consistent temperature and even cooking.
To add the charcoal, use long-handled tongs or a specialized charcoal tool to avoid getting burned. Carefully lift the grate and place the fresh charcoal in small piles around the grill, making sure they’re spread out evenly. Once you’ve added the charcoal, let it sit for a few minutes to heat up before starting to cook.
In addition to these tips, here are some other things to keep in mind when adding charcoal:
- Use high-quality charcoal for best results
- Avoid using lighter fluid as it can affect the taste of your food
- Consider using a chimney starter to light your charcoal before adding it to the grill
Using a Drip Pan to Prevent Flare-Ups and Add Flavor
Grilling on charcoal is an age-old tradition that has stood the test of time. But if you’ve ever experienced a flare-up, you know how frustrating it can be to watch your food go up in flames. That’s where the drip pan comes in – it’s a simple yet effective tool that can prevent flare-ups and add flavor to your food at the same time.
Picture this – as you cook your juicy meat or vegetables on the grill, the drippings fall onto the coals and cause a sudden burst of flame. This can leave your food charred and unevenly cooked. But with a drip pan placed under your food, you can collect those drippings and prevent them from falling onto the coals. This means no more flare-ups and perfectly cooked food every time.
Now, let’s talk about adding flavor. A drip pan is not just a functional tool but also a versatile one. You can add liquid like beer, wine, or broth to the pan to create steam that infuses additional flavor into your food. You can even add herbs, garlic, or onions to give it a delicious aroma that will make your mouth water.
But how do you use a drip pan? It’s simple – just place it on the grate of your charcoal grill and fill it with liquid if desired. Then place your food on top of the grate directly above the drip pan. Don’t forget to keep an eye on the liquid level in the pan and add more as needed throughout the cooking process.
One thing to keep in mind is that not all foods require a drip pan. If you’re grilling lean meats like chicken breasts or vegetables, a drip pan might not be necessary. But if you’re cooking fatty meats like pork ribs or beef brisket, using a drip pan can make all the difference.
Avoid Constantly Checking on Food
Not only does this disrupt the cooking process, but it also leads to a loss of heat and smoke – key components for achieving the perfect flavor. Fear not, as an expert in this area, I’ve gathered some tips to help you avoid this temptation and let your food cook undisturbed.
First and foremost, invest in a meat thermometer. This handy tool allows you to monitor the internal temperature of your food without repeatedly opening the grill lid, which can cause heat to escape. Different types of meat require different internal temperatures to be considered safe for consumption, so make sure you do your research before grilling. For instance, chicken should be cooked to an internal temperature of 165°F, while beef can be cooked to a lower temperature depending on the desired level of doneness.
In addition to using a meat thermometer, setting a timer based on the estimated cooking time for each type of food is also crucial. This ensures that you don’t forget about your food but also prevents you from constantly disturbing it. Remember that thicker cuts of meat require longer cooking times than thinner ones.
Lastly, try your best to resist the urge to move or flip your food too often. Each time you do so, you risk losing heat and smoke, which can ultimately affect the texture and flavor of your final product. Instead, let your food cook on one side until it develops a nice sear before flipping it over.
By following these tips, you’ll avoid constantly checking on your food and achieve delicious results every time. So sit back, relax, and let your charcoal grill work its magic. In summary:
Tips for Keeping Charcoal Grills Going for Hours
- Clean Your Grill: Start with a clean slate by removing any leftover ashes or debris from previous uses. This ensures a consistent temperature and prevents flare-ups.

-
Use the Two-Zone Cooking Method: Create separate hot and cooler zones on your grill. Sear your meats on the hot side before moving them over to finish cooking on the cooler side. This technique prevents under or overcooking and guarantees an even cook.
- Use a Chimney Starter: Avoid using lighter fluid and opt for a chimney starter to light your charcoal. This method ensures all of the charcoal is lit evenly and eliminates any chemical flavors that could affect the taste of your food.
-
Monitor Temperature: Keep an eye on the temperature of your grill throughout the cooking process. Adjust the vents or add more charcoal or wood chunks as necessary to maintain the desired temperature.
- Close Vents When Finished: After finishing cooking, close all vents on your grill to extinguish any remaining coals safely. This will prevent any fire hazards and allow you to reuse any leftover charcoal for future grilling sessions.
ieRNhjBIN_M” >
Conclusion
As a charcoal grilling expert, you know that mastering the art of grilling requires not only skill but also the right tools and techniques. To keep your grill going for hours and achieve perfectly cooked meals every time, proper preparation is key.
Before starting to cook, make sure to prep your grill properly. Choose the perfect type of charcoal and light it using a chimney starter. Maintaining an even temperature throughout your cooking session is crucial, so consider creating different temperature zones on your grill.
To prevent flare-ups while adding moisture and flavor to your food, use a drip pan underneath it. And don’t forget to oil your grill grates before starting to cook – this will help prevent sticking and keep them well-maintained.
One of the most critical things to remember when grilling for long periods is to resist constantly checking on your food. Trust in the process and let it work its magic.
By following these tips and tricks, you’ll be well-equipped to keep your charcoal grill going strong. Impress your friends and family with perfectly grilled meals that will leave them craving more.
You may also like: