Do you find yourself constantly overcooking or undercooking your favorite cuts of meat?
Are you searching for a more instinctual way to ensure your steak is juicy and cooked to perfection without relying on a kitchen thermometer? Look no further.
In this blog post, we’ll delve into the art of determining meat doneness without the aid of a thermometer. Whether you’re a novice cook or a seasoned chef, this guide will unveil some incredible techniques that will leave your loved ones in awe of your ability to consistently serve up flawlessly cooked meat.
So, let’s jump right in and uncover the secrets to mastering the art of gauging meat doneness without a thermometer.
Contents
Visual Cues
While thermometers are a reliable tool, there are instances when you need to rely on your instincts and observation. Visual cues become your secret weapon in these situations. By keenly observing the color, texture, juices, and surface appearance of the meat, you can master the art of determining its doneness without the need for a thermometer.
Color:
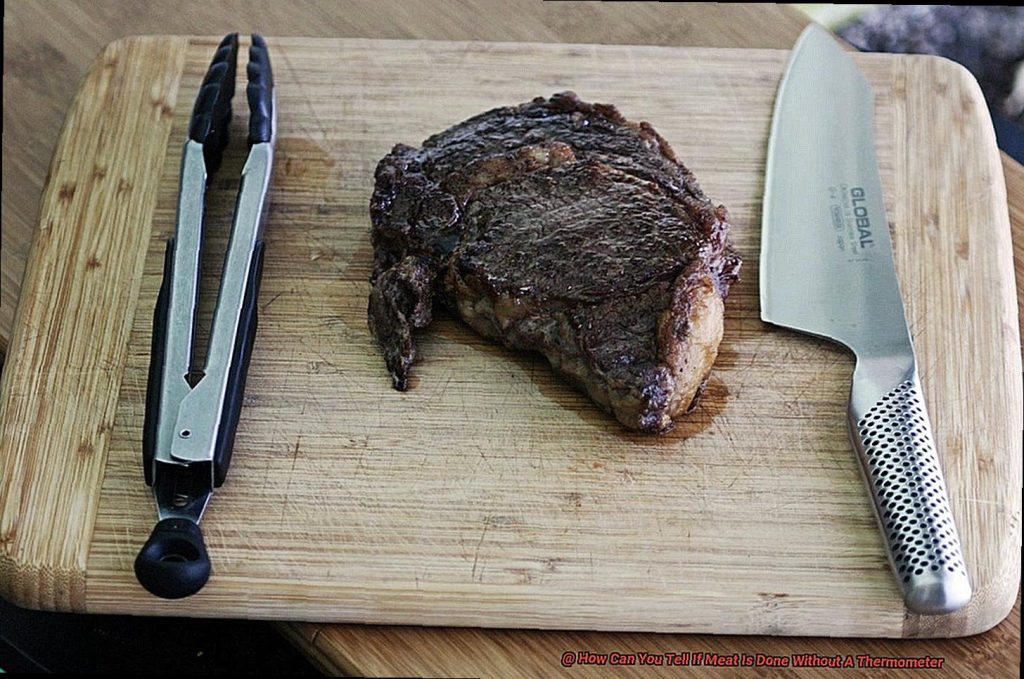
The color of the meat is a critical visual cue. For beef, a rare steak boasts a vibrant red or pink center, while medium-rare presents a pink center with a delectable brown crust. As it continues to cook, the center transitions to brownish hues for medium doneness and fully browned territory for well-done. Poultry, like chicken or turkey, should exhibit a white or pale yellow center when cooked to perfection.
Texture:
The sense of touch also holds valuable clues about meat doneness. A rare steak will yield softly under your touch, while a well-done steak will offer firm resistance. Gently pressing on the meat with your finger or using tongs allows you to assess its firmness accurately.
Juices:
When meat reaches perfection, its juices should run clear. Transparent juices in poultry signify that it is fully cooked and safe to eat. However, if the juices appear bloody or retain a pinkish hue, it’s an indication that further cooking is necessary.
Surface Appearance:
The appearance of the meat’s surface provides another visual cue. A well-cooked piece flaunts a crispy and beautifully browned exterior, showcasing excellent searing and cooking skills. Conversely, an undercooked piece looks pale or grayish.
Touch Test
Grilling is an art form that requires precision, skill, and a touch of intuition. While many rely on meat thermometers to determine doneness, seasoned grill masters know that the Touch Test is an invaluable tool in their arsenal. In this article, we will delve into the secrets of the Touch Test, providing you with expert advice on how to determine the perfect level of doneness for your grilled meat.
Understanding the Basics: Different Levels of Doneness:
Before we dive into the nitty-gritty details of the Touch Test, let’s establish some fundamental knowledge about different levels of doneness. A rare steak should feel soft and springy, while a well-done steak should be firm and resistant. Armed with this knowledge, you’re ready to put your detective skills to work.
The Touch Test Technique: A Sensory Journey:
To properly perform the Touch Test, simply press the center of the meat with your fingertip or the back of a spoon. Pay close attention to how it feels and compare it to our guidelines:
- Rare: The meat will feel very soft, leaving an indentation when pressed. It will be juicy and offer a lot of give.
- Medium-Rare: Slightly firmer than rare, it will still have some give and resistance when pressed. Juiciness is key.
- Medium: A firm yet springy texture will be present, with less give than medium-rare. Expect moderate juiciness.
- Medium-Well: Quite firm with minimal give, this level lacks juiciness compared to the previous stages.
- Well-Done: Expect a very firm, almost hard texture with no give. Unfortunately, juiciness is scarce at this stage.
Mastering the Technique: Sharpening Your Detective Skills:
The Touch Test is not foolproof and takes practice to master. Factors such as meat thickness, cooking method, and personal preference can influence the outcome. Embrace trial and error to refine your skills and become confident in your ability to determine doneness.
Visual Cues: The Detective’s Toolkit:
While the Touch Test is an excellent method, you can enhance your detective skills by observing visual cues. Look for a seared and browned exterior on a perfectly cooked steak or ensure that there are no pink juices running out of a chicken breast when pierced with a knife.
Meat Juices
Meat juices are a crucial aspect of cooking meat, especially on a grill. They provide valuable information about the doneness of the meat and can be used as an indicator to determine if it is cooked to perfection, even without the use of a thermometer.
When meat is cooked, it releases juices that contain a combination of water, proteins, fats, and other flavor compounds. These juices undergo a remarkable transformation as the meat cooks further. The color and consistency of the meat juices are two key indicators of doneness.
Let’s start with color. When meat is raw or undercooked, the juices are usually clear or slightly pink. However, as it reaches its desired level of doneness, the juices change in color. For well-done meat, the juices should run clear or have a very faint pink tinge. This tells you that the meat has reached a high internal temperature and any potential harmful bacteria have been eliminated. On the other hand, if the juices appear pink or have a reddish hue, it’s a sign that the meat may still be undercooked.
Now let’s talk about consistency. As the meat cooks, its proteins firm up, causing the juices to become thicker and more gel-like. When the meat is still raw or undercooked, the juices will be thin and watery. But as it reaches its desired level of doneness, the juices will become thicker and more viscous. You can observe this change in consistency by cutting into the meat or gently pressing down on it to see how the juices flow.
It’s important to note that while visual cues from meat juices can provide a general indication of doneness, they’re not as reliable as using a meat thermometer. A thermometer ensures accuracy and eliminates any guesswork when it comes to cooking meat to a safe internal temperature. But in a pinch, relying on visual cues from meat juices can be a helpful alternative.
Time and Temperature Guidelines
Grilling season is in full swing, and the tantalizing scent of sizzling meat on a hot grill fills the air. But amidst the excitement of creating mouthwatering dishes, it’s crucial to pay attention to time and temperature guidelines. These guidelines ensure that your food is not only delicious but also safe to eat.
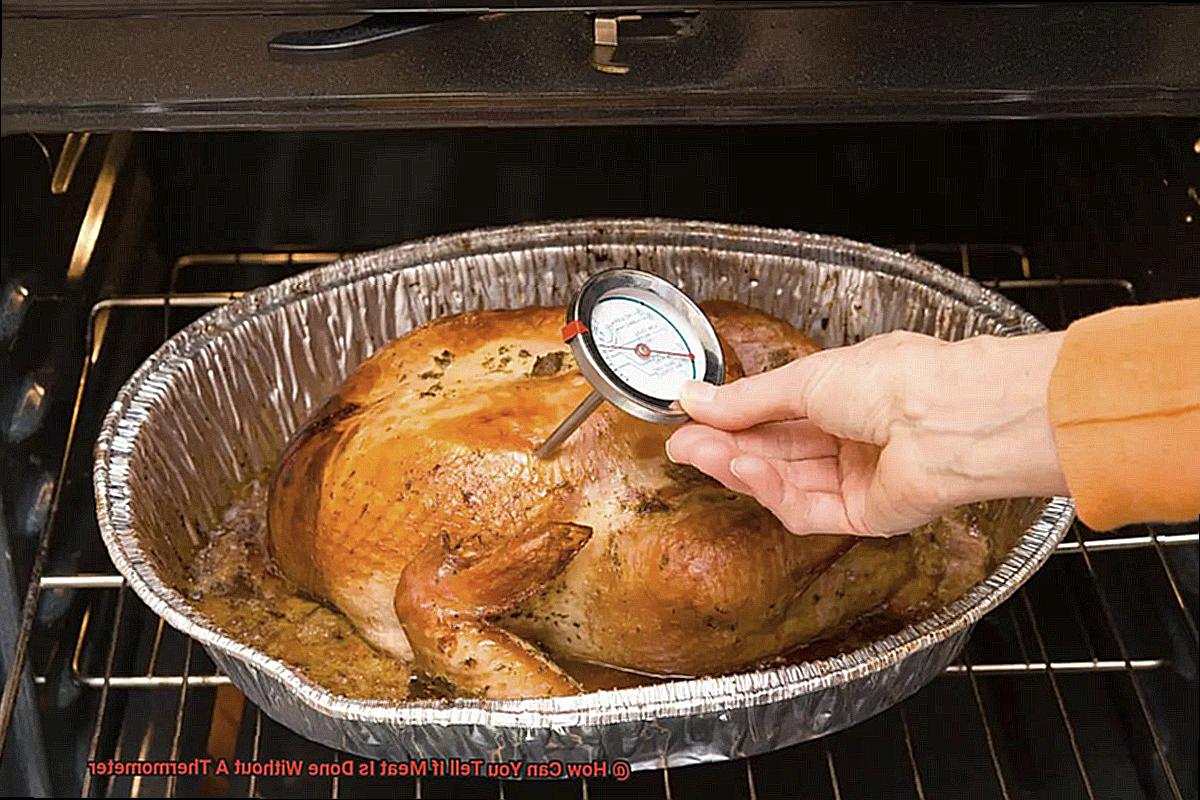
Different types of meat have different recommended cooking times and temperatures. The United States Department of Agriculture (USDA) provides general guidelines based on the internal temperature at which harmful bacteria are killed. For instance, chicken should be cooked to an internal temperature of 165°F (74°C), while beef can be cooked to a lower internal temperature depending on the desired level of doneness.
“But won’t following these guidelines result in overcooked meat?” you might wonder. It’s a valid concern. These guidelines prioritize safety, and they may indeed lead to well-done meat, which some people may find overcooked. However, it’s essential to remember that cooking times and temperatures can vary depending on the method used – grilling, baking, or frying – allowing for more flexibility in achieving desired levels of doneness.
Visual cues can be helpful indicators if you don’t have a thermometer on hand. Chicken should have clear juices running from it when pierced with a fork, and the meat should no longer be pink. Fish should be opaque and flake easily with a fork. Beef can be checked for doneness using the finger test, where pressing on the meat gives an indication of its level of doneness.
While visual cues provide a general idea, relying solely on them may not always be accurate, especially for poultry and ground meats that can appear pink even when fully cooked. To ensure accuracy, it is highly recommended to use a food thermometer. This is particularly important for larger cuts of meat or when cooking poultry or ground meats.
Resting Period
Well, prepare to be enlightened by the secret ingredient that will revolutionize your cooking: the resting period. Yes, my friends, the resting period is the key to unlocking maximum flavor and tenderness in your grilled masterpieces. Once you embrace this essential step, you’ll wonder how you ever grilled without it.
Let’s dive into the captivating world of the resting period and uncover its magic. When meat encounters the searing heat of the grill, its muscle fibers tighten like a coiled spring, causing precious juices to escape. But fear not. By giving your meat a well-deserved rest, those fibers gradually loosen, allowing the juices to reabsorb. The result? A succulent, melt-in-your-mouth piece of meat that will make your taste buds sing with joy.
Now, how long should this transformational rest be? It depends on the size and type of meat you’re grilling. For smaller cuts like steaks or chicken breasts, a quick 5 to 10-minute rest should suffice. But if you’re tackling a grand roast or a whole bird, be patient for 15 minutes to an hour. Remember, during this resting period, the internal temperature of the meat continues to rise by a few degrees, so plan accordingly if you have specific doneness in mind.
But wait, there’s more. The resting period also ensures an even distribution of heat throughout the meat. As you grill, the outer layers firm up while the center leisurely catches up. Slicing into it prematurely would yield some parts that are scorching hot and others that are disappointingly undercooked. However, when you grant your meat a well-deserved rest, the heat evens out like a symphony orchestra playing in perfect harmony. The result? A perfectly cooked piece of meat that will have your friends and family convinced you possess grilling genius.
Let’s not forget the practical benefits of the resting period. It makes your meat easier to handle and carve, minimizing the risk of losing those precious, tantalizing juices. Plus, it grants you a few extra minutes to set the table, grab a refreshing beverage, and prepare to relish every delectable bite.
Other Factors to Consider
When it comes to grilling, determining if your meat is done to perfection is a crucial skill every backyard chef should possess. But what if you don’t have a thermometer on hand? Fear not, my fellow grill masters. There are several other factors to consider that can help you determine if your meat is cooked just right.
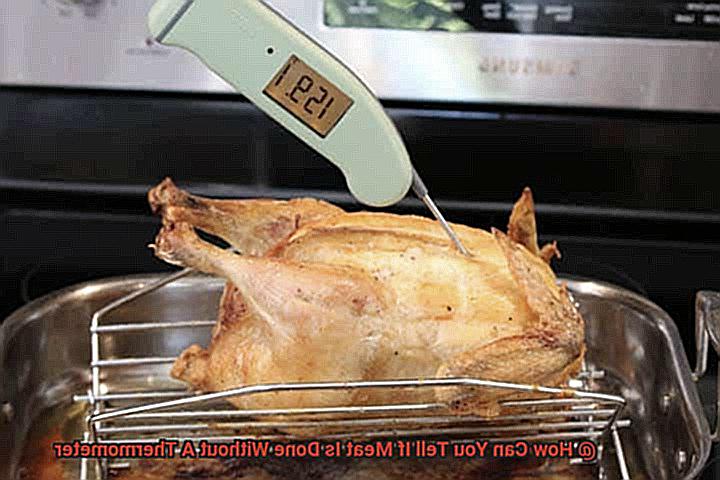
First and foremost, let’s talk about the type of meat you’re grilling. Each type has its own guidelines for doneness. For poultry like chicken and turkey, you want to see clear juices flowing and an internal temperature of 165°F (74°C). Cut into the thickest part of the meat and check for any pink or bloody areas. If you spot them, keep grilling.
Now, let’s move on to thickness. Thicker cuts of meat will take longer to cook than thinner ones. It’s important to adjust your cooking time accordingly. To gauge the doneness of a steak, try the finger test – compare the firmness of the meat to different parts of your hand. The more resistance it gives when pressed, the more well-done it is.
The cooking method itself plays a significant role as well. Grilling can create a beautifully charred exterior while leaving the interior undercooked. To ensure food safety, make sure your meats are thoroughly cooked before indulging in their juicy goodness.
Don’t underestimate the power of marination and resting time. Marinating meats in acidic ingredients can partially cook them, so be sure to separate marinating time from actual cooking time. And after you’ve grilled your masterpiece, allow it to rest for a few minutes. This allows the muscle fibers to relax and reabsorb those delectable juices, resulting in a tender and flavorful bite.
Lastly, let’s not forget personal preferences. Some people prefer their meat rare, while others like it well-done. Adjust your cooking time based on individual tastes to achieve that perfect level of doneness.
Tips for Mastering the Art of Doneness
Cooking meat to the perfect level of doneness can be a challenge, especially if you don’t have a thermometer on hand. However, with a keen eye, intuitive touch, and a few tricks up your sleeve, you can master the art of doneness and create deliciously cooked meat every time. In this comprehensive guide, we will explore five key tips and techniques to help you achieve the best results without relying on a thermometer.
Visual Cues: The Eye of the Grill Master
When grilling meat, visual cues can provide valuable insights into its doneness. Pay close attention to the color and firmness of the meat. A rare steak will be bright red and soft when touched, while a medium-rare steak will have a pink center and slightly firmer texture. As the meat cooks further, it will turn brown and become progressively firmer. Trust your eyes to guide you towards the perfect level of doneness.
The Touch Test: Feel Your Way to Perfection
When cooking cuts of meat that are too thick to judge by sight alone, use the touch test. By pressing on the meat with your fingers or using the “finger test,” you can assess its elasticity and firmness. A well-done steak will feel firm with little give when pressed, while a medium steak will be slightly springy. Let your fingertips become your own personal meat thermometer.
The Juicy Truth: Checking Meat Juices
The appearance of juices can also indicate doneness. When meat is cooked, its juices run clear. Cut into the meat and observe the color and consistency of the juices. If they are clear and slightly pink for poultry or clear for beef, it is likely still rare or medium-rare. As the meat cooks further, the juices should become more transparent and run clear. Follow the path of the juices to the perfect doneness.
Resting is Besting: The Importance of Resting
Resting meat is a crucial step often overlooked. After removing meat from the heat source, let it rest for a few minutes. During this time, the residual heat redistributes within the meat, resulting in a more even and flavorful final product. Resting also allows the juices to settle, preventing them from spilling out when the meat is cut. Embrace the waiting game and taste the rewards.
Guidelines and Adjustments: Finding Your Perfect Timing
While general cooking times can serve as guidelines, it’s important to consider other factors and make adjustments based on personal preferences and specific cooking conditions. Thickness and initial temperature can affect cooking times. Experiment with different times and techniques, take note of your observations, and adjust accordingly. Let your own culinary journey shape your mastery of doneness.
The Importance of Using a Thermometer
In this article, we will delve into the importance of using a thermometer accurately and how it can benefit us in our everyday lives.
Ensuring Food Safety:
The safety of our food should always be a top priority. By using a thermometer, we can accurately measure the internal temperature of our cooked meat, ensuring that it reaches the recommended temperatures for safe consumption. This is especially crucial for proteins like poultry, pork, and ground meats, which can harbor harmful bacteria if not cooked to the appropriate temperature. With a thermometer in hand, we eliminate the guesswork and make sure that our meals are safe for ourselves and our loved ones.
Achieving Perfect Doneness:
Have you ever dreamt of achieving that perfect level of doneness when cooking meat? A thermometer is your trusty guide on this journey. It allows you to measure the internal temperature of the meat accurately, ensuring that it reaches the desired level of doneness. Whether you prefer a juicy medium-rare steak or tender well-done chicken, a thermometer helps you achieve optimal flavor and tenderness without any disappointments.
Consistency is Key:
Consistency is key in the realm of cooking. By following specific temperature guidelines for different types of meat, we can ensure that every batch we cook is consistently cooked to perfection. No more worrying about unevenly cooked meat or being unsure if it’s done. With a thermometer as our ally, we can replicate our culinary triumphs time and time again, impressing guests and creating memorable dining experiences.
Types of Thermometers:
Investing in a good-quality food thermometer is an investment in our culinary adventures. Instant-read thermometers are perfect for quick readings, while probe thermometers allow us to monitor the internal temperature throughout the cooking process. Choose the one that suits your cooking style and never look back.
p5YU-g_mTeE” >
Conclusion
Determining if meat is done without a thermometer may seem like a daunting task, but fear not. There are several tried-and-true methods that can help you gauge the doneness of your meat with nothing more than your senses and a few simple techniques.
One method is the touch test. By using your fingers to press on different parts of the meat, you can get a sense of its firmness and elasticity. For example, a rare steak will feel soft and squishy when pressed, while a well-done steak will be firm and resistant to pressure. It’s all about finding that sweet spot where the meat feels just right.
Another technique is the color check. As meat cooks, it undergoes chemical changes that cause its color to change as well. For instance, raw poultry will have pink or red hues, but once fully cooked, it should turn white or pale yellow. Similarly, beef can go from pink to brown as it reaches the desired level of doneness. Keep an eye on these color transformations to ensure your meat is cooked to perfection.
Don’t forget about the good old-fashioned visual inspection. Cutting into the thickest part of the meat and examining its internal appearance can give you valuable clues about its doneness. Look for clear juices running out of the cut – if they’re still pink or bloody, more cooking time is needed. On the other hand, if the juices run clear or only have a hint of pinkness, your meat is likely cooked through.
Lastly, trust your instincts and rely on experience. With practice, you’ll develop an intuition for when meat is done based on how it looks and feels. Remember that practice makes perfect – keep experimenting in the kitchen and soon you’ll be able to tell if your meat is done without even thinking twice.
In conclusion, while using a thermometer provides precise results when determining if meat is done, there are alternative methods available for those without one at hand. By mastering the touch test, color check, visual inspection, and trusting your instincts, you can confidently cook meat to perfection without relying on a thermometer.