Are you tired of serving up burgers that are as dry as the Sahara and lacking in flavor? Do you want to take your burger game to the next level and create the perfect patty every time? Look no further than the reverse sear method.
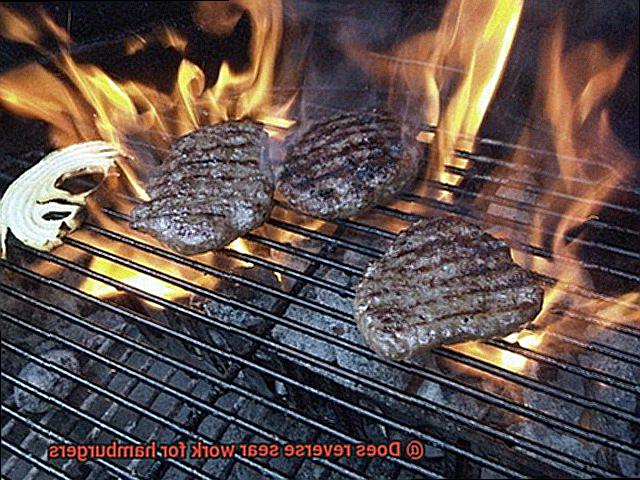
Traditionally, hamburgers are cooked by searing them on high heat to develop a crispy outside while keeping the inside juicy and flavorful. But what if we told you there was a better way? The reverse sear method flips the script by cooking the burgers low and slow first before finishing them off with a high-heat sear. And let us tell you, it works wonders for hamburgers.
The answer is a resounding yes. Reverse searing allows you to cook your burgers evenly and avoid the dreaded hockey puck effect. By starting the burgers off at a lower temperature, you can ensure that the meat cooks all the way through without drying out or becoming overcooked. Plus, the slower cook time allows for all those delicious flavors to develop and intensify, resulting in a mouthwatering burger with a crispy exterior and a juicy interior that will make your taste buds dance with joy.
So ditch those old burger-cooking methods and give reverse searing a try. Whether you’re firing up the grill or preheating your oven, this technique will take your burger game from zero to hero in no time. Trust us – once you’ve tasted these burgers, there’s no going back.
Contents
Benefits of Using the Reverse Sear Technique for Hamburgers
This cooking method has been gaining popularity among grill enthusiasts for good reason. Not only does it work wonders for steaks, but it can also elevate your hamburgers to the next level.
So, what is the reverse sear technique, and why is it beneficial for hamburgers? This technique involves cooking the meat at a low temperature first and then searing it at high heat to get that perfect crust. Let’s dive into the details of why this method is so effective for making mouthwatering burgers.
Firstly, using the reverse sear technique ensures that your hamburger is cooked evenly throughout. By cooking the meat slowly at a low temperature, you won’t end up with a burger that is dry on the outside but raw on the inside. Instead, you’ll have a perfectly juicy and flavorful burger every time.
Secondly, this technique allows you to control the level of doneness of your burger more accurately. Whether you prefer medium-rare or medium, cooking the meat slowly at a low temperature first helps you achieve your desired level of doneness. Once you have achieved this, you can then sear it quickly on high heat to get that perfect crust.
Thirdly, using the reverse sear technique results in a juicier and more flavorful burger. By cooking the meat slowly at low heat, the juices inside the meat are retained, resulting in a juicy and flavorful burger. The quick sear at high heat also helps to caramelize the outer layer of the burger, adding an extra layer of delicious flavor.
But that’s not all. Using the reverse sear technique is also more forgiving than traditional grilling methods. With traditional grilling methods, it’s easy to overcook or undercook your burgers, resulting in dry or raw meat. However, with the reverse sear technique, you have more control over the cooking process, making it easier to achieve the perfect burger every time.
Step-by-Step Guide to Reverse Searing a Hamburger
Look no further than the reverse sear technique. As an expert in this field, I am thrilled to guide you through the step-by-step process of creating the perfect reverse-seared hamburger.
To start, preheat your grill to a low temperature of around 225°F. This will ensure that your burger cooks evenly without burning on the outside. Next, place your burgers on the grill and cook them until they reach an internal temperature of around 110°F. This may take approximately 30 minutes, depending on the thickness of your burger.
Once your burger has reached this temperature, remove it from the grill and get ready for the exciting part. Increase the heat to high, around 450°F. This quick high-heat sear will give your burger that crispy crust that we all love. Place your burgers back on the grill and cook them for an additional 2-3 minutes per side, or until they reach your desired level of doneness.
Here are some additional tips to take your reverse-seared burgers to the next level:
- Season your burger patties generously with salt and pepper before cooking.
- Use a digital meat thermometer to ensure that your burgers reach the correct internal temperature.
- Let your burgers rest for a few minutes before serving to allow the juices to redistribute and create a juicier burger.

It’s important to remember that while reverse searing can produce a delicious and perfectly cooked burger, it may not be everyone’s cup of tea. Some people prefer a traditional sear or grilling method for their burgers, and that’s okay. It’s all about personal preference.
Tips for Perfectly Cooked Burgers Every Time
If you want to impress your family and friends with perfectly cooked burgers every time, look no further than the reverse sear method. This technique involves cooking the burger slowly over low heat until it reaches the desired internal temperature, and then searing it quickly over high heat to create a crispy crust on the outside.
To achieve perfect results using the reverse sear method, here are some tips to keep in mind:
Choose the Right Cut of Meat
The quality of the meat is crucial in determining the final taste and texture of the burger. Ideally, opt for ground beef that contains around 80% lean meat and 20% fat for the juiciest and most flavorful burgers.
Season Generously
When it comes to seasoning your burger, don’t be afraid to use a generous amount of salt and pepper. You can also experiment with other seasonings such as garlic powder, onion powder, or paprika to add more depth of flavor.
Use a Meat Thermometer
To achieve the perfect internal temperature for your burger, use a meat thermometer to check the temperature as it cooks. For medium-rare burgers, aim for an internal temperature of 130-135°F, while medium burgers should reach 140-145°F.
Rest before Searing
Once your burger has reached the desired internal temperature, remove it from the heat and let it rest for a few minutes before searing. This allows the juices to redistribute throughout the meat, resulting in a juicier burger.
Sear to Perfection
Turn up the heat to high and sear your burger on both sides until it develops a nice crust. Remember not to flip it too often, as this will prevent the crust from forming properly. Let your burger rest for a few more minutes before serving to allow the juices to redistribute throughout the meat.
The Pros and Cons of Reverse Searing Burgers
As an expert on the pros and cons of this cooking technique, I can tell you that it’s a game-changer for creating mouth-watering burgers.
Let’s take a closer look at the advantages of reverse searing burgers. Firstly, this method allows for greater control over the cooking process. By starting with low heat and gradually increasing it, you can ensure that your burger cooks evenly all the way through. This means no more burnt outsides and raw middles. Additionally, this technique helps to retain moisture in the meat, resulting in a juicier and more flavorful burger.
Another benefit of reverse searing is the formation of an irresistible crust on the outside of the burger without overcooking the inside. This is because the low-temperature cooking ensures that the internal temperature of the burger stays relatively low until it’s time to sear it. The result is a crispy exterior that gives way to a juicy, tender center.
However, as with any cooking method, there are some potential downsides to reverse searing burgers. One concern is that it can take longer than traditional grilling methods, which may not be ideal if you’re short on time or have a hungry crowd waiting. Another potential drawback is that the texture of a burger cooked using this method may not be as crispy as a traditionally grilled burger.
It’s worth noting that reverse searing may not be necessary for thinner burgers. For patties less than an inch thick, sticking with traditional grilling methods is often sufficient and saves time.
Equipment Needed for Reverse Searing Burgers
It’s time to step up your grilling game with reverse searing. But first, let’s talk about the equipment you’ll need to achieve the perfect juicy and delicious burger.
First on the list is a grill. Whether you prefer charcoal or gas, make sure it has a lid. This will help trap in the heat and smoke, ensuring that your burgers cook evenly and absorb all that delicious flavor.
Next, invest in a meat thermometer. This is essential for cooking your burgers to the perfect temperature. For medium-rare, aim for an internal temperature between 130-135°F, while medium should be between 140-145°F.
While not necessary, a cast iron skillet can take your burgers to the next level. Use it to sear the burgers after they’ve been smoked on the grill. The result? A crispy exterior and tender center that will have your taste buds dancing.
Want to add even more flavor to your burgers? Consider using smoking wood chips. Popular options include hickory, mesquite, and applewood. These wood chips will infuse your burgers with an extra layer of deliciousness.
Of course, you’ll need tongs and a spatula to flip and move your burgers around on the grill without losing any precious juices.
Finally, don’t forget about aluminum foil. Tenting your burgers with foil after they’ve been smoked on the grill allows them to rest and retain their juices before being seared in the skillet.
Common Mistakes to Avoid When Reverse Searing Burgers
Then it’s time to try reverse searing. This technique delivers perfectly cooked burgers with a juicy center and crispy exterior. However, there are a few mistakes that could ruin your burger masterpiece. To ensure that you get it right every time, let’s take a look at some of the common mistakes to avoid when reverse searing burgers.
Firstly, don’t forget to season your burgers generously with salt and pepper. This step is crucial for creating a flavorful burger, especially when reverse searing. Without proper seasoning, you risk ending up with bland and unappetizing burgers.
Another mistake to avoid is cooking your burgers straight from the fridge. When you do this, the cold center will take longer to cook, resulting in uneven cooking. Letting your burger patties sit at room temperature for about 30 minutes before cooking will help them cook evenly and more quickly.
It’s also essential not to overcrowd the grill or pan when reverse searing burgers. If you add too many burgers at once, they will stick together, cook unevenly and may even burn. Cook your burgers in batches if necessary, ensuring they have enough space to cook properly.
While flipping burgers may seem like a no-brainer, flipping them too often is one of the most common mistakes people make. Flipping your burgers too much can cause them to dry out and become tough. Instead, only flip your burgers once during the cooking process.
Finally, overcooking your burgers is a big no-no. Use a meat thermometer to determine when your burgers are cooked to your desired level of doneness – whether it be rare, medium-rare or well-done. Overcooked burgers are dry and tasteless. To avoid this, keep an eye on the thermometer and remove your burger patties from the heat as soon as they reach the desired temperature.
Alternative Ways to Cook Hamburgers Without Reverse Searing
There are plenty of alternative ways to achieve delicious and juicy burgers without this technique. Let’s explore some subtopics:
Grilling
Grilling is a classic way to cook hamburgers. Preheat your grill to medium-high heat and place your seasoned burgers on the grill grates. Cook for approximately 4-5 minutes per side or until the internal temperature reaches 160°F for medium doneness.
This method works great for thicker patties and gives you that delicious char on the outside. Plus, it’s perfect for outdoor gatherings with friends and family.
Pan-frying
If you don’t have access to a grill, pan-frying is a great alternative. Heat a tablespoon of oil in a skillet over medium-high heat and place your patties in the pan. Cook for approximately 3-4 minutes per side or until the internal temperature reaches 160°F for medium doneness. You can also add cheese during the last minute of cooking to melt on top of your burgers. This method is quick and easy, perfect for busy weeknights.
Cast-iron griddle or pan
For an extra sear and juicy burger, try cooking on a cast-iron griddle or pan. Simply heat up the griddle or pan over high heat and cook the burgers for 3-4 minutes per side or until they are cooked through. This method gives you that restaurant-quality sear and helps lock in the juices. Plus, it’s perfect for indoor cooking when it’s too cold or rainy to grill outside.
Baking
Baking is a healthier option for those who want to cut back on oil and grease. Preheat your oven to 400°F and place the patties on a baking sheet lined with parchment paper. Bake for 15-20 minutes or until they are cooked through. While this method may not give you that crispy crust that you get with grilling or pan-searing, it’s still a great option. Plus, it’s perfect for cooking burgers in batches for a large group.
Smoking
For those who love smoked meats, smoking your burgers is a great option. Preheat your smoker to 225°F and place your seasoned patties on the smoker grates. Smoke for approximately 1-2 hours or until the internal temperature reaches 160°F for medium doneness. This method gives you a unique smoky flavor that pairs perfectly with burgers. It requires more time and effort, but the result is worth it for those who love the taste of smoked meat.
lZu6cirAV6s” >
Conclusion
To sum it up, the reverse sear method is a game-changer for anyone looking to create exceptional hamburgers. This technique involves slow cooking the meat at a low temperature before searing it at high heat to achieve that perfect crust. The benefits of using this approach are numerous, including even cooking, greater control over the level of doneness, juicier and more flavorful burgers, and the ability to recover from mistakes.
To ensure your hamburgers are cooked to perfection every time using the reverse sear method, there are a few key steps you need to follow. First, choose the right cut of meat and season generously with your favorite spices. Use a meat thermometer to monitor the internal temperature and let your burgers rest before searing them to lock in moisture.
It’s worth noting that while this technique is ideal for thicker burgers, thinner ones may not require such an elaborate process. If you’re not sold on reverse searing or don’t have access to a grill or smoker, there are plenty of other ways to cook delicious and juicy hamburgers such as grilling, pan-frying, cast-iron griddle or pan cooking, baking or smoking.
Regardless of which method you use to cook your hamburger patties, remember to avoid common pitfalls like forgetting to season with salt and pepper or overcooking them.