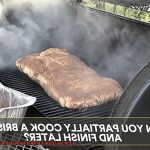
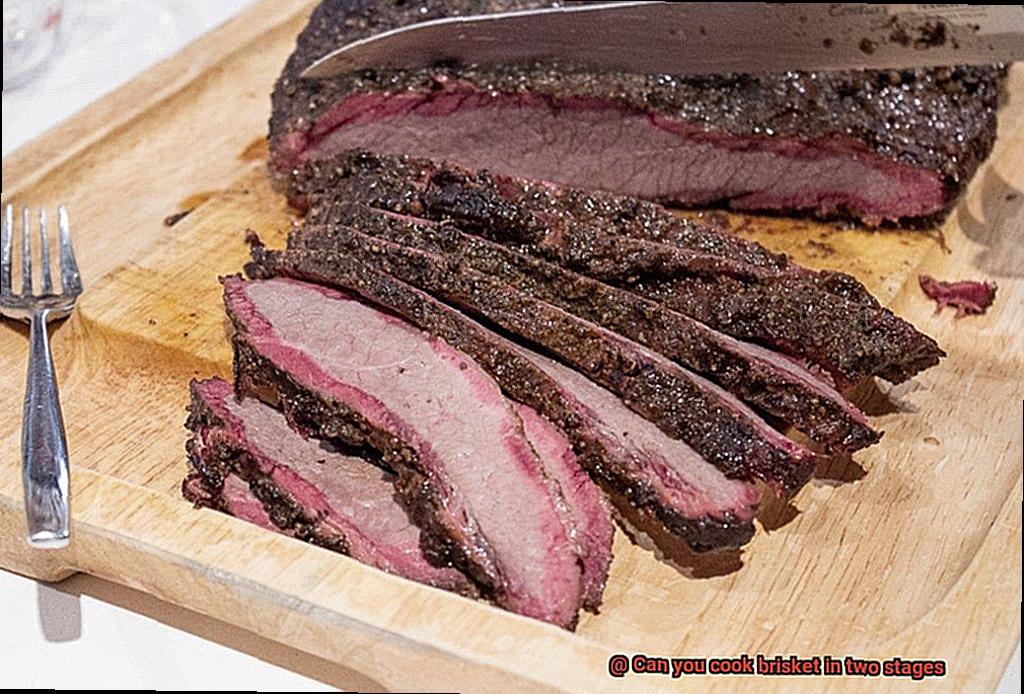
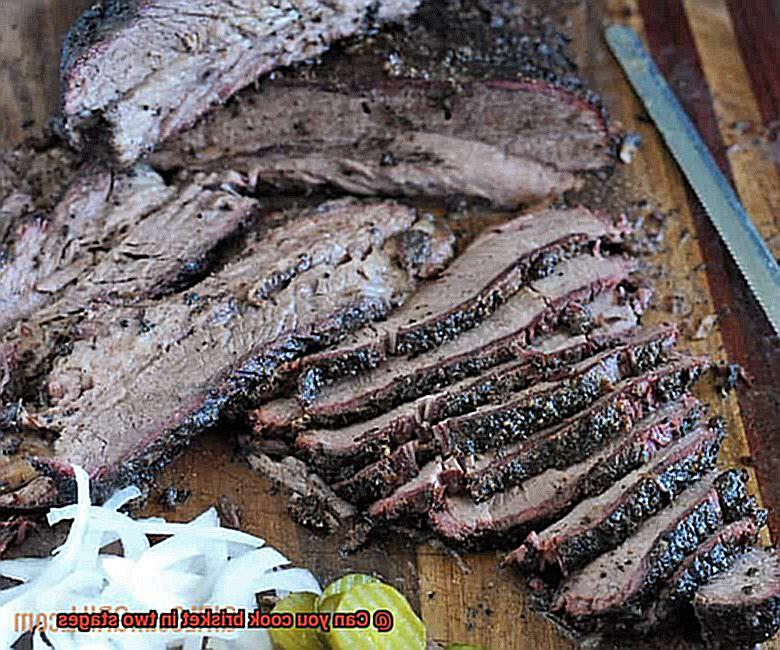
Brisket, the mouthwatering star of barbecues and comfort food feasts, has long been celebrated for its tender, juicy deliciousness. But what if I told you there’s a secret technique that can take this classic dish to new heights? Brace yourself for the two-stage cooking method for brisket.
Forget the old ways of cooking it all at once. This method requires a little extra time and effort, but trust me when I say the flavor explosion is worth it. By breaking down the process into two stages, you’ll unlock a depth of flavor that will make your taste buds dance with joy.
So how does this magical two-stage method work? First, you start with smoking or slow-cooking your brisket until it reaches that perfect level of smoky goodness, fat rendering, and initial tenderness. This step alone can take anywhere from 4 to 8 hours depending on your preferences. Picture yourself inhaling those heavenly smoky aromas while anticipation builds for the feast ahead.
Once you’ve achieved your desired smokiness, it’s time for stage two. Wrap that partially-cooked brisket in foil along with some tantalizing marinades or seasonings and transfer it to the oven or a low heat grill. This slow and steady second phase seals in all those incredible flavors while ensuring ultimate tenderness. And don’t be afraid to get creative – try glazing or basting techniques during this stage to add an extra layer of deliciousness.
The beauty of this two-stage method lies not only in its mind-blowing taste but also in its versatility. Whether you’re hosting a casual backyard bash or an elegant dinner party, this technique lets you serve up a dish that’s both comforting and sophisticated. The intense smokiness from stage one combined with the caramelization from stage two creates a carnivorous masterpiece that’s sure to impress.
In conclusion, the two-stage cooking method for brisket opens up a whole new world of flavor possibilities. By taking the time to smoke or slow-cook before finishing in the oven, you’ll create a brisket that’s moist, succulent, and bursting with a tantalizing mix of comforting and gourmet. So get ready to elevate your brisket game and prepare for a taste sensation like no other.
Contents
Why Cook Brisket in Two Stages?
If you’ve ever tasted a perfectly cooked brisket, you know that it’s worth the effort. But why cook brisket in two stages? Let’s dive into the world of slow-cooking and discover the benefits of this method.
Flavor Development:
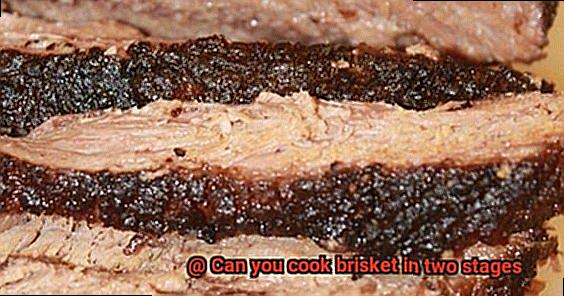
Cooking brisket in two stages allows for better flavor development. During the initial low-and-slow stage, the meat absorbs the smoky goodness or flavorful rub, infusing every bite with a mouthwatering taste. This stage also helps create a tantalizing bark on the outside, adding texture and depth to your final masterpiece.
Tender Perfection:
Brisket is notorious for being a tough cut of meat. By cooking it in two stages, you’re giving yourself the best chance at achieving tender perfection. The first stage starts breaking down collagen and connective tissues to pave the way for a melt-in-your-mouth experience. The second stage ensures that your brisket reaches its ideal internal temperature without overcooking or drying out.
Control Over Cooking Process:

Precision is key when it comes to cooking brisket, and two-stage cooking offers you better control. The initial slow-cooking phase lets you develop a beautiful crust and absorb enough smoke or heat before wrapping it up. Wrapping during the second stage helps retain moisture, preventing excessive evaporation and resulting in a juicier end product.
Timing and Planning Made Easy:
Preparing brisket for a large gathering can be overwhelming, but cooking in two stages provides flexibility and peace of mind. You can start the process well in advance, breaking up the cooking time to fit your schedule. This method ensures that your brisket is ready to impress when the time comes, without leaving you stressed and overwhelmed.
Enhanced Flavor Profile:
Cooking brisket in two stages allows flavors to meld together and develop a deeper, more complex taste. The slow-cooking process gives your chosen rub or marinade time to work its magic, resulting in a flavor explosion that will have your guests coming back for seconds and thirds.
Preparing the Brisket for Cooking
Today, we’re diving into the essential steps for preparing that beautiful hunk of meat before it hits the grill. These tips will have your taste buds dancing and your guests begging for seconds.
First things first, let’s talk about fat. While a little fat adds flavor and moisture, too much can leave your brisket feeling greasy. Trim off any excess fat with a trusty knife, creating a more balanced and delicious end result.
Next up, get creative with a dry rub. This magical mixture of herbs, spices, and seasonings will take your brisket from good to downright amazing. Customize it to your heart’s content, but don’t forget the basics like salt, pepper, paprika, garlic powder, and onion powder. This flavorful rub will become your secret weapon.
Now comes the patience part: let that brisket rest. After applying the dry rub, give it at least an hour to soak up all those incredible flavors. For an even tastier experience, cover it up and let it marinate overnight in the fridge. Your taste buds will thank you for the extra effort.
Feeling adventurous? Consider injecting your brisket with a marinade or brine solution. This technique adds moisture and flavor deep into the meat, but be careful not to overdo it. We want a perfect balance of flavors, not a salty mess.
Last but not least, make sure your brisket is at the right temperature before grilling. Take it out of the fridge at least 30 minutes prior to cooking to allow it to come to room temperature. This simple step ensures even cooking throughout the meat and guarantees that every bite is tender and juicy.
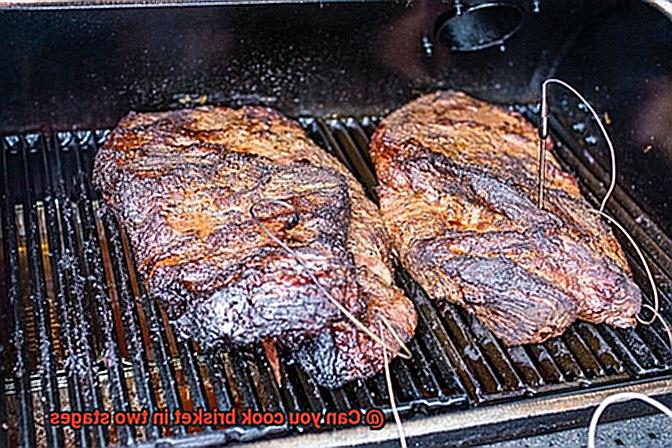
The First Stage of Cooking
Get ready to elevate your grilling game and impress your guests with a tender and flavorful brisket that will leave them craving for more.
Step 1: Choose the Perfect Brisket:
To begin your brisket journey, select a cut with marbling that promises moisture and flavor. Ensure its freshness, avoiding those near their expiration date.
Step 2: Trim Excess Fat:
Trimming excess fat is crucial to avoid a greasy finished product. Carefully remove thick layers with a sharp knife, leaving a thin, even layer on top.
Step 3: Seasoning – A Symphony of Flavors:
Compose your own symphony of flavors with a well-balanced dry rub. Salt, pepper, garlic powder, and paprika create a classic combination, but feel free to experiment with different spices to suit your taste preferences.
Step 4: Resting – The Diva’s Preparation:
Allow the seasoned brisket to rest in the refrigerator for at least a few hours or overnight. This resting period enhances the meat’s overall taste as the flavors penetrate.
Step 5: Bring it to Room Temperature:
Before cooking, bring the brisket to room temperature. Let it sit out for about an hour to ensure even cooking throughout the meat.
Step 6: Choosing Your Cooking Method:
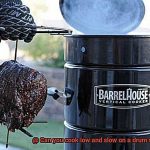
Now it’s time to decide how you want to cook your brisket. Indirect heat grilling offers smoky flavor and a beautiful crust, while slow roasting in the oven at a low temperature guarantees tender and juicy results.
Step 7: Monitoring the Temperature:
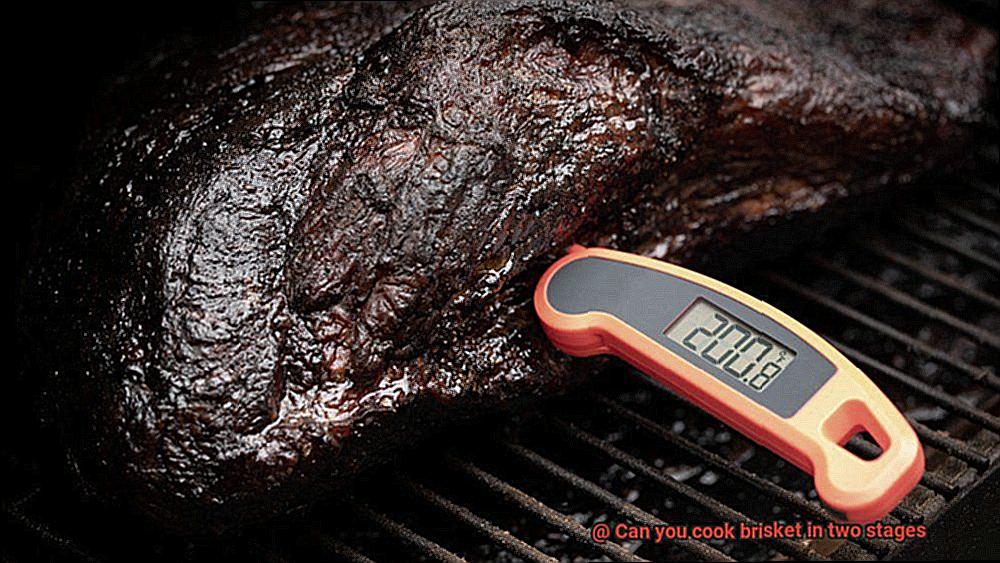
The key to success lies in monitoring the internal temperature. Use a meat thermometer to track the brisket’s progress. Aim for around 225°F (107°C) for the first stage. This low and slow cooking technique allows the collagen in the meat to break down gradually, resulting in ultimate tenderness and flavor.
The Cooling Phase
Today, we’re going to explore the concept of “The Cooling Phase” in the two-stage cooking process for grilling brisket. This game-changing step will elevate your brisket to new heights of deliciousness.
Imagine this: you’ve carefully selected the perfect cut of brisket, meticulously trimmed it, and applied a mouthwatering dry rub. As you fire up your grill, you embark on a low and slow cooking journey until the meat reaches its ideal internal temperature. Now comes the crucial part – the cooling phase.
During this phase, you must remove the brisket from the heat source and grant it some well-deserved rest. This is where the magic happens, my friends. Allowing the meat to cool down gives it an opportunity to reabsorb and redistribute its juices, resulting in a final product that is tender and moist beyond belief. Trust me, skipping this step would be a grave mistake.
But how long should you let it cool? Well, that depends on a few factors. As a general rule of thumb, aim for at least 30 minutes to an hour of resting time. However, some pitmasters take it even further, allowing their briskets to rest for several hours. Ultimately, it’s a matter of personal preference and what works best for you.
Now, here’s an invaluable pro tip: ensure that your brisket stays warm during this resting period. Enveloping it in foil or placing it snugly in an insulated cooler will help retain its heat and prevent any sudden temperature drops that could turn your masterpiece into a dry disappointment.
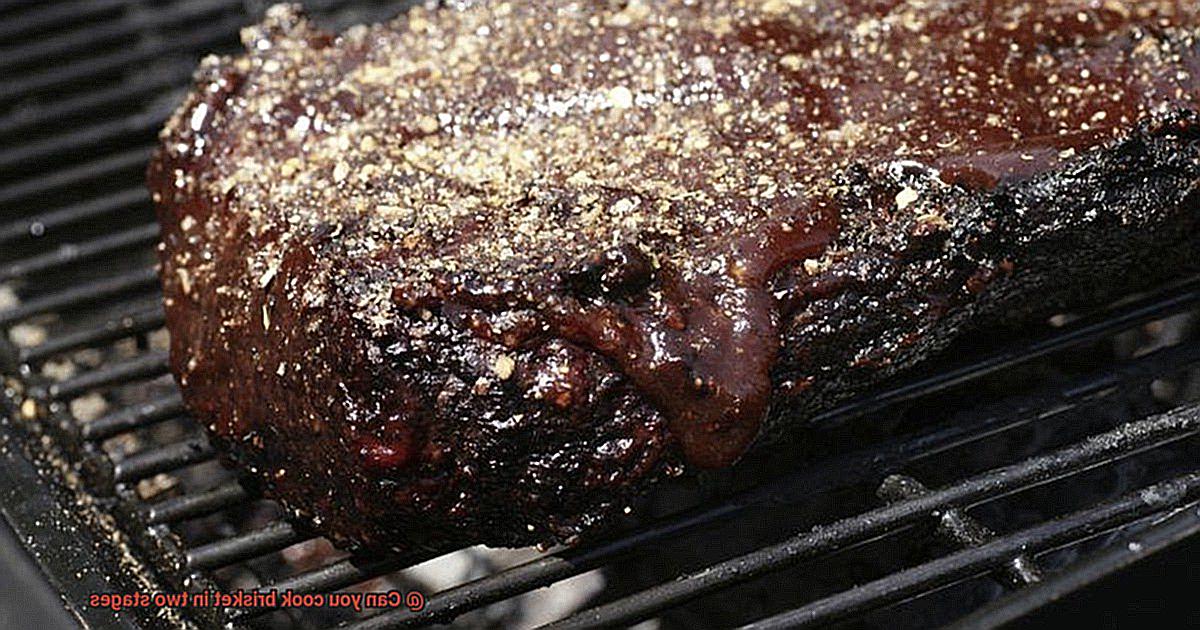
But why stop at moisture and tenderness? This resting period also grants you time to add those finishing touches that will take your brisket from great to extraordinary. Think glazes, sauces, or any other flavor boosters you have up your sleeve. Moreover, it allows you to synchronize your timing flawlessly if you’re serving your brisket at a specific time. It’s all about that culinary finesse, my friends.
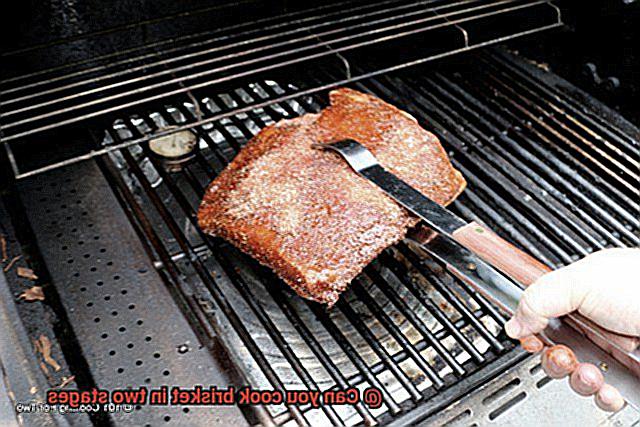
Once your brisket has cooled down sufficiently, it’s time for the second stage of cooking – the grand finale. In this stage, you’ll reheat the meat, infusing it with an extra burst of flavor and texture. Whether you choose to grill, sear, or broil, this stage will transform your brisket into a culinary masterpiece that will have everyone clamoring for seconds.
Finishing the Brisket in the Oven or Grill
When it comes to finishing your brisket, the decision between using the oven or the grill can be a tough one. Each method offers its own unique advantages and can contribute to the overall flavor and texture of the meat. Let’s explore the pros and cons of each option, so you can make an informed choice based on your grilling preferences.
The oven method is a popular choice for many pitmasters due to its precise temperature control and ability to provide even cooking throughout the brisket. To begin, preheat your oven to a temperature of around 225°F to 250°F. This gentle heat will work its magic on your brisket, resulting in a tender masterpiece.
Once your brisket reaches an internal temperature of around 160°F to 165°F, it’s time to transfer it to a baking dish or roasting pan. This not only catches any delicious drippings but also prevents any potential mess in your oven (because who wants to clean up that?).
For an extra layer of moisture and tenderness, tightly wrap your brisket in aluminum foil before placing it in the oven. This creates a steamy environment that helps retain moisture and promotes tenderization. Cooking times can vary depending on the size of your brisket, but a general guideline is about 1 hour per pound. Remember to regularly check the internal temperature using a meat thermometer to ensure doneness.
Now, let’s talk about bringing smoky flavors into the equation – the grill method. Some pitmasters swear by finishing their brisket on the grill for that authentic, mouthwatering smokiness. To begin, preheat your grill to around 225°F to 250°F and set up indirect heat by only lighting one side of the grill. This allows for slower, indirect cooking similar to that of an oven.
Place your brisket on the unlit side of the grill, fat side up, and close the lid. This creates a smoky chamber of flavor that will make your taste buds dance with joy. Maintaining a steady temperature is crucial, so adjust vents or add charcoal as needed to keep that sweet spot. And don’t forget to monitor the internal temperature with a meat thermometer – aim for around 160°F to 165°F before transferring to direct heat.
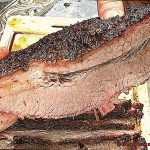
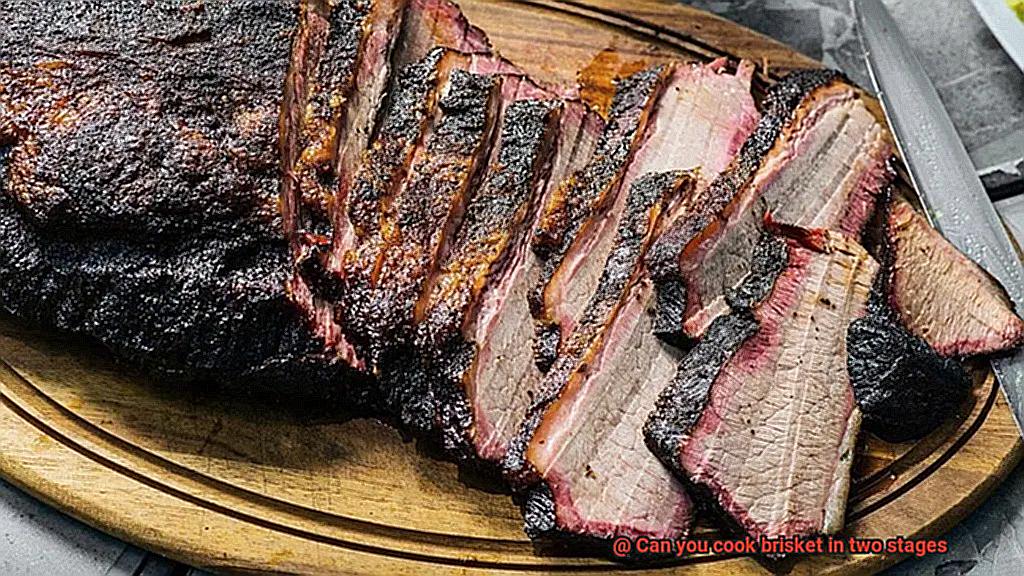
To achieve that beautiful crust and enhance the flavor even further, it’s time for direct heat. You can either light both sides of the grill or move the brisket to the lit side. This step adds a caramelized goodness that will take your brisket to new heights. Once your brisket reaches an internal temperature of around 195°F to 205°F, it’s fully cooked and ready to be removed from the grill.
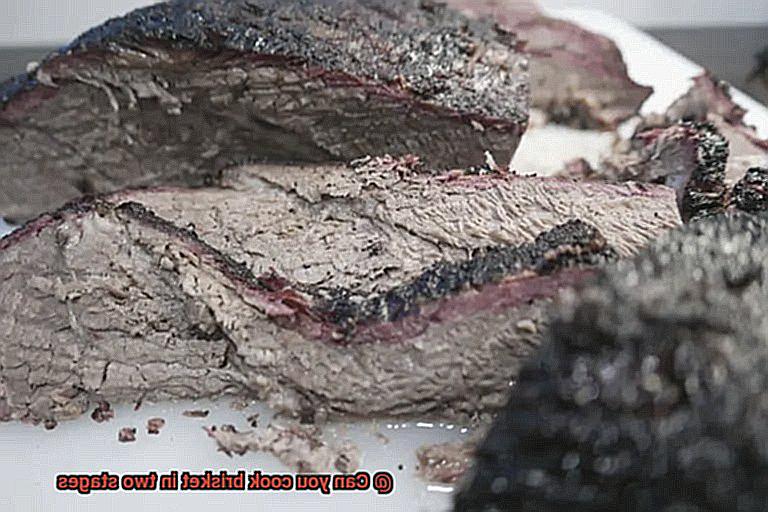
But wait, don’t slice into that succulent masterpiece just yet. Resting is essential for the juices to redistribute and ensure a moist and tender end result. Let it rest for at least 30 minutes (if you can resist the temptation) before diving in.
Finishing the Brisket with a Sous Vide Cooker
Once you’ve gone through the initial stages of smoking or searing your brisket, it’s time to dive into the sous vide cooking process. Get ready for tender, juicy, and flavorful meat that will have your taste buds doing a happy dance.
Preparation:
To begin, seal your brisket in a vacuum-sealed bag. This step is crucial as it helps to lock in all those delicious flavors and juices. Once your brisket is snugly sealed up, it’s time to get your sous vide cooker fired up.
Cooking Time and Temperature:
The beauty of sous vide cooking lies in its precise temperature control. Set your cooker to 155°F (68°C) and let it work its magic for the next 24-48 hours. This slow and steady cooking process allows the connective tissues in the brisket to break down, resulting in that melt-in-your-mouth tenderness we all crave.
Infusing Flavor:
While your brisket is happily cooking away in its water bath, take a moment to appreciate the benefits of this method. Not only is it foolproof, but it also infuses the meat with flavor like no other technique can.
Adding the Perfect Crust:
Once your sous vide cooking time is up, it’s time to give your brisket one final flourish. Remove it from the bag and get ready to add that perfect crust and smoky flavor. Fire up your grill or preheat your oven to a high temperature – we’re talking about 450°F (232°C) here.
Place your brisket on the grill or in the oven and let it sizzle away for a few minutes on each side. This step not only adds that beautiful caramelized crust but also enhances the smoky flavors from the previous stages of cooking.

Resting Period:
Before you start slicing into that mouthwatering brisket, exercise a little patience. Give it a few minutes to rest. This allows the juices to redistribute throughout the meat, ensuring a tender and juicy bite with every slice.
Planning and Timing Considerations for Two-Stage Cooking
Take your grilling game to the next level with two-stage cooking. This method allows for better control over the cooking process, ensuring your brisket is cooked to perfection. Let’s dive into the planning and timing considerations for two-stage cooking.
First, decide on the first stage of cooking: smoking or slow roasting. Smoke or roast the brisket for several hours at a low temperature to tenderize the meat and infuse smoky flavors. Monitor the smoker or oven temperature closely to maintain consistency and avoid uneven cooking.
Consider the size and thickness of your brisket. Thicker cuts require longer cooking times, while smaller cuts may be ready sooner. Adjust your overall cooking time accordingly.
After the first stage, it’s time for the second stage: searing the meat to develop a flavorful crust. Use a preheated grill or broiler for this short stage, around 15-20 minutes depending on desired doneness. Keep a close eye to prevent overcooking or burning.
Timing is everything in two-stage cooking. Factor in total cooking time, allowing enough time between stages. This ensures your brisket is cooked properly and ready to serve when desired. Don’t forget about additional preparations or side dishes – time them correctly to serve everything together.
To guarantee a perfectly cooked brisket, use a meat thermometer. It accurately gauges internal temperature, preventing undercooking or overcooking mishaps.
Food Safety Tips When Handling Partially Cooked Brisket
Grilling is an art, and when it comes to cooking brisket, it’s essential to prioritize food safety to ensure a delicious and safe meal for you and your loved ones. In this guide, we will explore some vital food safety tips when handling partially cooked brisket in a two-stage cooking process. From maintaining proper temperatures to preventing cross-contamination, we’ve got you covered.
Cleanliness is Key:
Before you even start handling the brisket, make sure your hands and cooking surfaces are squeaky clean. This simple step helps prevent the spread of harmful bacteria that can cause foodborne illnesses. Wash your hands thoroughly with soap and warm water for at least 20 seconds before and after handling raw brisket. Additionally, keep separate cutting boards and utensils for raw and cooked meat to avoid cross-contamination.
Safe Temperatures:
Bacteria love the “danger zone” between 40°F (4°C) and 140°F (60°C), so it’s crucial to keep your partially cooked brisket below or above this range at all times. If you need to store the brisket, refrigerate it within two hours of cooking, ensuring it cools down quickly in a shallow container. To speed up the cooling process, consider placing the container in an ice bath or stirring the brisket occasionally.
Divide and Conquer:
When storing partially cooked brisket, divide it into smaller portions. This allows for faster and more even cooling while reducing the risk of bacterial growth. Store these portions in airtight containers or wrap them tightly with plastic wrap to maintain freshness. Remember to label the containers with the date and time of storage to keep track of how long the brisket has been stored.
Proper Labeling:
It’s easy to lose track of time when storing partially cooked brisket. To ensure its quality and safety, label the containers with the date and time of storage. This way, you can monitor how long the brisket has been stored, and if it exceeds three days, it’s best to discard it. Proper labeling also helps you identify the order in which you should consume the portions to minimize waste.
Reheating:
When ready to continue cooking the brisket, ensure it reaches an internal temperature of at least 165°F (74°C) to kill any bacteria that may have grown during storage. Whether you use an oven, grill, or stovetop, make sure the meat is thoroughly heated before serving. Use a food thermometer to check for doneness and be cautious not to overcook the brisket, as it can become dry and tough.
BHIDWWMPJu0″ >
Conclusion
Yes, you can absolutely cook brisket in two stages.
This method allows for a tender and flavorful end result that will have your taste buds dancing with joy. By starting with a low and slow smoke session to infuse the meat with smoky goodness, and then finishing it off with a high-heat sear to create a mouthwatering crust, you’ll achieve the perfect balance of tenderness and caramelized flavor.
So, go ahead, break out your smoker and grill, and get ready to embark on this culinary adventure.